

Redux is a toolkit for ReactJS that offers application-level state management features and can help overcome event bubbling performance issues in complex component architecture based Single Page (Web) Applications (SPA).
In this article:
- Preamble
- Sprawling Apps and Component State
- Component State vs Application State
- Redux: Solving State Complexity in ReactJS
- Core Redux
- The Redux Toolkit
- Asynchronous Programming with Redux Toolkit
- Redux Implementation Best Practice
Preamble
It is probably worth noting before we start that even though this article’s title and summary suggest that Redux is solely for use with ReactJS, it is in fact a general purpose application state management JavaScript (JS) library that can be used with pretty much any JS Web Framework that is in need to global state management.
Component architecture is a design pattern whereby aspects of an application architecture are analysed with a view to identifying and defining re-usable components in the design to simplify development and maximise code re-use. This practice is pre-dominantly undertaken in the UI scope, with UI Frameworks like ReactJS, AngularJS / Angular, .NET Blazor, etc. adopting and recommending the practice.
Consider a simple web form. A designer might identify many components in the form’s hierarchy, such as:
- GenericForm. The form component itself, acting as the top-level component in the hierarchy.
- TextField. A single-line field on the form that accepts textual data input. It may have options to restrict the amount of data supplied (min/max characters), etc.
- CommentsFields. A multiline text field on the form that can be used for capturing larger passages as text such as comments. It may have options to restrict the amount of data supplied (min/max characters), specify the number of lines to show for the field, etc.
- IntegerField. A field on the form that accepts a whole number only. It may have options to restrict the data to a positive value or a negative value only, allowing or invalidating 0, and min/max range.
- DecimalField. A field on the form that accepts a decimal number. It may have options to restrict the number of decimal places of precision allowed, to restrict data to a positive value or a negative value only, allowing or invalidating 0, and min/max range.
- TickBoxField. A field on the form that has a tick-box representing a Boolean state. It may have options such as title/caption, text before or text after the tick-box, etc.
- YesNoField. A field on the form that has a drop-down with Yes / No options representing a Boolean state. It may have options such as title/caption, text before or text after the drop-down, etc.
- OnOffField. A field on the form that has a drop-down with On/ Off options representing a Boolean state. It may have options such as title/caption, text before or text after the drop-down, etc.
- DateField. A field on the form that displays a formatted date value and a button that shows a date picker pop-up to allow selection of a new date. It may have options such as date format, min/max date allowed, etc.
- TimeField. A field on the form that represents a time of day. It may have options such as hour format (12/24 hour), show seconds input box, etc.
- DateAndTimeField. A field on the form that representing a date and time. It may have options such as date format, min/max date allowed, hour format (12/24 hour), show seconds input box, etc.
- SubmitButton. A button below the form fields that submits the form to the server.
- CancelButton. A button that cancels form editing (either by blanking the form fields or redirecting the app back to the previous view, as appropriate).
<GenericForm>
    <TextField id="forenameField" label="First Name" min="2" max="100" />
    <TextField id="lastNameField" label="Last Name" min="2" max="100" />
    <DateField id="dateOfBirthField" label="Date of Birth" minDate="01/01/2007" maxDate="today" />
    <CommentsField id="addressField" label="Office Address" min="10" />
    <YesNoField id="marketingEmailsField" label="Opt-in to Marketing Emails" />
</GenericForm>Code language: HTML, XML (xml)
Component architecture philosophy promotes the concept that there is no such thing as too small a component. While this is true in the purist sense, most designers will weigh complexity against performance as each additional component rendering and managing its own state may introduce very small performance overheads.
As you can see, even in a small scenario, like for the form above, many components can be identified fairly quickly. We’ve kept things fairly flat in the example above, but in reality we might define a Label component that the TickBoxField, YesNoField, and OnOffField share for consist title/caption display. We could also re-use the DateField and TimeField components on the DateAndTimeField, or even have separate Date and Time component that all 3 of those field components share.
Additional components could also be defined to show data validation error messages and highlight individual fields.
The point is that the component hierarchy could become nested and complex fairly easily.
Sprawling Apps and Component State
A core principle of component architecture implementation is that each component maintains its own state, which essentially means the data/properties that drive the rendering of the component.
Events triggered by the component itself, by a child component, or even by a parent component could lead to a change in state for the component in focus.
In a nested component hierarchy, a change in a child component may trigger a state change that bubbles an event from that child component up to the immediate parent. That parent component can then decide how to deal with the event, deciding if it needs to respond to the event (e.g. by updating its own state), if it needs to raise an event to its own parent, etc. This is known as the Chain of Responsibility design pattern.
Consider the following, which might be a layout for a company’s internal, bespoke, CRM app:
<Dashboard className="{theme}">
    <Zones>
        <Zone mode="Reporting" title="Reports">
            <TabContainer>
                <Tab title="Recent Sales">
                    <Report select="RecentSales" />
                </Tab>
                <Tab title="Sales Team Rankings (Year to Date)">
                    <Report select="TeamRankingsYTD" />
                </Tab>
                <!-- other reports omitted for brevity. -->
            </TabContainer>
        </Zone>
        <Zone mode="Customers" title="Customers">
            <CustomersNavigator />
        </Zone>
        <!-- other zones omitted for brevity. -->
    </Zones>
</Dashboard>Code language: HTML, XML (xml)
In this case we’ve got up to 5 levels of nesting already, and the ‘Report’ and ‘CustomerNavigator’ components are likely to be complex and contain many levels of nesting themselves too.
In a heavily nested and complex component architecture hierarchy like this, the event bubbling effect could become very convoluted, with long chains or complicated cause and effect pipelines. Bubbling events up the hierarchy may cause state changes in intermediary components, triggering the need to re-render themselves and their children.
This could mean that a simple button click in a low level component may lead to tens, or even hundreds, of components being notified in a chain of events – all of them needing to re-evaluate their state and re-render if necessary. Even worse, if the code isn’t carefully crafted then low-level components may re-render multiple times as each parent tier in the hierarchy responds to the event, re-renders due to their own change of state, while at the same time passing the event on up to their own parent.
Component State vs Application State
Application state is not a new concept, and has been around for ages. For example, it has been an integral part of ASP.NET and other server-side web frameworks for decades.
Where component state concentrates on storing information pertinent to that single component instance itself, application state, as the name implies, holds data as a centralised state (set of properties) at application-level.
There are various advantages to adopting application state over component state, such as:
- Application state centralises data and state within the application so that a trigger, such as a button click, somewhere in the application can raise the event to all listeners (components) so that they can all respond to the state change and re-render as necessary.
- All state management is done centrally and any component can, theoretically, subscribe to state changes in any of that data, and update the state of any property.
- Viewing/debugging state can sometimes be easier as it is held centrally, i.e. in one place.
There are some disadvantages to using application state too:
- With application state you often have an all or nothing state change. Let’s say 3 components are subscribed to changes on a specific property in application state. An event triggers a state change and all 3 components are informed, and update their state… but what if we only wanted 2 of those 3 components to be updated? If the event bubbled up the component hierarchy, each node (component instance) in the chain could decide how it wanted to respond to the event, but with application state you often lose that flexibility.
- Centralising state may lead to undesirable state changes, or ugly duplicate properties. For example, consider 2 components that each use the same data but may be using it slightly differently. An event triggers a state change which the subscribed components respond to. Both re-render based on the change but one of the components was an editor that held an uncommitted value that has now been overwritten. This might mean a separate duplicate component for a specific use case or the need to double up on properties at application state level to support the concept of ‘edit mode’ and ‘view mode’ states of a property, along with the headache of how to consistently name properties in this scenario.
- When debugging, the state properties are not co-located with the component code which might mean a lot of back and forth between the application state code and the component code, or even accidentally looking at the wrong state properties in the app state if it isn’t obvious which properties the component is accessing.
- Giving all components in the entire component architecture access to all of the state may be undesirable in some situations. If application state properties are not clearly defined and well described, then developers may misunderstand the purpose of them and use the same property for different purposes, leading to potential data corruption, data loss, or unexpected app behaviour.
Redux: Solving State Complexity in ReactJS
What is Redux?
If you’ve been searching the Internet for articles on Redux you may have gotten totally confused. That’s because, at the time of writing, there are now different styles of React (old-style React JS classes, and the newer modern React with Hooks) coupled with Redux examples being, generally, one of core Redux JS or the Redux Toolkit (which is a wrapper for Redux itself). This means that on top of trying to understand Redux and how to implement it you also have to grapple with the fact you might be reading about it in any one of 4+ scenarios.
Redux is a global application state management solution suited perfectly for ReactJS. It was designed and introduced in an attempt to solve issues with state management on large and complex web applications where nesting in the app architecture was sprawling. State management became over complicated due to headaches with marshalling and synchronising event notifications and component state updates to all the components in a particular scope.
Redux has the following core concepts:
- State. One or more properties representing data as plain JavaScript objects.
- Action. An event that is triggered within the app to update the application state.
- Reducer. A pure function that should only rely on its inputs and not affect anything external in the app, returning the updated state. State changes need to be immutable, so these functions should update state by making a copy of the supplied current state, updating the copy and then returning that instead of attempting to modify the current state directly.
- Store. Holds the current application state. Components can subscribe to receive events when the state changes and dispatch state change requests to the store.
- Thunk. Middleware that wraps the ‘dispatch’ function primarily for use in async programming scenarios where the synchronous version is not suitable.
The following two sections aim to explain the two main flavours of Redux implementation (at the time of writing).
Core Redux
In its most basic form, Redux can be implemented fairly simply. Let’s go through a worked example to make understanding Redux more practical.
npx create-react-app <your-path>/reactwithreduxbasicCode language: plaintext (plaintext)Once the new project has been generated, go to the root folder in a terminal and install the redux dependency.
npm i reduxCode language: plaintext (plaintext)Build and run the project in dev mode.
npm run startCode language: plaintext (plaintext)Now update the scaffolded default project as follows:
- Update App.js to include Redux and a Counter component. Notice that the app state is being updated outside the Counter component when a button rendered by the App component itself is clicked. Further down you should notice that the Counter subscribes to state changes on the app state’s store so that it can respond to them.
// Import the functionality we need.
import { AppState } from './appState/store';
import { Counter } from './components/Counter';
import { CounterActions } from './appState/counterState';
// Button click handler to increment the count.
const incrementCount = () => {
AppState.dispatch(CounterActions.Increment());
}
// JSX to be added in the component layout (e.g. just after the logo image).
<div>
<Counter />
<button type="button" onclick="incrementCount()">Increment</button>
</div>Code language: HTML, XML (xml)- Create a new ‘appState’ folder off the project’s ‘./src’ folder. Define the app-state definitions (actions, reducers) for a new ‘Counter’ component’s sub-state. Although, technically, you don’t have to define actions in this way it can simplify consuming code and make it more readable. Remember that the reducer should treat state as being immutable, hence using the JSON object as a quick-and-dirty means to do a deep-copy clone of the current state.
// Counter app state definitions (e.g. in ./src/appState/counterState.js).

export const CounterActions = {
    Increment: () => ({ type: 'counter/increment', payload: null }),
    Decrement: () => ({ type: 'counter/decrement', payload: null })
};

export const CounterReducer = (state = [], action) => {

    // NOTE: using JSON stringify and parse for a quick-and-dirty deep-copy clone.
    var newState = JSON.parse(JSON.stringify(state));

    switch (action.type)
    {
        case 'counter/increment':
            newState.count += 1;
            break;
        case 'counter/decrement':
            newState.count -= 1;
            break;
    }

    return newState;
};Code language: JavaScript (javascript)- Create a new store-level JS file (e.g. store.js) and initialise the app’s main store, exporting the generated store object as a variable called AppState.
// Initialise the application store (e.g. ./src/appState/store.js).
import { createStore } from 'redux';
import { CounterReducer } from './counterState';


export const InitialAppState = {
    count: 0
};

export const AppState = createStore(CounterReducer, InitialAppState);Code language: JavaScript (javascript)- Create a new ‘components’ folder off the project’s ‘./src’ folder. Define a new Counter component.
// Counter component (e.g. ./src/components/Counter.js).
import { AppState } from "../appState/store";
import { useState } from 'react';

export const Counter = () => {

    const [count, setCount] = useState(AppState.getState().count);
    const handleStoreChanged = () => {
        const newCount = AppState.getState().count;
        if (newCount !== count) setCount(newCount);
    };

    // Subscribe to Redux state changed events.
    AppState.subscribe(handleStoreChanged);

    return <span>{count}</span>;
};Code language: JavaScript (javascript)
With the above code, we have implemented a Counter component linked to application state (implemented as a Redux store). The count value can be updated anywhere in the application via the Redux store to stimulate the Counter component to check for state changes and re-render if required.
Update: since this article was written, this traditional style has been deprecated and the Redux team now recommend using the Redux Toolkit in all cases.
The Redux Toolkit
The Redux Toolkit (RTK) aims to simplify the setup of Redux on a project by encapsulating it and simplifying configuration steps.
Immediately, you’ll notice that RTK replaces Redux’s createStore method with a configureStore alternative that simplifies the boiler plate configuration options required, and it has good commonly used defaults to reduce explicit configuration.
RTK also introduces the concept of ‘Slices’, which are essentially sub-store areas to help organise and structure the app-state more explicitly.
Let’s use the same worked example as above to implement app-state using RTK.
NOTE: before embarking on the worked example, I just wanted to point out that the RTK’s website tutorials co-locate state slices with the feature they relate to. While this may be good in some scenarios from a per-feature development perspective, it can make the app-state code as a whole disparate and much more difficult to navigate. As such, I tend to prefer co-locating all the app-state slices together instead of with their individual features and that’s the way it is organised in this example.
Create a new react app scaffold.
npx create-react-app <your-path>/reactwithreduxtoolkitCode language: plaintext (plaintext)Once the new project has been generated, go to the root folder in a terminal and install the RTK and react-redux dependencies.
npm i @reduxjs/toolkit
npm i react-reduxCode language: plaintext (plaintext)
Build and run the project in dev mode.
npm run startCode language: plaintext (plaintext)Now update the scaffolded default project as follows:
- Edit the index.js file, importing the store, Provider, Counter, and CounterActions behaviours and updating the app structure to include and wire up the store provider. Registering the store with the new Provider component we’re using means we can use methods from the react-redux library to interact with the store without needing to request the store directly each time.
// Import the functionality we need.
import { store } from './appState/store';
import { Provider } from 'react-redux';

// Replace this...
<React.StrictMode>
    <App />
</React.StrictMode>

// ... with this...
<Provider store={store}>
    <App />
</Provider>Code language: JavaScript (javascript)- Create a new ‘appState’ folder off the project’s ‘./src’ folder. Create a sub-folder off ‘appState’ called ‘counterSlice’. Notice we’re able to directly update state properties in reducer functions because RTK uses Immer to manage state as immutable object implicitly.
// Definitions for the 'counter' slice of the app-state
// (e.g. ./src/appSate/counterSlice/counterSlice.js).

import { createSlice } from '@reduxjs/toolkit'

const initialState = {
    count: 0
};

export const counterSlice = createSlice({
    name: 'counter',
    initialState,
    reducers: {
        increment: (state) => {
            // Redux Toolkit uses the Immer library behind the scenes to implement
            // immutable state objects, so we can update the supplied state object
            // directly in this case. Yay!
            state.count += 1;
        },
        decrement: (state) => {
            state.count -= 1;
        }
    }
});

// Actions are specified for each case in the reducer function.
export const { increment, decrement } = counterSlice.actions;

export default counterSlice.reducer;Code language: JavaScript (javascript)- Register the counter slice with the RTK store. Here we are creating and configuring the Redux store and registering the slice of it relating to our Counter component.
// Declare the Redux RTK store (e.g. ./src/appState/store.js).

import { configureStore } from '@reduxjs/toolkit';
import { counterReducer } from './counterSlice/counterSlice';

export const store = configureStore({
    reducer: {
        counter: counterReducer
    }
});Code language: JavaScript (javascript)- Define the Counter component. Notice that this is a lot simpler now we’re using RTK, and we can employ the
useSelectormethod from the react-redux library to directly hook into the global state property we’re interested in, instead of having to maintain state locally and globally.
// Counter component (e.g. ./src/components/Counter.js).

import { useSelector } from 'react-redux';

export const Counter = () => {

    const count = useSelector((state) => state.counter.count);

    return <span>{count}</span>;
};Code language: JavaScript (javascript)- Update the app code to consume the app-state store and add the Counter component.
// Updates to App (e.g. .src/App.js).
import { useDispatch } from 'react-redux';
import { decrement, increment } from './appState/counterSlice/counterSlice';
import { Counter } from './components/Counter';
const appDispatch = useDispatch();
// Button click handler to increment the count.
const incrementCount = () => {
appDispatch(increment());
}
// JSX to be added in the component layout (e.g. just after the logo image).
<div>
<Counter />
<button type="button" onclick="incrementCount()">Increment</button>
</div>Code language: JavaScript (javascript)Asynchronous Programming with Redux Toolkit
Using Thunks
In programming terms, a ‘thunk’ is a subroutine injected into another routine, delaying the outcome until it is required. As such, RTK has adopted this term to describe the mechanism for handling asynchronous requests in app state (as an async subroutine may be needed to query a remote endpoint, for example).
The most obvious scenario when async programming might be required is when data for the state needs to be retrieved from a Web API. In this case, a web request would need to be sent asynchronously, and after an unknown period of time a response would be returned or a communications timeout may occur.
Let’s refactor the above Redux Toolkit ‘Counter’ worked example project to use Web API calls and host the count on a remote endpoint. (Not exactly a realistic scenario but it meets our immediate needs, and helps demonstrate the changes to the code better.)
- First, let’s add async support to the Counter slice. You’ll notice there’s quite a lot more code now. We need to add the thunk creation method calls that can be used to query the Web API, and make those thunks available in the slice as ‘extra’ reducers.
// Definitions for the 'counter' slice of the app-state
// (e.g. ./src/appSate/counterSlice/counterSlice.js).

import { createSlice } from '@reduxjs/toolkit'

const initialState = {
    isLoading: true,
    error: null,
    count: 0
};

const queryCount = createAsyncThunk('counter/current', async () => {

    var response = await fetch('https://counting.test/counter/current');

    var count = null;
    var isSuccess = response.ok;
    var errorMessage = null;

    if (isSuccess) {
        var json = await response.json();
        count = JSON.parse(json);
    } else {
        errorMessage = response.statusText;
    }

    return { count: count, success: isSuccess, error: errorMessage };
});

const postCountIncrement = createAsyncThunk('counter/increment', async () => {

    var response = await fetch({
        url: 'https://counting.test/counter/increment',
        method: 'POST',
        body: ''
    });

    var count = null;
    var isSuccess = response.ok;
    var errorMessage = null;

    if (isSuccess) {
        var json = await response.json();
        count = JSON.parse(json);
    } else {
        errorMessage = response.statusText;
    }

    return { count: count, success: isSuccess, error: errorMessage };
});

export const counterSlice = createSlice({
    name: 'counter',
    initialState,
    reducers: { },
    extraReducers: (builder) => {
        // The 'extraReducers' configuration property needs to be used for any
        // actions initiated outside the slice such as by thunks.
        builder
            .addCase(queryCount.pending, (state, action) => {
                state.isLoading = true;
                state.error = null;
            })
            .addCase(queryCount.fulfilled, (state, action) => {
                state.isLoading = false;
                state.error = null;
                state.count = action.payload.count;
            })
            .addCase(queryCount.rejected, (state, action) => {
                state.isLoading = false;
                state.error = state.error !== null ? state.error : 'Query failed';
            })
            .addCase(postCountIncrement.pending, (state, action) => {
                state.isLoading = true;
                state.error = null;
            })
            .addCase(postCountIncrement.fulfilled, (state, action) => {
                state.isLoading = false;
                state.error = null;
                state.count = action.payload.count;
            })
            .addCase(postCountIncrement.rejected, (state, action) => {
                state.isLoading = false;
                state.error = state.error !== null ? state.error : 'Command failed';
            })
    }
});

export default counterSlice.reducer;Code language: JavaScript (javascript)- Now let’s update the Counter component. We need to implement React’s useEffect hook to dispatch the queryCount thunk and retrieve the data, and we need to update the component to get the more verbose counter state dataset from the app state too. Finally, we need to support the different data retrieval states/outcomes that are now possible (loading, data retrieved, error, etc.)
// Counter component (e.g. ./src/components/Counter.js).

import { useEffect } from 'react'
import { useSelector, useDispatch } from 'react-redux'
import { fetchTodos } from '../actions/todos'
import { selectTodosStatus, selectTodos } from '../selectors/todos'

export const Counter = () => {

    const dispatch = useDispatch();
    const counterState = useSelector((state) => state.counter);

    useEffect(
        () => {
            dispatch(queryCount())
        },
        [dispatch]
        );

    if (counterState && counterState.isLoading) {
        return <span>Loading...</span>;
    } else if (counterState &&
        counterState.error !== 'undefined' && counterState.error != null) {
        return <span>Error: {counterState.error}</span>;
    } else if (counterState && counterState.count) {
        return <span>{count}</span>;
    } else {
        return <span>No data</span>;
    }
};Code language: JavaScript (javascript)- There is only a minor change to the app component code. We just need to call the increment count thunk instead of the reducer method.
// Updates to App (e.g. .src/App.js).

// Button click handler to increment the count.
const incrementCount = () => {
    appDispatch(postCountIncrement());
}Code language: JavaScript (javascript)
That should be it. We should now have an app that implements async calls in the Redux slice.
Using RTK Query
As well as offering ‘thunk’ functionality in RTK, its authors have also provided a simple to use library with fetching / posting capability in the form of ‘RTK Query’.
RTK Query greatly simplifies creating Slices that use Web API calls and removes the need to declare any actions, reducers, selectors, thunks, or effects when performing data fetching or updates. All those Redux entities are generated and configured behind the scenes.
We’ll modify our app code again, this time to use RTK Query instead of thunks.
- We can leave all the existing
counterSlicein place as we won’t be using it, but it could also be deleted if desired as the revised approach is a complete replacement. (Make sure you retain the Counter component though, as we still need that.) - Now, let’s define our RTK Query API service. Calling the
createApimethod implicitly creates a RTK Slice behind the scenes, automatically adding the required actions and reducers, and generating custom Redux middleware for managing subscription counts and cache lifetimes.
// Counter query API (e.g. ./src/apis/counterApi.js).

import { createApi, fetchBaseQuery } from '@reduxjs/toolkit/query/react';

export const counterApi = createApi({
    reducerPath: 'counterApi',
    baseQuery: fetchBaseQuery({ baseUrl: 'https://counting.test/api/v1/' }),
    endpoints: (builder) => ({
        getCount: builder.query({
            query: () => '/counter/current',
        }),
        increment: builder.mutation({
            query: () => ({
                url: '/counter/increment',
                method: 'POST',
                body: ''
              })
        })
    })
});

// Export our queries as hooks for convenience.
export const { useGetCountQuery, useIncrementCountMutation } = counterApi;Code language: JavaScript (javascript)- Next, replace the store initialisation code. Notice that we can use the counterApi slice object directly to configure the store, just like we would with a regular slice object. If we had multiple reducers we could add them below the counterApi reducer as normal.
// Modify the Redux RTK store to be configured to use the new API service
// (e.g. ./src/appState/store.js).

import { configureStore } from '@reduxjs/toolkit';
import { counterApi } from '../apis/counterApi';

export const store = configureStore({
    reducer: {
        [counterApi.reducerPath]: counterApi.reducer
    },
    middleware: (getDefaultMiddleware) => {
        return getDefaultMiddleware()
            .concat(counterApi.middleware);
    }
});Code language: JavaScript (javascript)- The Counter component needs changes too. The async nature of the state data means we need to consider ‘fetching’ and ‘error’ states instead of just grabbing the count from app state. We can use the get count hook we exported above to simplify reading the state.
// Modify the Counter component to query the count via the new API service
// (e.g. ./src/components/Counter.js).

import { useGetCountQuery } from '../apis/counterApi';

export const Counter = () => {

    const { state: count, isFetching, isSuccess } = useGetCountQuery();

    if (typeof state.isLoading !== 'undefined' && state.isLoading) {
        return <span>Loading...</span>;
    }
    else if (typeof state.isSuccess !== 'undefined' && !state.isSuccess) {
        console.error(error);
        return <span>Error!</span>;
    }
    else if (state.count) {
        return <span>{count}</span>;
    }
    else {
        return <span>No data</span>;
    }
};Code language: JavaScript (javascript)- Finally, we need to update the App component to use the new async counter increment command.
// Updates to App (e.g. .src/App.js).

// Remove: import { decrement, increment } from './appState/counterSlice/counterSlice';
// Add:
import { useIncrementCountMutation } from './apis/counterApi';


// Button click handler to increment the count.
const incrementCount = () => {
    appDispatch(useIncrementCountMutation.initiate());
}Code language: JavaScript (javascript)
That should be it. Our React app now retrieves data from the remote Web API using RTK Query instead of thunks and native JS fetching methods.
You may have noticed, in the changes made to the App component above, that we call an initiate method after the useIncrementCountMutation selector. Each endpoint defined in RTK query will have the following methods available:
- initiate. Triggers the async action.
- select. Allows any response (data) returns by a query or mutation to be retrieved.
- matchPending. Allows matching on the pending state of a query so that it can be handled in the
extraReducersproperty of a Slice definition. - matchFulfilled. Allows matching on the fulfilled (completed) state of a query so that it can be handled in the
extraReducersproperty of a Slice definition. - matchRejected. Allows matching on the rejected (failure) state of a query so that it can be handled in the
extraReducersproperty of a Slice definition.
Redux Implementation Best Practice
It is worth mentioning that best practice often evolves over time, and as such what is considered to be best practice now, at the time of authoring this article, may not remain so. Nevertheless here are some suggestions for best practice implementation when integrating Redux into your apps.
- Redux works best with modern React (i.e. using Hooks).
- The Redux Toolkit (RTK) is now the recommended approach to integrating Redux with your app.
- Use TypeScript. Many modern Web Frameworks now promote TypeScript (TS) as the programming language instead of vanilla JS. This is the case for ReactJS and Redux so consider developing any new projects in TS. The language has many pluses when developing complex web apps, including strongly typed entities, compile time type checking, the ability to explicitly define method signatures using types, the ability to strongly type component properties in ReactJS, etc.
- For projects of any reasonable size, try to think about the structure of your global state store up-front. Having a clearly defined structure (i.e. top-level slices) will help keep app state and your app development activities more manageable. It is worth noting, at the time of writing, RTK does not support the concept of nested slices, and as such you will need to define top-level slices and build any hierarchy by combining reducers in the traditional sense. A suggested structure for a generic ‘single store’, and example code, that may be applicable to most projects is provided below for your convenience.
Redux Single-Store Design
Design constraints:
- Use top-level slices with nested reducers behind the scenes to support hierarchical app state navigation (e.g. store.data.userProfiles.all, store.session.userProfiles.current, or store.ui.app.theme, etc.).
- Define 3 top-level slices:
- data. A centralised data cache for, typically, long-lived datasets (and often those with cross-cutting concerns). Data in this scope should be as generic in nature as possible, i.e. it should not be loaded and customised/filtered based on individual component requirements.
- ui. Maintains data relating directly to components and the rendering of UIs. This may lead to some duplication of data from the
dataslice if filtered datasets need to be cached for app performance reasons, but wherever possible components should run queries against the source data (dataslice) when rendering and not hold their own copies unless absolutely necessary. Theuislice is likely to focus on component properties/settings first and foremost. - session. Holds data relating to the current session, but not necessarily directly related to the current UI being displayed. Session data is likely to need to persist for the current user session (i.e. while they continue to be logged in). An example of data stored in this instance might be the current user’s user profile and their assigned application roles.
- Consider data lifetimes carefully.
- Define a ‘CachedItem’ type that can be used by the
dataandsessionslices when storing data so that it auto-expires and can be deleted by background tasks, if desired. - The
uislice should always contain relevant data for display so cache lifetimes are not so relevant, but consider including routines in components that clear out data no longer needed when components are being discarded/destroyed.
- Define a ‘CachedItem’ type that can be used by the
For example:
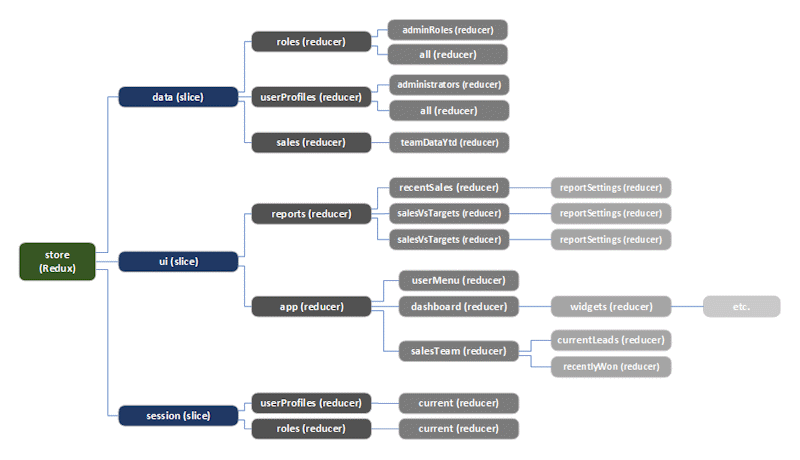
The above diagram demonstrates a typical structure we might use for a sales team’s company-internal sales planning app.
The app has three main roles:
- Lead Generator. A member of the sales team responsible for lead generation that will log business leads they have identified in the app.
- Sales Person. A member of the sales team that will use the app to view potential leads, attempt to win them, and update those leads with progress and outcomes until the are completed (won or lost).
- Administrator. A system administrator responsible for managing the app, assigning roles/permissions, etc.
As previously described, the data slice should contain shared data, and in this case it contains the available roles and user profiles for the app as well as current year-to-date (YTD) sales data for the team. This approach allows the app to download data when it needs it to provide the app behaviours, and cache that data for use throughout the solution as needed.
The interesting thing about this is that when we’re accessing the state in code, we have very readable paths, like this:
const profile = useSelector((state) => state.data.sales.teamDataYtd);Code language: JavaScript (javascript)When data gets loaded will depend on application needs. For example, as soon as the user logs in, the app will likely need a current snapshot of the team’s YTD sales data so that it can render and display the reports and sales planner views.
The ui slice typically focuses on holding state data relating specifically to the UI components, their configuration and layout. For example, the app contains a configurable custom dashboard view that allows sales team members to add widgets displaying indicators, quick edit facilities, or even mini-reports. As with the data slice, this makes the components’ code more readable as we can retrieve the dashboard widgets configuration similar to this, for example:
const widgets = useSelector((state) => state.ui.app.dashboard.widgets);Code language: JavaScript (javascript)Although it may seem counter-intuitive to have an ‘app’ node in the ui slice’s hierarchy, this can be useful if there are any app-level UI settings (e.g. such as theme) defined.
As soon as the user logs in, the app will also need access to their current user profile and their assigned app role(s) data, so this needs to be downloaded and, being user session related, is most suited to being stored in the session slice. The app doesn’t support the live update of current user profile or assigned role(s), but the built-in cached item expiry feature means user profile details and roles may be auto-refreshed from time to time.
At this point, for a normal sales team member, the data slice’s userProfiles and roles properties haven’t needed to be populated at all. This can remain the case until a system administrator logs in.
There may be merit in retrieving data in the background too. For example on initial login, the current snapshot of sales data (YTD) will need to be downloaded so the reports and sales planner views can be populated. But, after that it may be useful to have a background task that polls the back-end (Web API(s)) periodically for updates, and downloads and integrates changes into the datasets being used implicitly.
Sample Implementation of the Single-Store Design
To demonstrate how to implement the single-store design in a ReactJS app, we’ll walk through a worked example simulating a lot of the back-end data retrieval to simplify the project code.
First, let’s create a new ReactJS app (replacing the placeholders as necessary):
npx create-react-app <your-path>/<your-app-name>
Code language: plaintext (plaintext)
Switch to the drive/folder for the app scaffold you just created. Since we’re using TypeScript for this project we need a few more packages. Run the following:
npm i -g typescript
npm i @reduxjs/toolkit react-redux toastr
npm i -include=dev @types/react @types/react-dom @types/react-redux @types/toastr css-loader style-loader ts-loader typescript webpack webpack-cli
tsc --initCode language: plaintext (plaintext)
The last command above initialises TypeScript by creating a tsconfig.json at the project root (hopefully). We’ll need to edit that, and an example of the settings to apply is provided below:
{
  "compilerOptions": {
    "strict": true,
    "noImplicitAny": true,
    "noImplicitReturns": true,
    "noImplicitThis": true,
    "noEmitOnError": true,
    "removeComments": true,
    "sourceMap": false,
    "target": "es6",
    "module": "CommonJS",
    "resolveJsonModule": true,
    "esModuleInterop": true,
    "moduleResolution": "Node",
    "jsx": "react"
  },
  "exclude": [
    "node_modules",
    "wwwroot"
  ],
  "include": [
    "./src/**/*"
  ]
}Code language: JSON / JSON with Comments (json)
Create new folders off the src folder as follows:
- apis
- appState
- appState/slices
- appState/slices/data
- appState/slices/ui
- appState/slices/session
- appState/slices/session/roles
- appState/slices/session/roles/current
- appState/slices/session/userProfiles
- appState/slices/session/userProfiles/current
- components
- components/userProfiles
- components/userProfiles/current
- types
- types/caching
- types/userProfiles
- types/roles
Now we’ve got some initial folders to organise the code into, let’s set up the Redux global store.
Add a store.ts file to the ./src/appState folder and populate it with the following code:
import { Action, combineReducers } from "redux";
import { configureStore, createReducer, ThunkAction } from "@reduxjs/toolkit";
import { TypedUseSelectorHook, useDispatch, useSelector } from "react-redux";
import { dataReducer } from './slices/data/dataSlice';
import { uiReducer } from './slices/ui/uiSlice';
import { sessionReducer } from './slices/session/sessionSlice';

const rootReducer = combineReducers({
    data: dataReducer,
    ui: uiReducer,
    session: sessionReducer
});

// The Redux application-state store.
const store = configureStore({
    reducer: rootReducer
});

// Reference to the Redux store's dispatcher.
export type AppDispatch = typeof store.dispatch;

// Reference to the Redux store's root application state.
export type RootState = ReturnType<typeof store.getState>;

// Reference to a thunk signature that can be used to post async behaviours to the
// Redux store.
export type AppThunk<ReturnType = void> = ThunkAction<ReturnType, RootState, unknown, Action<string>>;

// Alias to the Redux store's dispatcher to simplify code where the store is consumed.
export const useAppDispatch = () => useDispatch<AppDispatch>();

// Alias to the Redux store's root state selector to simplify code where the store
// is consumed.
export const useAppSelector: TypedUseSelectorHook<RootState> = useSelector;

export default store;
Code language: TypeScript (typescript)
It is worth noting again at this point what we’ve previously explained: RTK doesn’t support nested slices. As such, although we’re calling our top-level reducers ‘slices’ for convenience of naming convention, they aren’t created as slices at all and instead simply use the vanilla Redux approach to create the actions, declare the reducers, etc. and functionality from the react library to combine the reducers into a hierachical pattern.
The folder structure makes it easier to organise the actions, reducers, etc. and makes the code more readable.
So, let’s get started by scaffolding out three ‘slices’.
Create a new file called ‘./src/appState/slices/data/dataSlice.ts’ and populate it as follows:
//import { combineReducers } from "@reduxjs/toolkit";
import { createReducer } from "@reduxjs/toolkit";

// Placeholder for top-level data reducers sub-tree.
// Replace createReducer with combineReducers and the collection of child reducers
// when some are being added (commented out code provided as an example).
export const dataReducer = createReducer(null, (builder) => {});
// export const dataReducer = combineReducers({
//     userProfiles: userProfilesReducer,
//     salesDataYtd: salesDataYtdReducer
// });Code language: TypeScript (typescript)
Create a new file called ‘./src/appState/slices/ui/uiSlice.ts’ and populate it as follows:
//import { combineReducers } from "@reduxjs/toolkit";
import { createReducer } from "@reduxjs/toolkit";

// Placeholder for top-level ui reducers sub-tree.
// Replace createReducer with combineReducers and the collection of child reducers
// when some are being added (commented out code provided as an example).
export const uiReducer = createReducer(null, (builder) => {});
// export const uiReducer = combineReducers({
//     component1: component1Reducer,
//     component2: component2Reducer
// });Code language: TypeScript (typescript)
Create a new file called ‘./src/appState/slices/session/sessionSlice.ts’ and populate it as follows:
//import { combineReducers } from "@reduxjs/toolkit";
import { createReducer } from "@reduxjs/toolkit";

// Placeholder for top-level session reducers sub-tree.
// Replace createReducer with combineReducers and the collection of child reducers
// when some are being added (commented out code provided as an example).
export const sessionReducer = createReducer(null, (builder) => {});
// export const sessionReducer = combineReducers({
//     userProfiles: sessionUserProfilesReducer,
//     roles: sessionRolesReducer
// });
Code language: TypeScript (typescript)
The slices (top-level reducers) have already been wired up to the store, so we’ve now got our top-level app state structure up and running.
Now we need to add some strongly typed entities and state…
Create a new file called ‘./src/types/caching/CachedItem.ts’ and populate it with this:
export interface CachedItem<T> {
    data: T,
    expires: Date
}Code language: CSS (css)
Create a new file called ‘./src/types/userProfiles/UserProfile.ts’ and populate it with the following:
/**
 * Describes the properties of a user profile.
 */
export interface UserProfile {
    /** The username the user logs in with. */
    username: string,

    /** The user's first name. */
    firstName: string,

    /** The user's last name. */
    lastName: string,

    /** A value representing how the user's identity should be displayed in the app. */
    displayAs: string,

    /** The user's home email address. */
    email: string,

    /** The user's business email address. */
    workEmail: string,

    /** The user's date of birth. */
    dateOfBirth: Date,

    /** The user's marketing preferences. */
    marketing: {
        receiveNewsletter: boolean,
        receiveNewProductDetails: boolean,
        receiveSpecialOffers: boolean
    }
}Code language: TypeScript (typescript)
Create a new file called ‘./src/types/roles/UserRole.ts’ and populate it with the following:
/**
 * Describes an application role that can be assigned to a user.
 */
export interface UserRole {
    /** The name of the role. */
    name: string,

    /** A description of the purpose or scope of the role. */
    description: string
}Code language: TypeScript (typescript)
Return to the app state folder structure and create new files that will hold the current user profile session state.
Create a new file called ‘./src/appState/slices/session/userProfiles/userProfiles.ts’ and populate it with the following:
import { combineReducers } from "@reduxjs/toolkit";
import { currentProfileReducer } from "./current/currentProfile";

export const userProfilesReducer = combineReducers({
    current: currentProfileReducer
});Code language: TypeScript (typescript)
Create a new file called ‘./src/appState/slices/session/userProfiles/current/currentProfile.ts’ and populate it with the following:
import { createReducer, createAction, PayloadAction } from "@reduxjs/toolkit";
import { CachedItem } from "../../../../../types/caching/CachedItem";
import { UserProfile } from "../../../../../types/userProfiles/UserProfile";

const cacheLifetimeInHours: number = 8;

const initialState: CachedItem<UserProfile> = {
    data: {
        username: undefined,
        firstName: '',
        lastName: '',
        displayAs: 'Not logged in',
        email: '',
        workEmail: undefined,
        dateOfBirth: undefined,
        marketing: {
            receiveNewsletter: false,
            receiveNewProductDetails: false,
            receiveSpecialOffers: false
        }
    },
    expires: new Date(1901, 0, 1)
};

export const setCurrentUserProfile = createAction<UserProfile | undefined>('session/userprofiles/current');

export const currentProfileReducer = createReducer<CachedItem<UserProfile>>(
    initialState,
    (builder) => {
        builder
            .addCase(setCurrentUserProfile, (state: CachedItem<UserProfile>, action: PayloadAction<UserProfile | undefined>) => {
                if (action.payload === undefined || action.payload === null) {
                    state = initialState;
                } else {
                    const expires: Date = new Date();
                    expires.setHours(expires.getHours() + cacheLifetimeInHours);
                    const cachedProfile: CachedItem<UserProfile> = {
                        data: action.payload,
                        expires: expires
                    };
                    state = cachedProfile;
                }
            })
    }
);
Code language: TypeScript (typescript)
Create a new file called ‘./src/appState/slices/session/roles/roles.ts’ and populate it with the following:
import { combineReducers } from "@reduxjs/toolkit";
import { currentRoleReducer } from "./current/currentRole";

export const rolesReducer = combineReducers({
    current: currentRoleReducer
});Code language: TypeScript (typescript)
Create a new file called ‘./src/appState/slices/session/roles/current/currentRoles.ts’ and populate it with the following:
import { createReducer, createAction, PayloadAction } from "@reduxjs/toolkit";
import { CachedItem } from "../../../../../types/caching/CachedItem";
import { UserRole } from "../../../../../types/roles/UserRole";

const cacheLifetimeInHours: number = 8;

export const setCurrentUserRoles = createAction<Array<UserRole>>('session/roles/current');

export const currentRolesReducer = createReducer<CachedItem<Array<UserRole>>>(
    {
        data: [],
        expires: new Date()
    } as CachedItem<Array<UserRole>>,
    (builder) => {
        builder
            .addCase(setCurrentUserRoles, (state: CachedItem<Array<UserRole>>, action: PayloadAction<Array<UserRole>>) => {
                if (action.payload === undefined || action.payload === null) {
                    state = {
                        data: [] as Array<UserRole>,
                        expires: new Date(1901, 0, 1)
                    } as CachedItem<Array<UserRole>>;
                } else {
                    const expires: Date = new Date();
                    expires.setHours(expires.getHours() + cacheLifetimeInHours);
                    const cachedRoles: CachedItem<Array<UserRole>> = {
                        data: action.payload,
                        expires: expires
                    };
                    state = cachedRoles;
                }
            })
    }
);Code language: TypeScript (typescript)
The sessionSlice.ts file now needs updating to include the current user profile and current role(s) data… so, replace the existing content with:
import { combineReducers } from "@reduxjs/toolkit";
import { userProfilesReducer } from "./userProfiles/userProfiles";
import { rolesReducer } from "./roles/roles";

export const sessionReducer = combineReducers({
    userProfiles: userProfilesReducer,
    roles: rolesReducer
});Code language: TypeScript (typescript)
The session slice of the app state is now configured. Will skip the remain two slices as the principles for populating them are the same.
Now, let’s create a user-menu component to trigger logging in/out, and displaying the logged-in user details. Create a new file at ‘./src/components/userProfiles/current/UserMenu.tsx’ and populate it with the following:
import * as React from 'react';
import { useAppDispatch, useAppSelector } from '../../../appState/store';
import { setCurrentUserProfile } from '../../../appState/slices/session/userProfiles/current/currentProfile';
import { setCurrentUserRoles } from '../../../appState/slices/session/roles/current/currentRoles';
import toastr from 'toastr';
import { CachedItem } from '../../../types/caching/CachedItem';
import { UserProfile } from '../../../types/userProfiles/UserProfile';
import { UserRole } from '../../../types/roles/UserRole';
/**
* Defines the intialisation properties for the UserMenu component.
*/
export interface UserMenuProps {
// TODO: add any initialisation properties the component should expect.
// For example, an optional initialisation property that could be used to
// custom-style individual component instances.
// customCSS?: string;
}
/**
* Provides a component that allows the user to login,
* and displays their name when done along with a logout option.
*/
export default function UserMenu(props: UserMenuProps) {
const myProfile: CachedItem<UserProfile> =
useAppSelector((state) => state.session.userProfiles.current);
const dispatcher = useAppDispatch();
const handleLoginClick = () => {
dispatcher(setCurrentUserProfile({
username: 'jsmith@fabrikam.test',
firstName: 'John',
lastName: 'Smith',
displayAs: 'John Smith [jsmith@fabrikam.test]',
email: 'jsmith@fabrikam.test',
marketing : {
receiveNewsletter: false,
receiveNewProductDetails: true,
receiveSpecialOffers: true
}
} as UserProfile));
dispatcher(setCurrentUserRoles([
{ name: 'Lead Generator', description: '' } as UserRole,
{ name: 'System Administrator', description: '' } as UserRole
]));
toastr.info('User logged in.', 'Authenticated', { closeDuration: 2000 });
};
const handleLogoutClick = () => {
dispatcher(setCurrentUserProfile());
dispatcher(setCurrentUserRoles([]));
toastr.info('User logged out.', 'Logout', { closeDuration: 2000 });
};
if (myProfile && myProfile.data &&
myProfile.data.username && myProfile.expires > new Date()) {
<div>
<span>{myProfile.data.displayAs}</span>
<span className="logout-link" onClick={handleLogoutClick}>(Logout)</span>
</div>
}
return <div>
<span>Not logged in!</span>
<span className="login-link" onClick={handleLoginClick}>
(Click here to login)
</span>
</div>;
}Code language: TypeScript (typescript)This UserMenu component could then be added to the main app layout (e.g. on the app’s title bar) to allow users to login and logout. Notice that, because we’re using CachedItem<T>, we can evaluate if the data from the app state is stale. In this case we’re just invalidating the login but we might refresh the data from the server instead so that the user isn’t logged out, for example.
A final thought on the single-store design:
If you don’t fancy rolling back to vanilla Redux style definitions of actions and reducers – like we have above – just so you can nest your app state in a scalable hierarchy, you might be able to keep the flat slices approach if you adopt careful naming conventions for each slice instead.
For example, we could define a dataUserProfilesAll slice, a dataRolesAll slice, a sessionUserProfilesCurrent slice, a uiAppDashboardWidgets slice, etc. which would work for most scenarios and still provide the same level separation of concerns and code readability.