

In previous tutorials to date, we’ve broadly introduced the core concepts and features for developing with .NET, but we have only used Console applications to do this. Most .NET apps you will be writing are likely to be UI based, so let’s look at the most commonly used .NET Windows UI development platform, Windows Forms (or simply WinForms for short).
In this article:
- Beyond the Console
- All You Need is a Text Editor
- Visual Studio’s Form Designer
- Event-Driven Programming
- Common Graphical Controls
- Worked Example: Customer Details Editor App
- Custom Controls
- Application-Level Exception Handling
Beyond the Console
Console applications are alright for back-end processing, headless services, and quick and dirty command line utilities, but they don’t scream user friendly, pretty, or dynamic and engaging.
Microsoft has included a few different UI development toolkits with .NET over the years, but WinForms is the oldest and still heavily used. (Alternatives include: WPF for Windows apps, and ASP.NET for web forms.)
A form is what Microsoft refers to as a graphical user interface (GUI) in .NET, or in non-technical terms what is commonly referred to as an application window. The .NET Framework provides a wealth of classes and tools to help developers produce feature-rich GUI applications using WinForms. These features enable programmers to develop Windows applications far quicker than ever before.
All You Need is a Text Editor
Although few professional developers are going to program their apps using only a simple text editor, that is all you really need to get started with .NET programming, even when developing WinForms applications.
Prior to the introduction of Microsoft’s Visual Studio ‘Express’ Editions (and an independent open-source IDE called SharpDevelop), .NET developers either had to stump up for costly Visual Studio products/subscriptions or had to put up with simple text editors and the .NET’s command-line compiler.
By providing a much simpler programming model in .NET than in previous paradigms and toolkits, .NET applications could be developed reasonably easily at the command line, without the need for forms designers.
Let’s go through a worked example to prove the point. As a bare minimum, the .NET Software Development Kit (SDK) needs to be installed on your machine, and you can download from Microsoft if you don’t already have it installed.
Create a new text document in a folder (e.g. C:\work\tutorials\winforms\helloworld) and call it HelloWorld.cs. Open the document in Notepad, and then copy-and-paste the following code into the text file and save the changes:
using System;
using System.Windows.Forms;

namespace HelloWorld
{
    public class HelloWorldForm : Form
    {
        static void Main()
        {
            Application.Run(new HelloWorldForm());
        }

        public HelloWorldForm()
        {
            this.Text = "HelloWorld Example";

            Label helloWorldLabel = new Label();
            helloWorldLabel.Text = "Hello World!";
            helloWorldLabel.Dock = DockStyle.Fill;
            helloWorldLabel.TextAlign = System.Drawing.ContentAlignment.MiddleCenter;

            this.Size = new System.Drawing.Size(150, 100);
            this.StartPosition = FormStartPosition.CenterScreen;
            this.MaximizeBox = false;
            this.MinimizeBox = false;
            this.Controls.Add(helloWorldLabel);
        }
    }
}Code language: C# (cs)
Before we compile and run the application, let’s explain what’s going on.
The System.Windows.Forms.Application class provides all the base functionality you need for managing forms applications in .NET. This class provides properties and methods to configure applications, start or stop them, retrieve information about them, and to process ‘Windows messages’.
The Application.Run() method is a static member of the Application class and provides a means to load and display a form. This, coupled with the now hopefully familiar Main() method (the program entry-point), is all we actually need to get our application running.
To make it of any use, however, we do need to be able to specify GUIs in the application.
HelloWorldForm is a class that has been derived from the System.Windows.Forms.Form class. The Form class acts as the base class type for all forms in .NET Windows applications. It provides a large amount of built-in functionality to simplify the GUI programmer’s job. In our Hello World program we have used the following:
- Text property. Specifies the text that is displayed in the title bar of the form.
- Size property. Specifies the height and width of the form in pixels.
- StartPosition property. Specifies where the form will be initially positioned on the screen.
- MaximiseBox property. Specifies if a maximise box (icon) is displayed on the title bar of the form.
- MinimiseBox property. Specifies if a minimise box (icon) is displayed on the title bar of the form.
- Controls property. Used to add or remove user controls on the form.
The Label class represents a type of control. Controls may be placed on forms to provide pre-defined functionality – the .NET Framework provides many built in controls, such as a label, a button, a text box, a drop-down list, etc. and you can even create your own custom controls!
We are using an instance of the Label class to display ‘Hello World!’ as text in the centre of the form.
The Dock property is used to anchor the Label to one or more edges of the form (or to neighbouring controls), and the TextAlign property is used to set the horizontal and vertical alignment of the label’s text.
Now let’s compile and run the application. Open a command prompt (Start Menu, Run…, type cmd.exe and hit OK). Type the following at the command prompt (or you could use copy-and-paste) and press enter:
path=%PATH%;”C:\WINDOWS\Microsoft.NET\Framework\v2.0.50727”Code language: plaintext (plaintext)The above ensures that the .NET SDK is visible to the command prompt. The above version is very old now. At the time of writing, the current major version is .NET 4.0, so you could replace the version number above with that to use the latest SDK (assuming that’s the one you’ve downloaded and installed – go to the Framework folder and look at which versions you have available).
What the ‘path=’ line does is add a search path to the operating system’s ‘path’ environment variable, enabling a known .NET Framework directory to be seen globally. If your system folder is not “C:\WINDOWS” then you may need to alter the above to the correct path for your individual PC. (You need to find the directory where CSC.exe is installed.)
At the command prompt, navigate to the folder where you created your HelloWorld.cs file. Type the following:
CSC /t:winexe /out:HelloWorld.exe HelloWorld.csCode language: plaintext (plaintext)The C# compiler (CSC.exe) should have compiled the source file to “HelloWorld.exe”. Type ‘HelloWorld’ at the command prompt and press enter. A Window should be displayed in the centre of the screen, with a title of ‘HelloWorld Example’, and text saying ‘Hello World!’ in the body of the form.
That’s how simple it is to create a WinForms application in .NET.
Visual Studio’s Form Designer
Introducing the Form Designer
The basic .NET SDK provides some rapid application development (RAD) capabilities in its own right, but it is limited to text editors and command line compilation.
Microsoft’s professional software development product, Visual Studio, builds upon these foundations with a feature rich suite of tools, templates, etc. that enhance the RAD environment. This section aims to introduce the main features offered by Visual Studio.
It is quite likely that you’ll have been using Visual Studio for a while prior to reading this tutorial, but it’s worth considering what the product offers in terms of development assistance and workload reduction.
One of the most prominent features that Visual Studio offers is a set of pre-defined project and item templates as a starting point for software application development. These templates take a lot of the initial work out of configuring project files and initialising source code files for a given task.
Project templates provide a head-start that reduces the coding overhead. You can even produce your own templates and/or customise any templates that ship with Visual Studio.
Visual Studio offers a central point within which development, compilation, and debugging can be undertaken. The product provides a content sensitive text editor for source code files, and employs IntelliSense (Microsoft’s context sensitive auto-completion, and code documentation viewer, tool) to make the writing of code easier.
Build scripts for a given project are generated automatically by Visual Studio and the product executes the compiler within its processing hierarchy. Compilation messages are sent back to the Visual Studio environment to make interpreting them easier.
To accelerate GUI design and development tasks, Visual Studio offers a feature-rich Forms Designer. This designer can be used to build forms (and user controls – which will be discussed later) via a graphical drawing pane and the ability to drag and drop controls from a ‘toolbox’ panel.
Visual Studio also supports extensions that allow a developer to interact with a form and its constituent controls at design-time. This usually means a form can be created, customised and configured much more quickly than was previously possible.

The central pane in the Visual Studio window is the Form Designer.
It provides a real-time (design) view of the form being developed. Additional controls can be dragged from the Toolbox (the left-hand pane) onto the form and they can be positioned as required.
The Framework provides design-time extensions for all standard forms and controls, allowing the properties and events associated with them to be altered via the Properties pane (the right-hand pane.)
Assuming you have Visual Studio installed, let’s go through a worked example for developing a WinForms application.
Launch Visual Studio, and when it has loaded choose File, New, Project from the main menu. ‘Windows Forms Application’ should be one of the project templates, so select that, and enter HelloWorld as the project name and click OK.
A code project will be generated, representing a Windows application, with all the dependencies (references) needed, and Program.cs and Form1.cs files.
Partial Classes
Before we go any further, there a new C# concept we need to introduce which is ‘partial classes’; and, these were introduced with .NET 2.0.
They aren’t partial in the sense they aren’t full classes. It is simply a little syntactic sugar that let’s developers define a class spread across multiple files; and for the compiler to be able to interpret this, and compile the full class details correctly.
At first this may seem to blow code readability out of the water, and make source code much more disparate and difficult to understand. Microsoft did have a reason for doing this, which was to better organise large, sprawling, classes – something that can especially burden WinForms form classes.
Prior to partial classes, all the form code was in a single file. Adding controls to a form and configuring each of them can generate a lot of code statements. When these are in the same file as your event handlers, and other code, the class becomes bloated and difficult to navigate fairly quickly.
Microsoft’s solution was to split the code across specifically named partial class files. If you look at the code the project template has generated then you should notice there’s a Form1.cs, a Form1.designer.cs, and also a Form1.resx. If you open either of the .cs files, then you will see a class definition for Form1 including the partial keyword. This is all the C# compiler requires to let it know to compile a class from multiple source code files (well, and the filepaths of those files too).
Ignore the .resx file for now. This is just a ‘resources’ file that any icons, images, etc. you add to your form will be saved too.
Now, all the visual designer changes are written to the .designer.cs file and your main class file remains clean and readable.
The use of partial classes is not limited to WinForms code projects. It can be used with any class on any type of code project. For example a database interaction class could be split to read queries, create/update/delete commands, and house-keeping (init, open/close connection, etc.).
It is worth mentioning that using partial classes unnecessarily can inhibit readability and should generally be avoided unless you are doing so to make a large class file more manageable and readable.
If you are using partial classes, try to stick to Microsoft’s existing practice of naming files with the class name, then a dot (.), and then a descriptor that helps explain what the specific file holds. This will help, once again, with readability. For example, for a database I/O class interacting with the ‘Users’ table in a database:
- Users.cs. The main partial definition containing initialisation, open/close connection, etc.
- Users.queries.cs. A partial class file that holds the query (read data) methods.
- Users.commands.cs. A partial class file that holds the ‘modify’ (create/update/delete) methods.
- Users.utils.cs. A partial class file that holds shared utility methods.
As you can see we’ve split a large class up into activity specific sub-sets. The code is just as readable since we know what each file holds, and the files will be co-located in Solution Explorer so they are easy to find.
Using the Form Designer
Back to the forms designer! Let’s continue with our worked example.
Open the Form1 form in ‘design’ view, if it isn’t already displayed, by double-clicking on the Form1 node in Solution Explorer. This will load the visual designer for the form.
Look at the Toolbox pane on the left-hand-side (LHS) and find the Label control. Drag and drop a Label onto the form. Wherever you drop it is where it’ll initially be drawn. By default controls are named as their control type (e.g. Label in this case) followed by a number starting at 1 and incrementing as more controls of that type are added.
You can change the name of the control, and we’ll do that now. Click on the control in the designer and then right-click and choose Properties from the context menu.
The Properties pane should be displayed (by default on the right-hand-side (RHS), but you can re-configure the IDE’s panes however you want so it could be somewhere else if you’ve drag-dropped it to another position in the app).
On the Properties pane, find the (Name) property and change it from label1 to PromptLabel. While on the Properties pane, also update the following (and watch how the visual designer redraws the window):
- Set the
AutoSizeproperty tofalse. - Set the
Dockproperty toFill. - Set the
Textproperty to ‘Hello World!‘. - Set the TextAlign property to
MiddleCenter.
Now let’s configure the form itself. Click on the titlebar of Form1 in the designer, which should select the Form1 class, instead of the label, in the Properties pane. Update the form as follows:
- Set the
Fontproperty toArial,Bold,14pt. - Set the
Sizeproperty to ‘250, 100‘. - Set the
StartPositionproperty toCenterScreen. - Set the
Textproperty to ‘Boo!‘. - Set the
MaximiseBoxproperty tofalse. - Set the
MinimiseBoxproperty tofalse. - Set the
TopMostproperty totrue.
Now build and run the application by choosing DEbug, Start Debugging from Visual Studio’s main menu. We now have exactly the same app we created earlier using Notepad and the command-line compiler, but developed using the Form Designer.
You may have noticed one minor difference to before, and that’s the TopMost property. This draws the window on top of all other windows (except those also assigned top-most).
So far, we haven’t written a single line of code. If you expand the Form1 node in Solution Explorer, so that Form1.designer.cs is visible and then double-click it to open the code view, you’ll notice there doesn’t seem to be much in it apart from an implementation of IDisposable and the declaration of our single label.
If you look closer, you should observe a collapsed “Windows Form Designer generated code” region. If you expand this then, in the InitializeComponent method, you should notice all the property assignments that we set above. The file already runs to 50+ lines of code with just the form and a single label on it. Imagine what a complex UI with 50 or more controls on it might look like.
Hopefully you can now appreciate how partial classes can be a good thing.
Close the designer file’s code view again. We rarely need to open and view this file, and even more rarely do we need to edit it. Generally speaking the only time we would open and edit the file is if the Form Designer crashed and left the designer code in a broken state.
Event-Driven Programming
Event-driven behaviours were briefly covered in the initial tutorials in this series, but we revisit them in more detail again now, because WinForms uses events fairly comprehensively.
An event is a message sent from a source to a target to initiate some action/behaviour.
The Event-Driven architecture pattern proposes that a program can be expressed as a series of events (changes of state), and responses to them.
Events may occur for different reasons. For example, as a trigger, such as a database field changing; or, due to user interaction, such as when a user clicks a button on an application window.
In modern event-driven architectures, event are usually handled asynchronously but this isn’t always the case as an event could be defined and programmed so that the subscribers to it (the event handlers) are called synchronously by the caller (aka the source).
In the .NET Framework events are based on the ‘delegate’ model (delegation design pattern). A delegate is a special class that can hold a reference to a method. The delegate, unlike other classes, has a signature and can only hold references to methods that have the same signature.
A delegate is therefore equivalent to a type-safe function pointer. They are declared using the ‘delegate’ keyword, and simply declaring a delegate is sufficient to fully define it. For example, the System.EventHandler event handler delegate that is used as the signature for many Windows Forms events is expressed as:
public delegate void EventHandler(object sender, EventArgs e);Code language: C# (cs)The above declaration demonstrates the default signature style that is used when more complicated event delegates are defined.
The sender parameter provides details of the source of the event – for Windows Forms and Controls this is normally the object that triggered the event (i.e. the button, drop-down list, etc.)
The e parameter provides a means to provide contextual data about the event. In this most basic case, System.EventArgs doesn’t provide any additional data.
Specialised event argument classes may be used to provide additional information but they should always be derived from the System.EventArgs base class. For example, the MouseEventHandler delegate uses the MouseEventArgs type to provide additional information about the position of the mouse pointer, the mouse buttons that were clicked, etc. and is expressed as:
public delegate void MouseEventHandler(object sender, MouseEventArgs e);Code language: C# (cs)Classes expose events using the event keyword. When exposing an event, the programmer must define the event prototype (the signature of the event handling method) and this is where the delegate comes in. The delegate is used to specify the signature when defining the event.
For example, the System.Windows.Forms.Label class exposes a Click event using System.EventHandler delegate type:
public event EventHandler Click;Code language: C# (cs)Events are handled asynchronously in most event-driven paradigms (.NET included).
Triggering events in a certain order doesn’t guarantee that they will be executed in that order – and it doesn’t guarantee when the event will be handled (processed) either.
Another point to note is that event delegates are multi-cast. This means that they can hold references to multiple event handler methods, each of which are executed when an event occurs.
This might sound complicated, but we will only be assigning one event handler to each event for the most part and therefore won’t have to worry about it most of the time. (It is being mentioned here so you are aware of the fact).
Aside: it is also worth noting that delegates can be used to hold function pointers for implementations, other than events, where we might want to provide alternative method handling at runtime. Event handlers are registered or unregistered with a given event using the += and -= operators. When using the Forms Designer we don’t have to worry about this too much as the designer-generated code usually handles it, but there are occasions when we’ll need to register event handlers outside of the IDE’s Designer and therefore it’s worth knowing about.
Let’s continue with our “Hello World!” worked example, by adding a click event handler to the label.
- Open the code project in Visual Studio.
- Open the
Form1form in the Forms Designer. Double-click on the label on the form. This should automatically generate a click handler for us. - Open the Form1.designer.cs file in code view and expand any collapsed
regionsections. - Find where the label is being configured (we renamed it to
PromptLabelearlier), and notice that along with all the other statements that configure the object, there is aClickevent assignmement with a+=registering an event handler calledPromptLabel_Click. - Now look at
Form1.csin code view. Notice that the event handler method has been created in this partial class file, and not the.designer.csone.
So what has happened? Well, double-clicking on any control in the Forms Designer performs the default action of creating an event handler for that control’s Click event, and registering it with the control configuration.
The event handler method was dropped into the code view for the form but the configuration that registers this handler with the control’s event is in the designer file. This follows the logicial separation of concerns we went through earlier.
Now let’s do something when the label is clicked.
- Open the code view for
Form1.cs, and find the click event handler that has just been added. - In the body of the method add the following ‘show message box’ statement:
private void PromptLabel_Click(object sender, EventArgs e)
{
    MessageBox.Show("You clicked the \"Hello World!\" label.");
}Code language: C# (cs)- Compile and run the app.
- Click the label.
- Dismiss the message box by clicking the OK button.
- Close the app.
Above, we’ve wired up an event handler for the label’s Click event, and got it doing something.
Since you just used the shortcut approach of double-clicking the control to get the default event handler to be generated, how would you go about registering/generating event handlers for other events?
We’ll go through doing that now. We’re going to add handlers for the MouseEnter and MouseLeave events that will change the colour of the text when the mouse pointer is hovered over the label.
To do this, we first need to register the handlers:
- On the Forms Designer, right-click on the label and choose Properties from the context menu.
- The Properties pane has a few different views. The default view shows the properties in alphabetical order. Look for the toolbar at the top of the pane and click on the button that looks like a lightning bolt.
- The Properties pane should now show the list of events instead of properties.
- Scroll down and find the
MouseEnterevent. Click to the right of the event name so the cursor is shown, and then just hit the Enter key on the keyboard. (Visual Studio auto-generates a method name and creates and registers the event handler method for you.) - Go back to the Designer view and find the MouseLeave event in the list. Click to the right of the event name and hit Enter once again.
- When the event handler is generated it should automatically switch to the code view each time. If not do that yourself now.
- We need to get the event handlers doing something so modify the code as described below:
public class Form1 : Form
{
    // Add a private variable to hold the original colour of the label's text.
    private readonly Color labelOriginalColour;

    public Form1()
    {
        InitializeComponent();

        // Add an assignment, saving the original colour of the label's text.
        labelOriginalColour = PromptLabel.ForeColor;
    }

    private void PromptLabel_MouseEnter(object sender, EventArgs e)
    {
        PromptLabel.ForeColor = Color.Red;
    }

    private void PromptLabel_MouseLeave(object sender, EventArgs e)
    {
        PromptLabel.ForeColor = labelOriginalColour;
    }
}Code language: C# (cs)- Build and run the app. Hover over the label with your mouse pointer and notice the text colour changes to red. Move the mouse pointer away from the label and notice it returns to its original colour.
We skipped over the Properties pane toolbar buttons just now, only mentioning the view events button we needed to use. You’ll probably have noticed there were four buttons, and these are:
 |
Categorised View: displays property values and events based on category (Appearance, Behaviour, Mouse, Focus, Action, etc.) |
 |
Alphabetical View: displays property values and events alphabetically. |
 |
View Properties: displays the property values associated with the object. |
 |
View Events: displays the events associated with the object. |
So far we’ve registered event handlers using the += operator, but what if we wanted to unregister a handler? Although it might seem unnecessary, there are times when you may want to disable event handling. You could put conditional handling in your event handler method to accomplish this, but a more direct and eloquent approach is just to unsubscribe from the event.
Let’s do that now with the Click event handler. Modify the code as follows:
- Replace the message box display code currently in the
PromptLabel_Clickmethod with the following:
if (MessageBox.Show(
    "Do you want to disable the label click event handler?",
    "Disable Click",
    MessageBoxButtons.YesNo,
    MessageBoxIcon.Question) == DialogResult.Yes)
{
    PromptLabel.Click -= PromptLabel_Click;
}Code language: C# (cs)- Now build and run the app.
- Click the label, and then choose No on the modal pop-up displaying the question.
- Click the label again, noticing the click handler still works. This time click Yes on the modal pop-up.
- Trying clicking the label again now. Notice that the click handler is no longer working.
Common Graphical Controls
A key feature in making rapid application development possible in .NET (Visual Studio) is the set of predefined graphical control classes that the .NET Framework ships with.
There are many, many controls included so we’ll look at some of the most commonly used ones:
| Control | Description |
|---|---|
| Button | Provides a basic button that the user can click to trigger actions. |
| CheckBox | Provides a tick box that the user can click to tick (check) or untick. |
| ComboBox | Provides a drop-down list of items that the user may select a single item from. |
| DataGridView | Provides a viewer for tabular data (most notably supporting setting a DataTable or DataSet as the data source). |
| FlowLayoutPanel | Provides a simple layout panel that stacks the controls added to it horizontally or vertically depending on its configuration. |
| GroupBox | Provides a means of grouping controls in a logical manner. |
| Label | Displays read-only textual data (most notably the labelling (titling) of other controls). |
| ListBox | Provides a means of displaying a list of items that the user may select from (one or more items). |
| ListView | Provides a flexible way of displaying a list of items in different view styles. |
| MaskedTextBox | Provides a means of allowing users to enter only formatted data conforming to a specified mask (e.g. a date format). |
| MenuStrip | Provides a means of being able to add a (main) menu bar to the application. |
| NumericUpDown | Provides a means of allowing users to enter numeric data. |
| Panel | Provides a container that other controls can be placed in. The Panel control is useful in form layout tasks. |
| PictureBox | Provides a means of displaying an image/picture. |
| SplitContainer | Consists of a pair of panels separated by a bar that can be used to adjust the ‘split position’ (i.e. relative sizes) of those panels. |
| Splitter | Provides a means to adjust the ‘split position’ between two other controls that are docked to it. Similar to the split-container except it can be any two other types of control, not just panels. |
| StatusStrip | Provides a region at the bottom of a form (application window) that can be used to display contextual information such as a status message, a progress bar, etc. |
| TabControl | Provides a container that hosts one or more ‘tab panels’, each of which may be selected (made the visible panel) via a tab at the edge of the tab control. |
| TextBox | Provides a means of enabling the user to enter textual data. |
| ToolTip | Provides context based hints and tips that pop-up when the mouse hovers over a control. |
| TreeView | Provides a means to display items in a hierarchical (tree) structure. The folder view in Windows Explorer provides an example of how a tree-view control may be used. |
| WebBrowser | Provides the ability to browse or embed web pages in your app. |
Worked Example: Customer Details Editor App
Let’s go through a new worked example to try out some of these controls. We’ll create a simple app that can display core personal details about a person, their residential address and contact details, and an order history view.
Aside: not all developers properly name all their controls, but I like to do it for consistency and readability, so that’s what is happening below. Controls not being accessed programmatically are often left with their default names by developers rushing to get code out. While this is perfectly acceptable in principle, it does then inhibit readability of code and sets up a double-precedent for naming conventions so should be avoided if at all possible.
First, lets get the basic structure of the UI developed:
- NOTE: remember to save your changes regularly while following these instructions. While it is rare, Visual Studio crashes when you’ve done an hour’s work without saving can mean you lose it all – so save often and protect against loss of work!
- Create a new WinForms Application code project in Visual Studio and call it
CustomerEditor. - Rename
Form1toMainForm, and set the form title (Textproperty) to “Customer Details Editor”. Hint: the easiest way to rename both filenames and class name is to right-click on theForm1.csnode in Solution Explorer, choose Rename from the context menu, rename the form, and then click Yes to change all references fromForm1toMainFormin the code too. - Set the following for
MainForm‘s properties:Fontto use theSegoe UIfont type. (This then becomes the default font settings for all of the form’s controls too.)Size=800,500; and also set this as theMinimumSizeproperty value too.
- Add a
Panelcontrol to the form, and set the following properties:(Name)= “HeadingPanel”.Dock=DockStyle.Top.
- Drag a
Labelinto theHeadingPanelcontrol, and set the following properties:(Name)= “HeadingLabel”.AutoSize=falseTextAlign=TextAlignment.MiddleLeft.Dock=DockStyle.Left.Text= “Customer Search”.Fontproperty’sBoldsub-option totrue, andSizesub-option to10.Paddingproperty’sLeftsub-option to8, to add a little LHS padding to the label.
- Drag a
Buttoninto theHeadingPanelcontrol, and set the following properties:- (Name) = “BackButton”.
Text= “< Back”.Dock=DockStyle.Left.Visible=false. (This won’t hide the control in the Designer, only at runtime.)
- But now we have the back button after the label and we don’t want that. Right-click on the button in the Designer and then choose the
Send to Backoption. The controls should now be reversed, with the button in the right place. - We now have another problem to fix… The label isn’t very wide. We could just make it larger but there’s a better way to resize it in this case, and that’s by changing the
Dockproperty toDockStyle.Fill, so do that now. - The default panel height is much too large for our in-form sub-title so we need to change it. But now that the panel is filled it isn’t very easy to click on the panel to give it focus in the Designer. Once again, there’s a simple way to achieve this. Just click on one of the controls on the panel, and then hit the
Esckey on the keyboard. This navigates up the controls hierarchy to the immediate parent (theHeadingPanelcontrol in this case). - Now resize the panel height so both the button text and label text have a little vertical space either side of them. A panel height of approx. 30 pixels should be about right.
- Drag another
Panelcontrol onto the form below the existingHeadingPanelcontrol, taking care not to accidentally drop the new panel inside the existing one. Rename the new panel toSearchPanel. - Drag a 3rd
Panelcontrol onto the form below theSearchPanelpanel, once again taking care not to drop it onto either of the other panels. Set the following properties:(Name)= “DetailsPanel”.Dock=DockStyle.Bottom.Visible=false. (This won’t hide the control in the Designer, only at runtime.)
- Now set the
SearchPanel‘sDockproperty toDockStyle.Fillto fill the available space. - Did you notice what just happened?! The
SearchPanelpanel now takes up all the available space on the form, and draws the bottom of its own panel behind theDetailsPanelpanel. We don’t want that, so right-click on theSearchPanelcontrol in the Designer and chooseBring to Frontfrom the context menu.
Now we’ve got the basic layout of our form. What we’ve just done (in regards to the layout) might not make complete sense yet so here’s how we’re going to use the controls…
The form will initially display the SearchPanel control and hide the DetailsPanel control. This will cause the search panel to fill the form content region. The back button will be hidden by default and the heading label will be displayed with the default heading of “Customer Search”.
The next task we’re about to do is to populate the search panel. This will give users the capability to search for matching customers by partial name, with matches displayed in a tabular results view.
When the user selects one of the matches, the search panel will be hidden and the details panel will be displayed instead (populated with the selected customer’s details). The in-form heading (HeadingLabel) text will change to “Customer Details”, and the back button will be displayed on the in-form header too.
Let’s get on with our combined search and results view then…
- Drop a new
Panelcontrol into theSearchPanelpanel and set the following properties:(Name)= “SearchBarPanel”.Dock=DockStyle.Top.
- Add a
Labelto theSearchFieldsPaneland set the following properties:(Name)= “FirstNameSearchFieldLabel”.AutoSize=false.Dock=DockStyle.Left.- Set
Padding.Leftproperty sub-option to8pixels. Text= “First Name : “. (There’s a trailing space character in the text value.)TextAlign=TextAlignment.MiddleLeft.- Resize the label’s width to fully display the text, if necessary.
- Now add a
TextBox, and set the following properties:(Name)= “FirstNameSearchFieldTextBox”.Dock=DockStyle.Left.
- Next add another
Label, setting the following properties:(Name)= “NameSearchFieldsSpacerLabel”.AutoSize=false.Dock=DockStyle.Left.- Set the
Size.Widthsub-option to 24 pixels. Text= “”.
- Then add a further
Label, setting the following:(Name)= “LastNameSearchFieldLabel”.AutoSize=false.Dock=DockStyle.Left.Text= “Last Name : “. (There’s a trailing space character in the text value.)TextAlign=TextAlignment.MiddleLeft.- Resize the label’s width to fully display the text, if necessary.
- Now add another
TextBox, setting the following:(Name)= “LastNameSearchFieldTextBox”.Dock=DockStyle.Left.
- Now add one more
Label, setting the following properties:(Name)= “SearchButtonSpacerLabel”.AutoSize=false.Dock=DockStyle.Left.- Set the
Size.Widthsub-option to 24 pixels. Text= “”.
- Finally, add a
Buttonand set the following:(Name)= “SearchButton”.Dock=DockStyle.Left.Text= “Search”.
The layout probably looks terrible at the moment so let’s fix that next.
- Select one of the text-boxes and check it’s height (
Size.Heightproperty and sub-option). It’ll probably be something like 22 pixels by default. - Set the height of the host panel (
SearchBarPanel) to 2 pixels more that the text-box (e.g. to 24 pixels). - Feel free to stretch the width of the text-boxes and button to suit your layout too.
Hopefully the search bar now looks better.
We need to add the results view, so we’re going to use a ListView control for that.
- Add a label below the search bar (
SearchBarPanel), but within theSearchPanelcontrol, and set the following:- (Name) = “SearchResultsSpacerLabel”.
AutoSize=false.Dock=DockStyle.Top.Size.Height=8.Text= “”.
- Now add a
ListViewto theSearchPanelcontrol below the spacer label you just added. Set the following properties:(Name)= “SearchResultsListView”.Dock=DockStyle.Fill.FullRowSelect=true.HeaderStyle=ColumnHeaderStyle.Nonclickable.MultiSelect=false.View=View.Details.
- We need to add columns to the search results list-view, so we’ll do that now.
- Find the
Columnsproperty. - Click on the property’s title, and an ellipsis (
...) should appear right-most of the property value box. Click on that ellipsis. - The items editor window should be displayed. Click the Add button and then set the following properties for each of these column names:
(Name)= “IdResultsColumnHeader”,Text= “ID”.(Name)= “FirstNameResultsColumnHeader”,Text= “First Name”.(Name)= “LastNameResultsColumnHeader”,Text= “Last Name”.(Name)= “AddressResultsColumnHeader”,Text= “Address”.(Name)= “SelectResultsColumnHeader”,Text= “”. (This last column will just display a ‘View/Edit’ option for each result.)
- Find the
- If you want to see what data in the
ListViewlooks like, you can manually set some items for initial display (temporarily). You can do this by finding theItemsproperty and following a similar process to the one for adding columns, except each item added will be a row. The initial column uses theTextproperty of theListViewItemand the remaining properties are in theListViewItem.SubItemscollection (for which there is a property on theListViewItemeditor window). - You may also notice that by default the columns are quite narrow. You can graphically alter the widths in the Designer. This is much easier than specifying them using the
Widthproperty on the Columns editor window, hence not doing it that way above. Simply hover over the vertical line separating each column header in the Designer and the mouse should change to a resize width pointer. Click and drag left/right to make the column the size you want.
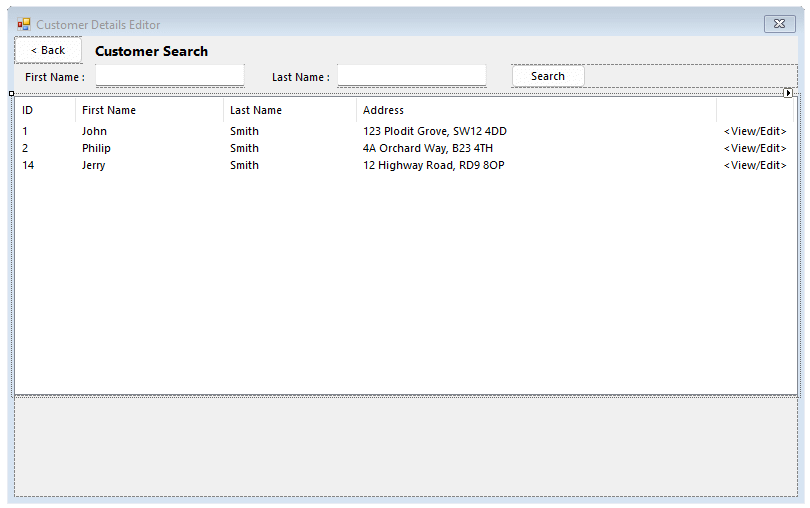
Check-point: your form should should now look something like this:
Now the search panel is laid out, lets make a start on the customer details viewer/editor panel.
Select the DetailsPanel control in the Designer.
Notice that you can resize it vertically. So we are able to edit the layout visually we’ll make the panel take up most of the form’s content area. Locate the resizing handle (a small circle midway along the top edge of the panel).
Click and hold the resizing handle with the mouse and then drag it up so that it obscures most of the search panel content. Let go of the mouse button and notice the resize is persisted. Click and drag back down again, noticing the search panel’s layout is retained. Drag it back to the top again to hide the search panel content once again.
The details pane is going to be split into a Personal Details view, an Address view, and an Orders History view, and we’re going to use a TabControl control to do that.
- Make sure the DetailsPanel is consuming almost all the form content region (by resizing it if you left it in a different state to that).
- Add a
TabControlfrom the IDE’s Toolbox pane to theDetailsPanelcontrol by dragging it over to the panel and dropping it in place. Set the following properties:(Name)= “DetailsTabControl”.Dock=DockStyle.Fill.- Notice that a couple of tabs are automatically added by default.
- Select the first tab page header title (likely to be something like
tabPage1).- Notice that this doesn’t select the sub-control yet.
- Now click the body of the tab-page, and make sure the tab page is selected in the Properties pane.
- Set
(Name)= “PersonalInfoTabPage”. - Set
Text= “Personal Details”.
- Select the second tab page header title (likely to be something like
tabPage2).- Click the body of the tab-page, and make sure it has been selected in the Properties pane.
- Set
(Name)= “AddressTabPage”. - Set
Text= “Address”.
- Now we need to add a 3rd tab to the layout, so…
- Right-click on the tab header area to the right of the ‘Address’ title.
- From the context menu that is displayed, click the Add Tab option.
- You may notice that this confusingly names the new tab as
tabPage1along with a header title of the same name. This is because we renamed the other tabs earlier. If we’d left the default control names oftabPage1andtabPage2, this new tab page would be calledtabPage3instead. - Set
(Name)= “OrderHistoryTabPage”. - Set
Text= “Order History”.
That’s the tab-control’s layout sorted, so we now need to populate the individual tab pages. Let’s do them in order, starting with the ‘Personal Details’ tab.
- Return to the Personal Details tab by clicking its title from the tabs header, and then clicking the body of the tab-control. Make sure the
PersonalInfoTabPageis selected in the Properties pane. - Drag a
Panelcontrol on the the tab page. Set the following properties:- (Name) = “PersonalInfoLayoutPanel”.
Dock=DockStyle.Fill.
- Drag a
Labelonto the personal info layout panel, near the top-left, and set the following:(Name)= “TitleEditFieldLabel”.Text= “Title : “.
- Drag a
ComboBoxon the personal info layout panel, aligning it to the right of the title label, and set the following:(Name)= “TitleEditFieldComboBox”.DropDownStyle=ComboBoxStyle.DropDownList.Items= “Mr”, “Mrs”, “Mstr”, “Ms”, “Dr”, “Prof”, “Reverend”, “<Other>”. (Add one item per line in the editor window, without the speech marks.)
- Now let’s use a Designer trick to quickly add more labels.
- Hold down the Ctrl key, and click-and-hold the left mouse button on the ‘Title’ label in the Designer. Drag the control downwards. Notice a copy has been made and the original control has been left in place. (This can be much quicker than finding the
Labelcontrol in the Toolbox, dragging it over, etc.) - Set the following properties for the newly added label:
-
(Name)= “FirstNameEditFieldLabel”. Text= “First Name : “.- The label will now not right-align with the ‘Title’ label above it any more. Click on the label and drag it to the left. When the right-most edge is aligned with the label above it a blue alignment helper guide-line should be displayed in the Designer. Stop moving it at this point.
- You can also use the alignment helper guide-lines to align controls horiztonally with respect to one another. Try this now by aligning the text of the ‘Title’ label with the drop-down field (
ComboBox) for it.
-
- Drag a
TextBoxcontrol from the designer and place it to the right of the label you just added. Set the properties as follows:(Name)= “FirstNameEditFieldTextBox”.
- Now select the
FirstNameEditFieldLabelandFirstNameEditFieldTextBoxcontrols on the form in the Designer (click one, then hold down the Ctrl key and click the other). While still holding the Ctrl key, left-click-and-hold the mouse button on either of the controls and drag downwards. This demonstrates how you can clone sets of controls at the same time in the Designer. - For the newly created label, set the following:
(Name)= “LastNameEditFieldLabel”.Text= “Last Name : “.- Align the label’s right most edge to match the other labels.
- For the newly created text-box, set the following:
(Name)= “LastNameEditFieldTextBox”.
- Click the lowest lable added so far, and clone it as we have done several times now. Set the following properties on the new label:
(Name)= “HomePhoneEditFieldLabel”.Text= “Home Phone : “.- Align the label’s right most edge to match the other labels.
- Drag a MaskedTextBox control from the Toolbox onto the tab page and align it to the right of the ‘Home Phone’ label. Set the following properties;
(Name)= “HomePhoneEditFieldMaskedTextBox”.Mask= “Phone number”. (Select the property title in the Properties pane, and then click the ellipsis in the value box. Choose ‘Phone number’ from the options.)- Adjust the mask for the local telephone number format (e.g. (99999) 000-000 for UK numbers that will be used in the sample data for the application when it is added further on).
- Select the
HomePhoneEditFieldLabelandHomePhoneEditFieldMaskedTextBoxcontrols and clone them as a new pair, aligning them below the existing ‘Home Phone’ label and field. - For the newly created label, set the following:
(Name)= “MobilePhoneEditFieldLabel”.Text= “Mobile Phone : “.- Align the label’s right most edge to match the other labels.
- For the newly created masked text-box, set the following:
(Name)= “MobilePhoneEditFieldMaskedTextBox”.- Notice you don’t have to set the mask again because it was retained during the clone.
- Create a label and text-box from the ‘Last Name’ field pair, and then set the following properties:
- [Label]
(Name)= “HomeEmailEditFieldLabel”. - [Label]
Text= “Email : “. - [Label] Align the label like the others.
- [TextBox]
(Name)= “HomeEmailEditFieldTextBox”.
- [Label]
Now let’s add some marketing preferences options for the customer to the right of the existing set of fields.
- Add a new label to the right of the existing title field. Set the following properties:
(Name)= “MarketingPrefsTitleLabel”.Font.Bold= true.Text= “Marketing Preferences :”.
- Add a CheckBox below the marketing preferences title label with the following properties:
(Name)= “WeeklyNewsViaEmailCheckBox”.Text= “Weekly newsletters as emails”.
- Add a CheckBox below the last one with the following properties:
(Name)= “WeeklyNewsViaTextCheckBox”.Text= “Weekly newsletters as text messages”.
- Add a CheckBox below the last one with the following properties:
(Name)= “PromosAndOffersViaEmailCheckBox”.Text= “Promotions and special offers as emails”.
- Add a CheckBox below the last one with the following properties:
(Name)= “PromosAndOffersViaTextCheckBox”.Text= “Promotions and special offers as text messages”.
- Add a CheckBox below the last one with the following properties:
(Name)= “WarrantyNoticesViaEmailCheckBox”.Text= “Warranty expiring notices as emails”.
- Add a CheckBox below the last one with the following properties:
(Name)= “WarrantyNoticesViaTextCheckBox”.Text= “Warranty expiring notices as text messages”.
- Add a CheckBox below the last one with the following properties:
(Name)= “NewProductsViaEmailCheckBox”.Text= “New product announcements as emails”.
- Add a CheckBox below the last one with the following properties:
(Name)= “NewProductsViaTextCheckBox”.Text= “New product announcements as text messages”.
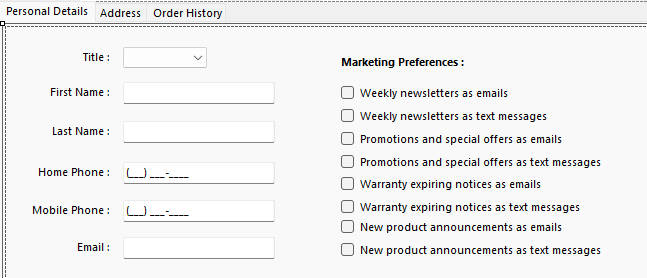
Check-point: your form should should now look something like this:
Now switch to the ‘Address’ tab, making sure you click on the tab page body to select the tab in the Properties pane.
Rather than providing comprehensive instructions here, have a go at laying out the tab page in detail yourself now you’ve got some experience doing it from the ‘Personal Details’ tab. Here are some design guidelines to follow to populate the address tab content:
- Host all the fields in a panel and make it fill the available space (call the panel “AddressDetailsPanel”).
- Add a House Name or Number field (TextBox), named using the following prefix:
HouseNameOrNumEditField(i.e.HouseNameOrNumEditFieldLabel, etc.) - Add a Street Name field (TextBox), with name prefixes of
StreetEditField. - Add a Locale field (TextBox), with name prefixes of
LocaleEditField. - Add an Area field (TextBox), with name prefixes of
AreaEditField. - Add a City field (TextBox), with name prefixes of
CityEditField. - Add a County/State field (Text), with name prefixes of
CountyOrStateEditField. - Add a Country field (ComboBox), with name prefixes of
CountryEditField. Populate the drop-down list withNot Specifiedas the first option and then a list of country names. - Add a Postal / ZIP Code field (MaskedTextBox), with name prefixes of
PostalCodeEditField.
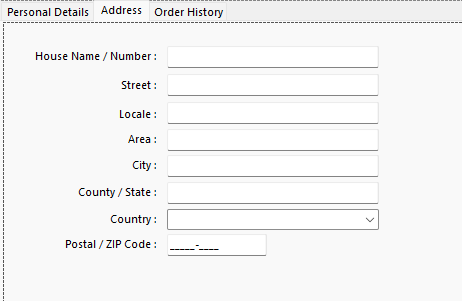
Check-point: your completed ‘Address tab page layout should look something like this:
Now let’s layout the ‘Order History’ tab. We’ll use a ListView control to display the order history, and once again let’s see if you can work out how to do it all on your own. Here’s a list of design guidelines again to hopefully make things a bit easier.
- Add a
ListViewto the page, make it fill the available space and call itOrderHistoryListView. - The list view will use the
Detailsdisplay style again. - Set the columns to “Order ID”, “Date Ordered”, “Status”, “Date Shipped”, “Date Received”, “Order Total”
- Adjust the column widths as necesary.
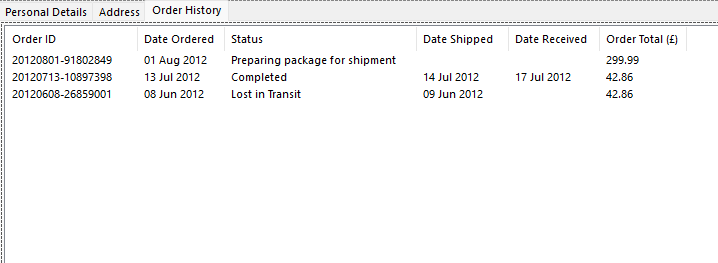
Check-point: the ‘Order History’ tab page layout should look something like this:
OK, we should now have our UI layout completed, but the app doesn’t do anything yet. Let’s add some sample data to the app and start wiring up behaviours.
We’ll use in-memory collections for simplicity of data management.
- Add a new Class file called
PersonalDetails.csto the code project, and populate it with the following code:
namespace CustomerEditor
{
    public class PersonalDetails
    {
        public PersonalDetails()
        {
            Title = "";
            FirstName = "";
            LastName = "";
            HomePhone = "";
            MobilePhone = "";
            Email = "";
        }

        public PersonalDetails(
            string title,
            string firstName,
            string lastName,
            string homePhone,
            string mobilePhone,
            string email)
        {
            Title = title;
            FirstName = firstName;
            LastName = lastName;
            HomePhone = homePhone;
            MobilePhone = mobilePhone;
            Email = email;
        }

        public string Title { get; set; }

        public string FirstName { get; set; }

        public string LastName { get; set; }

        public string HomePhone { get; set; }

        public string MobilePhone { get; set; }

        public string Email { get; set; }
    }
}
Code language: JavaScript (javascript)- Add a new Class file called
Address.csto the code project and populate it with the following code:
namespace CustomerEditor
{
    public class Address
    {
        public Address()
        {
            HouseNameAndOrNumber = "";
            Street = "";
            Locale = "";
            Area = "";
            City = "";
            CountyOrState = "";
            Country = "";
            PostalCode = "";
        }

        public Address(
            string houseNameAndOrNumber,
            string street,
            string locale,
            string area,
            string city,
            string countyOrState,
            string country,
            string postalCode)
        {
            HouseNameAndOrNumber = houseNameAndOrNumber;
            Street = street;
            Locale = locale;
            Area = area;
            City = city;
            CountyOrState = countyOrState;
            Country = country;
            PostalCode = postalCode;
        }

        public string HouseNameAndOrNumber { get; set; }

        public string Street { get; set; }

        public string Locale { get; set; }

        public string Area { get; set; }

        public string City { get; set; }

        public string CountyOrState { get; set; }

        public string Country { get; set; }

        public string PostalCode { get; set; }

        public string ToSingleLine()
        {
            StringBuilder address = new StringBuilder(128);

            if (HouseNameAndOrNumber != null && HouseNameAndOrNumber.Trim() != "") address.Append(HouseNameAndOrNumber.Trim());
            if (address.Length > 0 && Street != null && Street.Trim() != "") address.Append(',');
            if (Street != null && Street.Trim() != "") address.Append(Street.Trim());
            if (address.Length > 0 && Locale != null && Locale.Trim() != "") address.Append(',');
            if (Locale != null && Locale.Trim() != "") address.Append(Locale.Trim());
            if (address.Length > 0 && Area != null && Area.Trim() != "") address.Append(',');
            if (Area != null && Area.Trim() != "") address.Append(Area.Trim());
            if (address.Length > 0 && City != null && City.Trim() != "") address.Append(',');
            if (City != null && City.Trim() != "") address.Append(City.Trim());
            if (address.Length > 0 && CountyOrState != null && CountyOrState.Trim() != "") address.Append(',');
            if (CountyOrState != null && CountyOrState.Trim() != "") address.Append(CountyOrState.Trim());
            if (address.Length > 0 && PostalCode != null && PostalCode.Trim() != "") address.Append(',');
            if (PostalCode != null && PostalCode.Trim() != "") address.Append(PostalCode.Trim());
            if (address.Length > 0 && Country != null && Country.Trim() != "") address.Append(',');
            if (Country != null && Country.Trim() != "") address.Append(Country);

            return address.ToString();
        }
    }
}Code language: JavaScript (javascript)- Add a new Class file called
MarketingPreferences.csto the code project and populate it with the following code:
namespace CustomerEditor
{
    public class MarketingPreferences
    {
        public MarketingPreferences()
        {
            AllowNewsletterEmails = true;
            AllowNewslettersTexts = true;
            AllowPromotionEmails = true;
            AllowPromotionTexts = true;
            AllowWarrantyExpiringEmails = true;
            AllowWarrantyExpiringTexts = true;
            AllowNewProductEmails = true;
            AllowNewProductTexts = true;
        }

        public MarketingPreferences(
            bool allowNewsletterEmails,
            bool allowNewslettersTexts,
            bool allowPromotionEmails,
            bool allowPromotionTexts,
            bool allowWarrantyExpiringEmails,
            bool allowWarrantyExpiringTexts,
            bool allowNewProductEmails,
            bool allowNewProductTexts)
        {
            AllowNewsletterEmails = allowNewsletterEmails;
            AllowNewslettersTexts = allowNewslettersTexts;
            AllowPromotionEmails = allowPromotionEmails;
            AllowPromotionTexts = allowPromotionTexts;
            AllowWarrantyExpiringEmails = allowWarrantyExpiringEmails;
            AllowWarrantyExpiringTexts = allowWarrantyExpiringTexts;
            AllowNewProductEmails = allowNewProductEmails;
            AllowNewProductTexts = allowNewProductTexts;
        }

        public bool AllowNewsletterEmails { get; set; }

        public bool AllowNewslettersTexts { get; set; }

        public bool AllowPromotionEmails { get; set; }

        public bool AllowPromotionTexts { get; set; }

        public bool AllowWarrantyExpiringEmails { get; set; }

        public bool AllowWarrantyExpiringTexts { get; set; }

        public bool AllowNewProductEmails { get; set; }

        public bool AllowNewProductTexts { get; set; }
    }
}Code language: JavaScript (javascript)- Add a new Class file called
Order.csto the code project and populate it with the following code:
namespace CustomerEditor
{
    public class Order
    {
        public Order()
        {
            Id = "";
            CustomerId = "";
            OrderDate = DateTime.MinValue;
            ShippingDate = DateTime.MinValue;
            DateReceived = DateTime.MinValue;
            Status = "";
            Value = 0M;
        }

        public Order(
            string id,
            string customerId,
            DateTime orderDate,
            string status,
            decimal value,
            DateTime shipped,
            DateTime received)
        {
            Id = id;
            CustomerId = customerId;
            OrderDate = orderDate;
            Status = status;
            Value = value;
            ShippingDate = shipped;
            DateReceived = received;
        }

        public string Id { get; set; }

        public string CustomerId { get; set; }

        public DateTime OrderDate { get; set; }

        public string OrderId
        {
            get
            {
                return string.Format("{0:yyyyMMdd}-{1}", OrderDate, Id);
            }
        }

        public string Status { get; set; }

        public DateTime ShippingDate { get; set; }

        public DateTime DateReceived { get; set; }

        public decimal Value { get; set; }
    }
}Code language: JavaScript (javascript)- Add a new Class file called
Customer.csto the code project and populate it with the following code:
using System;
using System.Collections.Generic;

namespace CustomerEditor
{
    public class Customer
    {
        public Customer()
        {
            Id = "";
            PersonalDetails = null;
            Address = null;
            MarketingPreferences = new MarketingPreferences();
            Orders = new List<Order>();
        }

        public Customer(
            string id,
            PersonalDetails personalDetails,
            Address address)
        {
            Id = id;
            PersonalDetails = personalDetails;
            Address = address;
            MarketingPreferences = new MarketingPreferences();
            Orders = new List<Order>();
        }

        public Customer(
            string id,
            PersonalDetails personalDetails,
            Address address,
            MarketingPreferences preferences)
        {
            Id = id;
            PersonalDetails = personalDetails;
            Address = address;

            if (preferences != null) MarketingPreferences = preferences;
            else MarketingPreferences = new MarketingPreferences();

            Orders = new List<Order>();
        }

        public Customer(
            string id,
            PersonalDetails personalDetails,
            Address address,
            List<Order> orders)
        {
            Id = id;
            PersonalDetails = personalDetails;
            Address = address;

            if (orders != null) Orders = orders;
            else Orders = new List<Order>();
        }

        public string Id { get; set; }

        public PersonalDetails PersonalDetails { get; set; }

        public Address Address { get; set; }

        public MarketingPreferences MarketingPreferences { get; set; }

        public List<Order> Orders { get; set; }
    }
}Code language: JavaScript (javascript)- Add a new Class file called
SampleData.csto the code project and populate it with the following code:
using System;
using System.Collections.Generic;

namespace CustomerEditor
{
    internal static class SampleData
    {
        private static List<Customer> AllCustomers = new List<Customer>();

        private static List<Order> AllOrders = new List<Order>();

        static SampleData()
        {
            int id = 1047829571;

            AllCustomers.Add(
                new Customer(
                    id.ToString(),
                    new PersonalDetails("Mr", "John", "Smith", "00172 840 666", "00718 222 456", "john.smith@superweb.test"),
                    new Address("Bolthole", "Notreal Road", "Sailors Row", "Little Warpington", "Archester", "Derbyshire", "England", "AR99 4TS"),
                    new MarketingPreferences()
                ));
            id++;
            AllCustomers.Add(
                new Customer(
                    id.ToString(),
                    new PersonalDetails("Ms", "Cynthia", "Crow", "00186 998 123", "00744 719 888", "ccrow88@mymail.test"),
                    new Address("(Flat 7) 412", "Allflats Crescent", "Downtown", "Checkerton", "Havingham", "Hampshire", "England", "BS66 6TS"),
                    new MarketingPreferences()
                ));
            id++;
            AllCustomers.Add(
                new Customer(
                    id.ToString(),
                    new PersonalDetails("Mr", "Hubert", "Giles", "00175 387 918", "", "getorfmyland@farmersnetwork.test"),
                    new Address("Lower Beacon Farm", "", "Lessor Worthip", "Strawberry Fields", "Granthampton", "Somersetin", "England", "GR8 1TS"),
                    new MarketingPreferences()
                ));
            id++;
            AllCustomers.Add(
                new Customer(
                    id.ToString(),
                    new PersonalDetails("Ms", "Amandeep", "Patel", "", "00781 121 355", "apatel@cloudmail.test"),
                    new Address("14", "Marycopse Lane", "", "", "Kidneypool", "Stratforgen", "England", "KD7 2TS"),
                    new MarketingPreferences()
                ));
            id++;
            AllCustomers.Add(
                new Customer(
                    id.ToString(),
                    new PersonalDetails("Mr", "Rajesh", "Singh", "00121 841 567", "", "rajsingh77@megainbox.test"),
                    new Address("88", "Londinium Road", "", "", "Basinettestoke", "Hamshire", "England", "BS11 8TS"),
                    new MarketingPreferences()
                ));
            id++;
            AllCustomers.Add(
                new Customer(
                    id.ToString(),
                    new PersonalDetails("Mrs", "Gloria", "Stits", "00161 100 010", "", "gstits67@highclassmail.test"),
                    new Address("Woollam House", "", "Greater Whallop", "", "Sirenchester", "Galoceshire", "England", "SS1 9TS"),
                    new MarketingPreferences()
                ));
            id++;
            AllCustomers.Add(
                new Customer(
                    id.ToString(),
                    new PersonalDetails("Mr", "Drew", "Peecoct", "", "00771 555 343", "drewp@softmail.test"),
                    new Address("1A", "Golflinks Avenue", "", "", "West Fore", "Wessex", "England", "WE5 4TS"),
                    new MarketingPreferences()
                ));
            id++;
            AllCustomers.Add(
                new Customer(
                    id.ToString(),
                    new PersonalDetails("Ms", "Mai", "Tanaka", "", "00776 119 889", "maitan@quickmail.test"),
                    new Address("Flat 7, Westview House", "Old Town Road", "", "", "Higher Wicket", "Limpshire", "England", "HW2 4TS"),
                    new MarketingPreferences()
                ));
            id++;
            AllCustomers.Add(
                new Customer(
                    id.ToString(),
                    new PersonalDetails("Mr", "Hao", "Wang", "", "00777 100 098", "haowang94@easymail.test"),
                    new Address("Flat 28, Langdon Court", "Beach Road", "", "", "Painterton", "Devonia", "England", "TB12 6TS"),
                    new MarketingPreferences()
                ));

            id = 1002740180;
            int numOrders = 0;
            DateTime date = DateTime.Now;
            int advance = 0;
            bool isShipped  = false;
            bool isReceived = false;

            foreach (Customer customer in AllCustomers)
            {
                numOrders = new Random(id).Next(0, 16);
                date = DateTime.Now.AddDays(-141 - new Random(id).Next(0, 36));
                advance = 141 / (numOrders > 0 ? numOrders : 1);

                for (int i = 0; i < numOrders; i++)
                {
                    isShipped = date < DateTime.Now.AddDays(-30);
                    isReceived = date < DateTime.Now.AddDays(-15);
                    AllOrders.Add(
                        new Order(
                            id.ToString(),
                            customer.Id,
                            date,
                            isReceived
                                ? "Complete"
                                : (isShipped ? "Shipped" : "Pending"),
                            (decimal)(new Random(id).NextDouble()) * 1000M,
                            isShipped ? date.AddDays(4) : DateTime.MinValue,
                            isReceived ? date.AddDays(21) : DateTime.MinValue
                            ));

                    date = date.AddDays(advance);
                    if (date > DateTime.Now) date = DateTime.Now;
                }
            }
        }

        public static List<Customer> Customers
        {
            get
            {
                return new List<Customer>(AllCustomers);
            }
        }

        public static List<Order> Orders
        {
            get
            {
                return new List<Order>(AllOrders);
            }
        }

        public static Customer FindCustomer(string id)
        {
            foreach (Customer customer in AllCustomers)
            {
                if (customer != null && customer.Id != null && customer.Id == id)
                {
                    Customer match = new Customer(customer.Id, customer.PersonalDetails, customer.Address, customer.MarketingPreferences);
                    match.Orders = GetOrders(customer.Id);
                    return match;
                }
            }

            return null;
        }

        public static List<Customer> FindCustomers(string firstName, string lastName)
        {
            List<Customer> results = new List<Customer>();
            bool firstNameRequired = firstName != null && firstName.Trim() != "";
            bool lastNameRequired = lastName != null && lastName.Trim() != "";
            bool firstNameMatch = false;
            bool lastNameMatch = false;

            if (!firstNameRequired && !lastNameRequired)
            {
                return new List<Order>(AllCustomers);
            }

            foreach (Customer customer in AllCustomers)
            {
                if (customer == null || customer.PersonalDetails == null ||
                    ((customer.PersonalDetails.FirstName == null || customer.PersonalDetails.FirstName.Trim() == "") &&
                    (customer.PersonalDetails.LastName == null || customer.PersonalDetails.LastName.Trim() == "")))
                {
                    continue;
                }

                firstNameMatch = !firstNameRequired ||
                    (customer.PersonalDetails.FirstName != null &&
                        customer.PersonalDetails.FirstName.IndexOf(firstName.Trim(), StringComparison.OrdinalIgnoreCase) != -1);
                lastNameMatch = !lastNameRequired ||
                    (customer.PersonalDetails.LastName != null &&
                        customer.PersonalDetails.LastName.IndexOf(lastName.Trim(), StringComparison.OrdinalIgnoreCase) != -1);

                if (firstNameMatch && lastNameMatch)
                {
                    results.Add(customer);
                }
            }

            return results;
        }

        public static List<Order> GetOrders(string customerId)
        {
            List<Order> results = new List<Order>();

            foreach (Order order in AllOrders)
            {
                if (order != null && order.CustomerId != null && order.CustomerId.Equals(customerId))
                {
                    results.Add(order);
                }
            }

            return results;
        }

    }
}
Code language: PHP (php)
Now we’ve got some data to work with, let’s wire up the controls to the data.
- In the code view of
MainForm, modify the constructor so it looks like this (NOTE: setting the docking styles programmatically at runtime means we can retain our easy to edit panel layouts in the designer):
public MainForm()
{
    InitializeComponent();

    SearchPanel.Dock = DockStyle.Fill;
    DetailsPanel.Dock = DockStyle.Fill;
    DetailsPanel.Visible = false;
}Code language: PHP (php)- Switch to the designer view for
MainFormand then click the title bar of the form (to select theFormobject instance itself). Go to the events in the Properties pane and click on empty box to the right of theShownevent, and then press the Enter key. This should create a new event handler method in the code-behind file, which you can update with this code:
private void MainForm_Shown(object sender, EventArgs e)
{
    List<Customer> customers = SampleData.Customers;

    PopulateCustomerSearchResults(customers);
}Code language: PHP (php)- You’ll also need the
PopulateCustomerSearchResultsmethod so add that below the event handler method…
private void PopulateCustomerSearchResults(List<Customer> customers)
{
    SearchResultsListView.Items.Clear();

    string[] details;

    foreach (Customer customer in customers)
    {
        details = new string[5];
        details[0] = customer.Id;
        details[1] = customer.PersonalDetails.FirstName;
        details[2] = customer.PersonalDetails.LastName;
        details[3] = customer.Address.ToSingleLine();
        details[4] = "<View/Edit>";

        SearchResultsListView.Items.Add(new ListViewItem(details));
    }
}Code language: PHP (php)- Aside: it is worth noting a common mistake that developers face when working with the
ListViewcontrol at this point. If you look at the code immediately above you’ll notice theItemsproperty is being cleared. There is also aClear()method at the parent (ListView) level, and calling that by accident instead clears the column layouts, etc. too which can be a bit of a debugging headache if you aren’t aware what’s happened. - Return to the designer view for
MainForm. Click the Search button, and then go to events for that control in the Properties pane, click on the empty box to the right of theClickevent and press the Enter key to create an event handler. - In the code behind file, update the event handler code like this:
private void SearchButton_Click(object sender, EventArgs e)
{
    List<Customer> customers = SampleData.FindCustomers(
        FirstNameSearchFieldTextBox.Text, LastNameSearchTextBox.Text);

    PopulateCustomerSearchResults(customers);
}Code language: PHP (php)
Check-point: make sure the application builds and works as expected for the work we’ve done so far.
- Build and run the application.
- You should find that the app initially loads details for all the customers into the search results list view display.
- Try searching for matching and non-matching results in the sample list of customers we’re using. Observe that the search results list view display is updated based on the matches that are found.
- Clear both the first name and last name search field boxes and then click the Search button. Observe that all the customers are loaded into the search results list view display again.
Now we’ve got the customer summary display and search features working, let’s develop the full customer details viewer/editor.
- In the code view for
MainForm, add a class-level field to the top of the class code to hold the currently selected customer ID. For example:
public partial class MainForm : Form
{
    private string _selectedCustomerId = null;

    public MainForm()
    {
       // Code omitted for brevity.
    }

    // Code omitted for brevity.
}- On the designer view of
MainForm, Select theSearchResultsListViewcontrol instance and then in the Properties pane find the SelectedIndexChanged event, click the empty box to the right of it and then press the Enter key to generate an event handler. - In the code behind file, update the event handler so that it hides the
SearchPanelcontrol instance, displays theDetailsPanelcontrol instance instead, and loads the selected customer’d data into the details panel fields.
private void SearchResultsListView_SelectedIndexChanged(object sender, EventArgs e)
{
    SearchPanel.Visible = false;

    string customerId = null;

    if (SearchResultsListView.SelectedItems.Count > 0) customerId = SearchResultsListView.SelectedItems[0].Text;

    if (customerId == null)
    {
        SearchPanel.Visible = true;
        return;
    }

    Customer customer = SampleData.FindCustomer(customerId);

    TitleEditFieldComboBox.SelectedValue = customer.PersonalDetails.Title;
    FirstNameEditFieldTextBox.Text = customer.PersonalDetails.FirstName;
    LastNameEditFieldTextBox.Text = customer.PersonalDetails.LastName;
    HomePhoneEditFieldMaskedTextBox.Text = customer.PersonalDetails.HomePhone;
    MobilePhoneEditFieldMaskedTextBox.Text = customer.PersonalDetails.MobilePhone;
    HomeEmailEditFieldTextBox.Text = customer.PersonalDetails.Email;

    WeeklyNewsViaEmailCheckBox.Checked = customer.MarketingPreferences.AllowNewsletterEmails;
    WeeklyNewsViaTextCheckBox.Checked = customer.MarketingPreferences.AllowNewslettersTexts;
    PromosAndOffersViaEmailCheckBox.Checked = customer.MarketingPreferences.AllowPromotionEmails;
    PromosAndOffersViaTextCheckBox.Checked = customer.MarketingPreferences.AllowPromotionTexts;
    WarrantyNoticesViaEmailCheckBox.Checked = customer.MarketingPreferences.AllowWarrantyExpiringEmails;
    WarrantyNoticesViaTextCheckBox.Checked = customer.MarketingPreferences.AllowWarrantyExpiringTexts;
    NewProductsViaEmailCheckBox.Checked = customer.MarketingPreferences.AllowNewProductEmails;
    NewProductsViaTextCheckBox.Checked = customer.MarketingPreferences.AllowNewProductTexts;

    HouseNameOrNumEditFieldTextBox.Text = customer.Address.HouseNameAndOrNumber;
    StreetEditFieldTextBox.Text = customer.Address.Street;
    LocaleEditFieldTextBox.Text = customer.Address.Locale;
    AreaEditFieldTextBox.Text = customer.Address.Area;
    CityEditFieldTextBox.Text = customer.Address.City;
    CountyOrStateEditFieldTextBox.Text += customer.Address.CountyOrState;
    CountryEditFieldComboBox.SelectedValue = customer.Address.Country;
    PostalCodeEditFieldTextBox.Text += customer.Address.PostalCode;

    OrderHistoryListView.Items.Clear();
    string[] orderDetails;

    foreach (Order order in customer.Orders)
    {
        orderDetails = new string[6];
        orderDetails[0] = order.OrderId;
        orderDetails[1] = order.OrderDate.ToString("dd MMM yyyy");
        orderDetails[2] = order.Status;
        orderDetails[3] = order.ShippingDate == DateTime.MinValue
            ? ""
            : order.ShippingDate.ToString("dd MMM yyyy");
        orderDetails[4] = order.DateReceived == DateTime.MinValue
            ? ""
            : order.DateReceived.ToString("dd MMM yyyy");
        orderDetails[5] = "£" + order.Value.ToString("F2");
    }

    _selectedCustomerId = customerId;
    DetailsTabControl.SelectedIndex = 0;
    DetailsPanel.Visible = true;
    BackButton.Visible = true;
    HeadingLabel.Text = "Customer Details";
}Code language: PHP (php)- Now, return to the designer view for
MainForm, and select the Back button control. - In the properties pane, find the Click event and click on the empty box to the right of the event name. Press the Enter key to create an event handler and update the handler method using the code below:
private void BackButton_Click(object sender, EventArgs e)
{
    _selectedCustomerId = null;

    DetailsPanel.Visible = false;
    BackButton.Visible = false;
    SearchPanel.Visible = true;
    HeadingLabel.Text = "Customer Search";

    List<Customer> customers;

    if (FirstNameSearchFieldTextBox.Text.Trim() != "" ||
        LastNameSearchTextBox.Text.Trim() != "")
    {
        customers = SampleData.FindCustomers(
            FirstNameSearchFieldTextBox.Text, LastNameSearchTextBox.Text);
    }
    else
    {
        customers = SampleData.Customers;
    }

    PopulateCustomerSearchResults(customers);
}Code language: PHP (php)
Check-point: make sure the updated application builds and that customers can be selected and their full details viewed.
- Build and run the application.
- Click on a customer row on the search results list view display.
- Confirm that the customer details view is displayed, populated with the details for the customer you selected. Select the Address tab and confirm the address is correctly displayed. Select the Order History tab and confirm the orders are displayed.
- Click the Back button to return to the customers list view.
- Click on a different customer.
- Confirm the customer details view is displayed again, with the selected tab reset to ‘Personal Details’, and the newly selected customer’s details correctly loaded and displayed.
Now let’s add some customer details editing capabilities to the application. We’re going to adopt a ‘live edit’ saving mechanism where any changes are saved immediately without needing to implement save and cancel buttons on the editor.
- First, add some update methods to the
SampleDataclass:
public static void SavePersonalDetails(string customerId, PersonalDetails details)
{
    foreach (Customer customer in AllCustomers)
    {
        if (customer.Id == customerId)
        {
            customer.PersonalDetails = details;
            return;
        }
    }

    throw new ArgumentException(string.Format("A customer with ID={0} could not be found", customerId), "customerId");
}

public static void SaveAddress(string customerId, Address address)
{
    foreach (Customer customer in AllCustomers)
    {
        if (customer.Id == customerId)
        {
            customer.Address = address;
            return;
        }
    }

    throw new ArgumentException(string.Format("A customer with ID={0} could not be found", customerId), "customerId");
}

public static void SaveMarketingPreferences(string customerId, MarketingPreferences preferences)
{
    foreach (Customer customer in AllCustomers)
    {
        if (customer.Id == customerId)
        {
            customer.MarketingPreferences = preferences;
            return;
        }
    }

    throw new ArgumentException(string.Format("A customer with ID={0} could not be found", customerId), "customerId");
}Code language: PHP (php)- Now, in the designer view for
MainForm, make sure the details viewer/editor panel is visible and the Personal Details tab is selected. - Click on the Title combo-box field and then view the events in the Properties pane. Find the
SelectedIndexChangedevent, click the empty box to the right of it and then press the Enter key to generate the event handler. - Update the event handler code as follows:
private void TitleEditFieldComboBox_SelectedIndexChanged(object sender, EventArgs e)
{
    if (_selectedCustomerId == null)
    {
        return;
    }

    Customer customer = SampleData.FindCustomer(_selectedCustomerId);
    customer.PersonalDetails.Title = TitleEditFieldComboBox.SelectedValue.ToString();

    SampleData.SavePersonalDetails(_selectedCustomerId, customer.PersonalDetails);
}Code language: JavaScript (javascript)- Return to the designer view and select the first name field. Add a
TextChangedevent handler for that field and update the code like this:
private void FirstNameEditFieldTextBox_TextChanged(object sender, EventArgs e)
{
    if (_selectedCustomerId == null)
    {
        return;
    }

    Customer customer = SampleData.FindCustomer(_selectedCustomerId);
    customer.PersonalDetails.FirstName = FirstNameEditFieldTextBox.Text.Trim();

    SampleData.SavePersonalDetails(_selectedCustomerId, customer.PersonalDetails);
}Code language: JavaScript (javascript)- Return to the designer view again and select the top marketing preferences tick box option. Add a
CheckedChangedevent handler implementation and update it like this:
private void WeeklyNewsViaEmailCheckBox_CheckedChanged(object sender, EventArgs e)
{
    if (_selectedCustomerId == null)
    {
        return;
    }

    Customer customer = SampleData.FindCustomer(_selectedCustomerId);
    customer.MarketingPreferences.AllowNewsletterEmails = WeeklyNewsViaEmailCheckBox.Checked;

    SampleData.SaveMarketingPreferences(_selectedCustomerId, customer.MarketingPreferences);
}Code language: JavaScript (javascript)- Now that example event handlers have been added for each of the control types being used, try to add event handlers for all the remain editor fields, updating the relevant portion of the customer details.
- NOTE: the
SampleDataclass has three supporting methods:SavePersonalDetails,SaveAddress,SaveMarketingPreferences. Make sure you use the right one.
Custom Controls
For scenarios where none of the built-in controls are suitable, the .NET Framework also allows us to develop our own custom controls. This greatly improves the flexibility of the .NET UI design features as almost limitless additional UI behaviours can be developed given enough time and effort.
Custom controls are created in a similar way to Form instances, except that they inherit from a different base class. Most commonly the UserControl base class is used, but for more advanced scenarios the Control class can be inherited from instead.
Although we’ve suggested that custom controls are to fill a gap in the .NET Framework’s existing suite of available built-in controls, most custom controls just build more complex behaviours using the existing built-in controls instead of creating completely new ones from scratch.
For example, if we revisit our Customer Editor worked example above, we could have made the Personal Details tab content into a PersonalDetailsEditor user control, the Address tab content into an AddressEditor user control, and the Order History tab content into an OrderHistoryViewer user control.
You can add a user control (we’ll reproduce the Address tab content here) to a code project simply by doing the following:
- Right click on the project node in Solution Explorer and select the Add option.
- Find the User Control option from context sub-menu and select it.
- Call the component
AddressEditorand click OK.
You should notice that the designer is similar to the one used for forms but it doesn’t have any of the forms borders or title bar, etc.
Now let’s add some content to the user control…
- Expand the size of the control in the designer so it will have enough space for the address edit fields that we’d previously added to the Address tab on the form.
- Switch to the designer view for
MainFormand select the Address tab of the customer details editor panel. - Use the mouse to select all the controls on that tab body (the labels, text boxes, combo boxes, etc.) and then copy them.
- Switch back to the user control and paste the address editor controls there.
- Adjust the position of the address fields and their labels to suit the layout you want and then resize the user control so it fits the edit fields better.
Hopefully you’ll have ended up with a user control layout something like this:
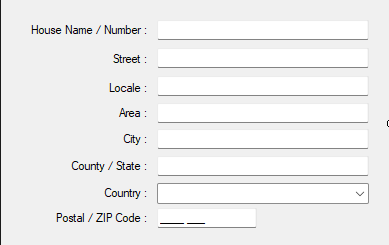
Even though the controls themselves were copied and pasted successfully, and event handler implementations would not be replicated. This is a good thing as most of the time developers want to implement behaviours slightly differently with user controls than they do when implementing a set of inidividual fields.
To demonstrate this we’ll partially implement setting field values and handling changes to them.
- First, switch to the user control’s code behind view. The easiest way to do this is to right click in the design view and choose the ‘View Code’ option.
- Added an explicity
Addressproperty like this:
public Address Address
{
    get
    {
        return new Address(
            HouseNameOrNumEditFieldTextBox.Text,
            StreetEditFieldTextBox.Text,
            LocaleEditFieldTextBox.Text,
            AreaEditFieldTextBox.Text,
            CityEditFieldTextBox.Text,
            CountyOrStateEditFieldTextBox.Text,
            CountryEditFieldComboBox.SelectedIndex < 0
                ? ""
                : CountryEditFieldComboBox.SelectedItem.ToString(),
            PostalCodeEditFieldTextBox.Text
            );
    }
    set
    {
        HouseNameOrNumEditFieldTextBox.Text = value.HouseNameAndOrNumber;
        StreetEditFieldTextBox.Text = value.Street;
        LocaleEditFieldTextBox.Text = value.Locale;
        AreaEditFieldTextBox.Text = value.Area;
        CityEditFieldTextBox.Text = value.City;
        CountyOrStateEditFieldTextBox.Text = value.CountyOrState;
        CountryEditFieldComboBox.SelectedIndex = CountryEditFieldComboBox.Items.IndexOf(value.Country);
        PostalCodeEditFieldTextBox.Text = value.PostalCode;
    }
}Code language: HTML, XML (xml)- Add a new Class file to the code project and call it
AddressEventArgs. Add modify the class as follows:
public class AddressEventArgs : EventArgs
{
    public AddressEventArgs()
    {
        Address = null;
    }

    public AddressEventArgs(Address address)
    {
        Address = address;
    }

    public Address Address { get; set; }
}- Add an event definition to the user control, by switching to the code behind view (of the
AddressEditoruser control), and adding the following at the top of the class:
public delegate EventHandler AddressChangedEventHandler(object sender, AddressEventArgs e);
public event AddressChangedEventHandler AddressChanged;Code language: PHP (php)
What we’re doing above is defining a method signature for our custom event handler and then defining an event on the user control using that event handler signature.
- Add a new tab to the existing
DetailsTabControlcontrol. Give it a tab header title of ‘Address UC’, and drag-drop your AddressEditor user control from the Toolbox into the body of the tab. (If the user control isn’t available, you may need to compile the code project first.) - Select the AddressEditor user control on the tab, and then view the events in the Properties pane.
You may be wondering where the AddressChanged event is at this point, as it probably won’t be in the list. That’s because you may need to rebuild the code project (or even close and re-open the whole thing) to properly pick up the changes.
Eventually you will get the AddressChanged event appearing in the properties pane events list though, and then you can use it just like any other control’s event.
- View the
AddressEditorinstance’s available events in the Properties pane. - Locate the
AddressChangedevent, and click on the empty box to the right of the event name. Press the Enter key to generate an event handler. - Notice this is done just like for any of the .NET Framework’s built-in controls.
- Implement the event handler in the
MainFormcode just as if the address fields were being edited like before. For example:
private void AddressEditor_AddressChanged(object sender, AddressEventArgs e)
{
    if (_selectedCustomerId == null)
    {
        return;
    }

    Customer customer = SampleData.FindCustomer(_selectedCustomerId);
    customer.Address = e.Address;

    SampleData.SaveAddress(_selectedCustomerId, customer.Address);
}Code language: JavaScript (javascript)- Return to the AddressEditor designer view now, as we need to implement event handlers for each of the individual edit fields to complete the user control behaviour.
- Select the House Name / Number text box, and view the events list in the Properties pane. Find the TextChanged event and click the empty box to the right of it. This time instead of just hitting Enter, type in an explicit name of
AnyTextBox_TextChangedand then press Enter.
This has the subtle difference that the event handler method is implemented with the custom name you entered instead of the default auto-generated one. You are about to see why this is good news…
- Select the Street text box, view the events in the Properties pane and find the
TextChangedevent again. This time after clicking on the empty box to the right of the event name, use the drop down option, right-most of the box, to select the sameAnyTextBox_TextChangedevent handler again. - You can repeat this for all the other text box fields (including the postal code which uses the MaskedTextBox and not the basic one). The only field that needs to be handled separately is the country name combo-box.
- Now select the Country combo-box in the designer view and find the
SelectedIndexChangedevent in the Properties pane. Implement an event handler for event using the default auto-generated naming convention.
You should now have two event handlers that will satisfy all your address editing needs. Implement the event handler method bodies like this:
private void AnyTextBox_TextChanged(object sender, EventArgs e)
{
    if (AddressChanged != null) AddressChanged.Invoke(this, new AddressEventArgs(Address));
}

private void CountryEditFieldComboBox_SelectedIndexChanged(object sender, EventArgs e)
{
    if (AddressChanged != null) AddressChanged.Invoke(this, new AddressEventArgs(Address));
}Code language: JavaScript (javascript)
Although, technically speaking, all the fields (including the combo-box) could share a single event handler method because the event handler signatures match, I tend to prefer to separating them to clearly differentiate between the different controls being used.
One final thing to do is to assign the Address property in the MainForm‘s SearchResultsListView_SelectedIndexChanged event handler method.
- For simplicity, just add the following code at the bottom of the existing method:
AddressEditor.Address = customer.Address;Now let’s test it all.
- Build and run the application.
- Select a customer from the search results list view display so that the customer details editor/viewer is shown.
- Select the Address tab and confirm the data is loaded correctly as before.
- Select the Address UC tab and confirm the data is also loaded correctly here too.
- Make a change to any field on the Address UC tab.
- Switch back to the Address and notice the change has not been replicated there. This is to be expected because the data on the two tabs are completely separate. In reality we wouldn’t have both these implementions in place side-by-side – we’d be using the Address UC implementation only.
- Switch to the Address UC tab again and confirm the changes you made are still there.
- Click the Back button to close the details editor panel and display the customers list again. Confirm the change you made to the customer’s address is reflected in what is displayed in the updated customers list data.
- Click the same customer again. Confirm the revised address details are correctly loaded on both the Address and Address UC tabs.
Bonus task: If you want to improve the final application code, modify it to remove the existing Address tab in the designer view (and all the orphaned event handler implementations in the code behind) so that only the Address UC tab and implementation remain. You can then rename the header title to just Address (and then move the tab to the expected position between the other two tabs).
Application-Level Exception Handling
A common frustration for developers new to WinForms programming in the .NET Framework is what happens when an unhandled exception bubbles up the call stack. This can often cause the application to be terminated unexpectedly with a vague/unhelpful error message before the application just shuts down.
An application termination like this can lead to data loss and irritated users, so it makes sense to try to handle these unforeseen behaviours as gracefully as possible.
To support this the .NET Framework offers two events where the default handling (terminating the application) can be interupted.
The first event is the Application.ThreadException event. If the application detects an unhandled error that has bubbled all the way to the top of the call stack and the error occurred on the application’s main thread then this event is fired. Exceptions raised on any other thread would not be detected/raised by this event. Implementing an event handler for this event can be as simple as:
public MainForm()
{
    InitializeComponent();

    Application.ThreadException += Application_ThreadException;

    // Code omitted for brevity.
}

private void Application_ThreadException(object sender, System.Threading.ThreadExceptionEventArgs e)
{
    ShowError(e.Exception, false);
}

private void ShowError(Exception error, bool isTerminating)
{
    StringBuilder message = new StringBuilder(1024);

    if (error != null)
    {
        message.Append("ERROR: ");
        message.AppendLine(error.Message);
    }
    else
    {
        message.AppendLine("An unspecified error has occurred. (No further information is currently available.)");
    }

    if (isTerminating)
    {
        message.AppendLine();
        message.AppendLine("The application is now in an unknown state and must shut down.");
    }

    MessageBox.Show(message.ToString(), "ERROR", MessageBoxButtons.OK, MessageBoxIcon.Error);
}Code language: PHP (php)
It may not be immediately obvious why we have a ShowError method with an isTerminating parameter we aren’t asserting. The reason for this will become clear when we implement the second error event handler.
In addition to the application-level ThreadException event, the parent level AppDomain exposes an UnhandledException event. Implementing this is just as simple as for the Application.ThreadException case, except the exception property of the event argument is a plain object type instead of an Exception type.
Where the application-level ThreadException would not detect/raise an event for uncaught exceptions on other threads the wider application may be running, the app-domain level event would detect and raise these.
So, an app-domain level exception handler might be implemented like this.
public MainForm()
{
    InitializeComponent();

    AppDomain.CurrentDomain.UnhandledException += CurrentDomain_UnhandledException;
    Application.ThreadException += Application_ThreadException;

    // Code omitted for brevity.
}

private void CurrentDomain_UnhandledException(object sender, UnhandledExceptionEventArgs e)
{
    ShowError(e.ExceptionObject as Exception, e.IsTerminating);
}Code language: PHP (php)
Both these event handlers methods aren’t limited to displaying just a modal error message. Any functionality you want could be included in the method bodies. For example, if unsaved changes exist one final attempt could be made to save them before the application terminates.
In both cases though, it is only unhandled exceptions that the events would be raised due to. If an exception has been caught and handled elsewhere (e.g. in a control’s event handler) then these events wouldn’t fire.