
TypeScript is a relatively new language that was created by Microsoft. It is an open source language loosely based on JavaScript syntax but extended to provide strong-typing declarations. An immediate advantage of using explicit data-types (like you would in other formal programming languages such as C/C++, C#, VB.NET, etc.) is that you get design-time data type checking when the ‘code’ is compiled into JavaScript.
The TypeScript Handbook
While this article aims to introduce you to some key facets of TypeScript (TS), it isn’t sensible to reproduce full guides or manuals that have already been produced and are freely available elsewhere. I heartily recommend spending some time on the main TypeScript website after you’ve read this article as it is a comprehensive and well organised reference for all things TypeScript.
Strongly-Typed Variables
At its core, a fundamental benefit that TypeScript provides is a more structured programming paradigm that allows developers to define variables, parameters, and functions with explicit data-types.
Consider the following JavaScript (JS) function:
function process(a, b) {
    var result;
    /* Omitted: do some stuff with a, b and assign to result. */
    return result;
}Code language: JavaScript (javascript)
What type of data is expected for parameters ‘a’ and ‘b’? What type of data is returned by the function? The answer to both of these is that we don’t know without reading through the function and working out what it does, or simply having to guess.
Now consider a similar function declared in TypeScript:
function process(a: string, b: number): string {
    let result: string;
    /* Omitted: processing code and assignment of result. */
    return result;
}Code language: TypeScript (typescript)
Immediately, you can infer more about what the function requirements are… we now know that ‘a’ needs to be a text value, that ‘b’ needs to be a number, and we are expecting a text value to be returned. I’ve given the function a vague name on purpose here, for demonstration purposes, but with a well-named function identifying what it does the method signature is even more intuitive.
Depending on the ‘compiler’ settings, TypeScript allows you to mix and match TS and JS style syntax. For example this is perfectly valid (although not recommended):
function process(a: string, b: number): string {
    var result;
    let tempNumber: number = b + 25;
    /* Omitted: processing and assignment of result. */
    return result;
}Code language: TypeScript (typescript)
Here we’ve defined results as an invariant data type but another internal variable used for processing has been explicitly defined with a numeric data type. We’re returning the invariant variable even though its data type isn’t explicitly defined. Depending on the TypeScript compilation settings, this might or might not be detected as a compilation error.
Strongly-Typed Callbacks
Another great benefit of developing your code in TypeScript is that you can explicitly define method signatures for callback parameters passed into functions (e.g. where the method/function is executing asynchronously). Take this function as an example:
function executeAsync(onSuccess: () => void, onFailure(message: string) => void) {
    try {
        // Do some stuff
        onSuccess();
    } catch (error) {
        onFailure(error.message);
    }
}Code language: TypeScript (typescript)
It is immediately obvious what the expected callback parameter signatures are. For a success callback, it is a simple function with no parameters, but if an error occurs the failure callback should expect an error message.
It’s Definitely-Typed
One of the biggest hurdles you’ll have to surmount when you start programming in TypeScript is making it aware of your data types. Out of the box, it’ll know about core JS functions and data types but you are likely to want to use industry standard APIs like jQuery or Bootstrap, and even your own classes/APIs too.
If you try to use a 3rd Party API without telling TypeScript about it then it’ll throw up compilation errors and stop your project from building. So, how do we resolve this issue to get our project to work with 3rd party libraries and still be strongly-typed?
The answer is TypeScript ‘declaration’ files. These have a .d.ts extension instead of the normal .ts extension that TypeScript code files use, and they are vaguely similar to C/C++ header files in that they define the signatures that are exposed by a library but not the function bodies themselves.
Depending on your development tools of choice, it can be fairly simple to download TypeScript declaration files authored by other developers. For example the DefinitelyTyped website a vast library of files that cover most if not all major JS APIs and libraries. You can even download a lot of them using Node Package Manager (NPM) or Microsoft’s NuGet Package Manager too.
For example, using NPM is as simple as:
npm install --save-dev @types/jqueryCode language: plaintext (plaintext)If you are developing your project using Visual Studio, then you can easily find most TS declaration files simply by searching for ‘DefinitelyTyped’ in NuGet.
Namespaces
Another great feature of TypeScript is the ability to group classes into namespaces (just like you can do in .NET). I know you can build up something similar in JS, using closures, but it feels much more straightforward and logical in TS. Consider the following JS code:
var MyLib;
(function (MyLib) {
    var WebServices;
    (function (WebServices) {
        var Utils = (function () {
            function Utils() {
            }
            Utils.myMethod1 = function () {
                // Method body omitted for brevity.
            };
            Utils.myMethod2 = function () {
                // Method body omitted for brevity.
            };
            return Utils;
        }());
        WebServices.Utils = Utils;
    })(WebServices = MyLib.WebServices || (MyLib.WebServices = {}));
})(MyLib || (MyLib = {}));Code language: JavaScript (javascript)
While you can infer what’s going on – I’m creating a namespace-style approach to organise a set of ‘static’ utility methods – it is hardly concise and readable code. Consider instead the same code defined using TS:
namespace MyLib.WebServices {
    export class Utils {
        constructor() { }
        public static myMethod1(): void {
            // Method body omitted for brevity.
        }
        public static myMethod2(): void {
            // Method body omitted for brevity.
        }
    }
}Code language: TypeScript (typescript)
Immediately, you can see it is more concise and readable. It even looks a lot like a normal 4GL programming language (C/C++, C#, etc.)
In the above example code, we’ve only got a simple two-part namespace but on complex projects we can end up with a lot of different ‘classes’ defined in a tree structure of nested namespaces. Reading and maintaining TypeScript code is MUCH easier than trying to develop and maintain the same in plain JS most of the time.
As an example, let’s add a few more classes to our code. The TypeScript now looks like this, which we’ve split out into separate files to better organise the classes…
A MyLib\WebServices\Utils.ts file:
namespace MyLib.WebServices {
    export class Utils {
        constructor() { }
        public static myMethod1(): void {
            // Method body omitted for brevity.
        }
        public static myMethod2(): void {
            // Method body omitted for brevity.
        }
    }
}Code language: TypeScript (typescript)
A MyLib\WebServices\RssFeed.ts file:
namespace MyLib.WebServices {
    export class RssFeed {
        constructor() { }
        public static getFeed(url: string): Array<{ id: number, title: string, body: string, published: Date }> {
            // Method body omitted for brevity.
            return null;
        }
    }
}Code language: TypeScript (typescript)
And, a MyLib\NewsArticles\Reader.ts file:
namespace MyLib.NewsArticles {
    export class Reader {
        constructor() { }
        public render(articleId: number): HTMLDivElement {
            // Method body omitted for brevity.
            return null;
        }
    }
}Code language: TypeScript (typescript)
The equivalent in a single, plain JS file is starting to look very messy and difficult to read by comparison:
var MyLib;
(function (MyLib) {
    var WebServices;
    (function (WebServices) {
        var Utils = (function () {
            function Utils() {
            }
            Utils.myMethod1 = function () {
                // Method body omitted for brevity.
            };
            Utils.myMethod2 = function () {
                // Method body omitted for brevity.
            };
            return Utils;
        }());
        WebServices.Utils = Utils;
        var RssFeed = (function () {
            function RssFeed() {
            }
            RssFeed.getFeed = function (url) {
                // Method body omitted for brevity.
                return null;
            };
            return RssFeed;
        }());
        WebServices.RssFeed = RssFeed;
    })(WebServices = MyLib.WebServices || (MyLib.WebServices = {}));
})(MyLib || (MyLib = {}));
(function (MyLib) {
    var NewsArticles;
    (function (NewsArticles) {
        var Reader = (function () {
            function Reader() {
            }
            Reader.prototype.render = function (articleId) {
                // Method body omitted for brevity.
                return null;
            };
            return Reader;
        }());
        NewsArticles.Reader = Reader;
    })(NewsArticles = MyLib.NewsArticles || (MyLib.NewsArticles = {}));
})(MyLib || (MyLib = {}));Code language: JavaScript (javascript)
We could split out the plain JS code into separate files if we wanted, but that would require more consideration than the simple TS syntax above. For example, the pure-JS equivalent of the Utils.ts file might be something like this…
if (typeof MyLib === 'undefined') MyLib = {};
if (typeof MyLib.WebServices === 'undefined') MyLib.WebServices = {};
if (typeof MyLib.WebServices.Utils === 'undefined') {
    var Utils = (function () {
        function Utils() {
        }
        Utils.myMethod1 = function () {
            // Method body omitted for brevity.
        };
        Utils.myMethod2 = function () {
            // Method body omitted for brevity.
        };
        return Utils;
     }());
     MyLib.WebServices.Utils = Utils;
}Code language: JavaScript (javascript)
As you can see from the above code fragment, implementing a set of namespace-like JS closures as separate ‘source-code’ files introduces its own maintenance overhead. Either we need to check the ‘parent’ namespaces have already been declared, and create them if not, like we are above… Or, we’d need to make sure the build order of the JS files is explicitly specified when combining the distributable JS for deployment (to ensure the parent entity is created before attempting to add child properties to it).
Back to Declaration Files
Now that we’ve got a scenario with a few custom classes defined, let’s revisit TypeScript declaration files, and see how they are structured.
Let’s suppose our MyLib project has been developed (in TypeScript) as a re-usable JS library that we want to use in other code projects. We need to be able to let those other projects know about the classes/functions in our MyLib library. Using our two-namespace example, we can define a MyLib.d.ts file that TypeScript can understand and be able to reference our custom data types from (at design/compile time):
declare namespace MyLib.WebServices {
    export class Utils {
        constructor();
        static myMethod1(): void;
        static myMethod2(): void;
    }
    export class RssFeed {
        constructor();
        static getFeed(url: string): Array<{ id: number, title: string, body: string, published: Date }>;
    }
}

declare namespace MyLib.NewsArticles {
    export class Reader {
        constructor();
        render(articleId: number): HTMLDivElement;
    }
}Code language: TypeScript (typescript)
If we take a look at the above declaration file code, it is really just a re-declaration of the classes and public method signatures. Notice the ‘declare’ keyword in the namespace blocks – it is this keyword that informs TypeScript that the declaration relates to definitions that didn’t originate directly in a TypeScript file in the same project.
In most cases, that’s all there is to it… and the simplest way to create a declarations file is often just to copy and paste the original code, add ‘declare’ before the namespace, delete any non-public members, remove the ‘visibility’ operator (i.e. ‘public’) and then delete the method bodies and add semi-colons to terminate the method signature definitions.
String Interpolation
Another nice feature of TypeScript is string interpolation, similar to that available in C#. String values can be defined using the back-quote (`) character, aka an acute/grave/grave-accent, instead of the usual single/double-quotes normally used when declaring literal text values.
Considering the following in plain JS:
var myText = 'This is the error message: ' + error.message;Code language: JavaScript (javascript)We could define the same in TypeScript, using string interpolation, like this:
let myText: string = `This is the error message: ${error.message}`;Code language: TypeScript (typescript)While the above may not seem much different, when we are building more complex text values, string interpolation can yield dividends in terms of code presentation and readability. Consider the following variable declaration in JS:
var htmlToAdd = '<div>' +
    '<h2>Booking Details</h2>' +
    '<table>'+
    '<tbody>' +
    '<tr><td>From:</td><td>' + startDate + '</td></tr>' +
    '<tr><td>Until:</td><td>' + endDate + '</td></tr>' +
    '<tr><td>Room:</td><td>' + roomName + '</td></tr>' +
    '</tbody>' +
    '</table>' +
    '</div>';Code language: JavaScript (javascript)
We could define the same in TypeScript as:
let htmlToAdd: string = `<div>
    <h2>Booking Details</h2>
    <table>
        <tbody>
            <tr><td>From:</td><td>${startDate}</td></tr>
            <tr><td>Until:</td><td>${endDate}</td></tr>
            <tr><td>Room:</td><td>${roomName}</td></tr>
        </tbody>
    </table>
</div>`;Code language: HTML, XML (xml)
The TypeScript version is immediately more readable and we have even managed to maintain the HTML syntax layout too. Behind the scenes, the TypeScript compiler will build JS something similar to that we quoted above, but while it remains as TypeScript source code it is much easier to read and maintain.
Compiling to JavaScript
We’ve developed our project using TypeScript, but in itself it is still just a big lump of source code since TypeScript isn’t really a scripting language at all but a programming language that is compiled to JS. Unless we compile it, it’s useless.
Depending on your development environment, you may be compiling your code in a number of different ways. For example, the full Visual Studio IDE includes TypeScript compiler packages, and projects can be configured to compile source files to JS on-the-fly when changes are saved. If, instead, you are working with a simple code editor (like Visual Studio Code) and a build pipeline using, for example, ‘gulp’ or ‘webpack’ then you’ll need to explicitly configure the appropriate workflow.
There are likely to be many other techniques/approaches to take with regards to compiling, but we’ll just discuss these two here for simplicity.
Compiling to JS in Visual Studio – Part 1
Let’s look at Visual Studio first… you’ve created a web project, and now want to add TypeScript editing and compilation to it. Your first step is to install the compiler packages. Launch NuGet and add the following two packages to your project:
- Microsoft.TypeScript.Compiler
- Microsoft.TypeScript.MSBuild
Once these are installed, it is a good idea to close and re-open the project/IDE. This is because the ‘TypeScript’ tab often doesn’t show up on the Project Properties pane unless you do this. Here is a typical view of the TypeScript tab’s options (which saves to a tsconfig.json file at the project root):
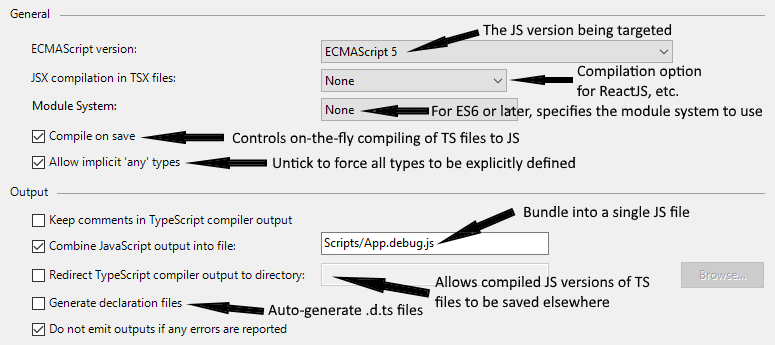
I won’t go into any further detail about all the different settings, as most should be straightforward, except a quick mention that it can be useful to use the ‘Combine JavaScript output into file’ as a quick way of bundling your code ready for minification/deployment.
At this point, if I’m being honest, I’ve found the on-the-fly compilation provided in Visual Studio to be a little hit or miss at best and have spent a lot of time trying to work out why a code fix didn’t work, only to realise the TS hadn’t recompiled into the JS file I was testing again. So, I’ve tended to go the more formal build-on-demand route using tsconfig.json files and batch file calls in the project’s PreBuildEvent settings that run the TS to JS compilation, minification, etc. when I build the VS code project instead.
TypeScript Configuration Files
Before continuing, it is probably worth taking a look at TypeScript configuration files (since I’ve mentioned them). These are JSON encoded files that provide compilation settings information to the TypeScript compiler.
Let’s take a look at a typical (tsconfig.json) configuration file:
{
  "compilerOptions": {
    "noImplicitAny": true,
    "noEmitOnError": true,
    "removeComments": true,
    "sourceMap": true,
    "target": "es5",
    "module": "none",
    "outFile": "App.debug.js"
  },
  "exclude": [
    "node_modules",
    "wwwroot"
  ],
  "files": [
    "src/*.ts",
    "src/*/*.ts"
  ]
}Code language: JSON / JSON with Comments (json)
You may notice that the set of compiler options defined above are similar to what you can configure via Visual Studio’s project properties. Behind the scenes Visual Studio is really just supplying the same compiler options at the command line that this file can.
The ‘exclude’ section allows specific folders to be ignored, and the ‘files’ section allows you to specify the source code files you want to include (here we’re including all TypeScript (.ts) files within the ‘src’ sub-folder tree, but you could also specify a set of files explicitly if you wanted).
Compiling to JS in Visual Studio – Part 2
Now we have an understanding of TypeScript compiler configuration files, we can look at taking more control over the build process. The Microsoft TypeScript compiler (tsc.exe) is what we’ll be using here, and you normally need to be running in a developer command prompt to have the required environment paths correctly configured.
Assuming we’re going to use a batch file to kick off our build process, we can easily load the developer command prompt environment by calling it in another batch file, like this:
call "%ProgramFiles(x86)%\Microsoft Visual Studio\2019\Professional\Common7\Tools\VsDevCmd.bat"Code language: DOS .bat (dos)Adjust the path as appropriate to your Visual Studio installation.
So, let’s produce a simple build.bat file for our Visual Studio code project:
cd "%~1"
call "%ProgramFiles(x86)%\Microsoft Visual Studio\2019\Professional\Common7\Tools\VsDevCmd.bat"
call tsc --project tsconfig.jsonCode language: DOS .bat (dos)
Copying and pasting the above into a batch file (e.g. build.bat) in the code project’s root folder is all you need to do to compile your TypeScript files on-demand when you build the VS code project. Well, I say all – you also need to add a PreBuildEvent into the project properties:
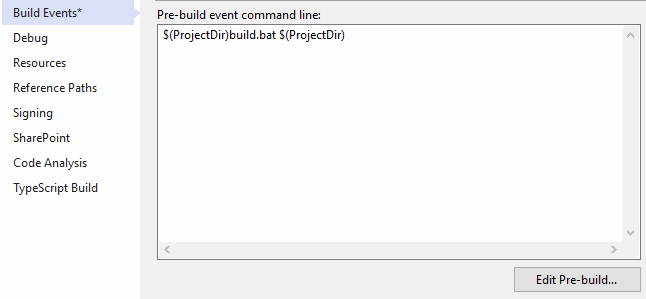
You may have noticed the ‘CD %~1’ line in the build.bat file contents above, and also the $(ProjectDir) references in the build event command line in the screen-shot. Well, The latter in the pre-build event command passes the code project’s root folder into the batch file and the %~1 is accessing that command line parameter and using it to change to the project’s root directory before executing any other commands.
That’s it… your TypeScript code should now compile to JS whenever you build the code project in Visual Studio. Simple, huh?!
Compiling to JS as Part of a Pipeline
The more common approach developers take when compiling TypeScript is to use a build pipeline tool like ‘gulp’ or ‘webpack’.
Above we described an approach to compile in Visual Studio, but what if you aren’t using Visual Studio or want to implement a more complicated build pipeline where you have multiple build targets, want to minify/uglify the output before production deployment, etc?!
JS Build Pipelines – Gulp Based
Here, we’ll use gulp to build our TypeScript into JS ‘debug’ files and then minify it afterwards for production use. Before going any further we need to install gulp. Open a (developer) command prompt, navigate to the root of your project directory and run the following:
npm install --save-dev del typescript gulp gulp-typescript gulp-concat gulp-uglify
npm install react react-domCode language: plaintext (plaintext)
Aside: something to quickly mention at this point is that, at the time of authoring, gulp-uglify only supports up to ECMAScript 5 (ES5). As such, you’ll need to make sure your tsconfig.json file is targeting compilation to this version if you are minifying using this approach.
Once gulp and the other supporting modules have finishing installing, we need to create a gulpfile.js file for the project. This tells gulp what actions to take to compile our project code. (We are assuming that we’ve already created and configured a tsconfig.json file for the project at this point.)
For more information about gulp, look here. A simple gulp configuration file (gulpfile.js) might look something like this:
var gulp = require("gulp");
var del = require('del');
var concat = require('gulp-concat');
var ts = require("gulp-typescript");
var minifyJS = require('gulp-uglify');
var project = ts.createProject("tsconfig.json");

gulp.task('bundleJs', function () {
  del('./dist/App.debug.js');
  del('./dist/App.min.js');
  return project.src().pipe(
    project()
  ).js.pipe(
    gulp.dest('./dist')
  ).pipe(
    concat('App.min.js')
  ).pipe(
    minifyJS({ output: { comments: 'Copyright' }}).on('error', console.error)
  ).pipe(
    gulp.dest('./dist')
  );
});Code language: JavaScript (javascript)
Above we’ve created the ‘default’ gulp task that is executed if you don’t specify a task name at the command line. This task initially deletes the existing output files (app.debug.js and app.min.js) if they exist, and then goes about compiling the the TypeScript into JS, minifying it, and then writing the output to the project’s ‘dist’ sub-folder.
In case you were wondering about the configuration relating to comments and ‘Copyright’, this simply asks the minify code to retain only important comments containing the word Copyright. For example:
/*!
 * Copyright MyCompany 2018. All Rights Reserved.
 * TO DO: Add full copyright notice and acceptable terms of use.
 */Code language: JavaScript (javascript)
The above copyright notice would be preserved in the JS files, but both the following alternatives would not (i.e. they would all be discarded):
/*!
 * An important comment that would still be discarded.
 */
/*
 * A less important comment that would be discarded.
 */
// Another less important comment that would be discardedCode language: JavaScript (javascript)
The above NPM ‘install’ commands that were executed should’ve created a new package.json file in the project root, if one wasn’t already present (in which case it would simply have been modified).
We can now just simply create a batch file for our build process, like this:
IF NOT "%1"=="" (CD "%1")

@echo Compiling TypeScript files...
call tsc --project tsconfig.json
@echo Done!

@echo Bundling and minifying JS
call gulp bundleJs
@echo Done!

@echo Complete!

pauseCode language: PHP (php)
JS Build Pipelines – Webpack Based
An alternative to Gulp that is becoming the industry favourite is webpack. Here, we’ll use webpack to build our TypeScript into JS ‘debug’ files and then minify it afterwards for production use.
To get started, we need to install webpack and other dependencies. Open a (developer) command prompt, navigate to the root of your project directory and run the following:
npm install --save-dev typescript @types/react @types/react-dom ts-loader css-loader style-loader webpack webpack-cli
npm install react react-domCode language: plaintext (plaintext)
This should’ve created or update a package.json file at the project root. It will hopefully look something like this (but the name, description, etc. might be different):
{
  "name": "theOneStore",
  "version": "1.0.0",
  "description": "A shop front web app that has everything.",
  "main": "index.js",
  "scripts": {
    "test": "echo \"Error: no test specified\" && exit 1",
    "build": "webpack --config webpack.config.js"
  },
  "author": "",
  "license": "ISC",
  "dependencies": {
    "react": "^16.5.2",
    "react-dom": "^16.5.2"
  },
  "devDependencies": {
    "@types/react": "^16.5.2",
    "@types/react-dom": "^16.5.2",
    "css-loader": "^1.0.0",
    "style-loader": "^0.23.0",
    "ts-loader": "^5.1.1",
    "typescript": "^3.0.3",
    "webpack": "^4.19.0",
    "webpack-cli": "^3.1.0"
  }
}Code language: JSON / JSON with Comments (json)
Create a webpack configuration file. This is a JS file that specifies the webpack settings that should be used. Here is an example file (webpack.config.js):
'use strict';

module.exports = {
    mode: 'development',
    watch: true,
    entry: './src/index.tsx',
    devtool: 'source-map',
    resolve: {
        extensions: ['.ts', '.tsx', '.js', '.css']
    },
    module: {
        rules: [
            {
                test: /\.tsx?$/i,
                use: 'ts-loader',
                exclude: /node_modules/
            },
            {
                test: /\.css?$/i,
                use: ['style-loader', 'css-loader']
            }
        ]
    },
    plugins: [
        {
            apply: (compiler) => {
                // Add a compiler hook to stop the webpack process running
                // indefinitely and stopping VS project build completing.
                compiler.hooks.done.tap('TerminateSessionPlugin', (stats) => {
                    setTimeout(() => {
                        process.exit(0)
                    });
                });
            }
        }
    ]
};Code language: JavaScript (javascript)
The above webpack config file configures webpack to look, within the current directory sub-tree, for all TypeScript (.ts) and TypeScript with JSX (.tsx) files and use ts-loader to compile them. It also instructs webpack to look for all CSS (.css) files and use style-loader (or css-loader) to compile them. Any JS (.js) files that are found will also be included.
(The plugins section is simply there to allow the webpack compilation to be called from a batch file without hanging the execution process – as webpack wouldn’t close otherwise, so the batch file would hang the session indefinitely.)
You may have noticed that we had a ‘build’ command in the scripts section of the package.json. This can be run to execute the build pipeline process, like this:
npm run buildCode language: plaintext (plaintext)The above command should run the webpack compilation process, outputting compiled do to the /dist folder.
TypeScript and JSX
One last thing worth mentioning is working with JSX. You can develop solutions using TypeScript with JSX style constructs by creating a source code file with a .tsx (instead of .ts) extension. This allows you to develop ReactJS projects in TypeScript with ease. The compiler options need to be configured to support it as well though, for example a revised tsconfig.json file might look like this (note the ‘jsx’ property, and addition of .tsx files):
{
  "compilerOptions": {
    "noImplicitAny": true,
    "noEmitOnError": true,
    "removeComments": true,
    "sourceMap": true,
    "target": "es5",
    "module": "none",
    "jsx": "react",
    "outFile": "App.debug.js"
  },
  "exclude": [
    "node_modules",
    "wwwroot"
  ],
  "files": [
    "src/*.ts",
    "src/*/*.ts",
    "src/*.tsx",
    "src/*/*.tsx"
  ]
}Code language: JSON / JSON with Comments (json)