
React JS is one of the latest in a long line of JavaScript Frameworks that are flooding the web development arena. It’s got a lot going for it, so let’s see what makes it worth learning yet another JavaScript framework for!
In this article:
- Preamble
- Overview of ReactJS
- Getting Ready to Use ReactJS
- Understanding the ReactJS Lifecycle
- JavaScript and XML (JSX)
- Getting to Grips with ReactJS
Preamble
Learning web programming languages and APIs is often a fleeting endeavour. In the beginning it was just text. Then came static HTML web pages that made the content more interesting and included graphics and other media assets. Next, client-side and server-side scripting (JavaScript, CGI, JSP, ASP, ASP.NET, etc.) was introduced to make websites more interactive. The latest trend in web development is re-usable JavaScript APIs, and ReactJS is one of them.
Right now you might be saying, “Why learn React when I already know jQuery and AngularJS?”. Good point, but the opening argument is that it was developed by Facebook to make their sites more interactive and a close second is that it is based on a solid design pattern – MVC. Another argument in favour of React is its novel approach to data management and display of views. For a start, it holds a lightweight description of what the DOM should look like when components are rendered – but this isn’t the full HTML representation, it has a smaller footprint.
Any time data changes, the affected views are re-rendered and the previous and current views are compared. Only changes that have occurred between renders are injected into the DOM. This provides a very dynamic and responsive web experience.
Overview of ReactJS
React has been developed around the concept of component-driven architectures. This paradigm promotes the development and use of hierarchical sets of encapsulated components that can be used and re-used to create complex, dynamic websites.
The focused capability that components should provide is often referred to as the ‘Single Responsibility Principle’, and that promotes keeping things simple and developing a formal hierarchy of components rather than a few very complex ones. For example, a low level component might display a single piece of data, its immediate parent might represent a collection or row of related data artefacts and the next parent up could be a table of rows. You can see how this would scale up/down.
Each component is defined as a React ‘class’. Normally, HTML tag names are lower case but React classes are defined in Pascal case (upper-camel-case.) Components can be defined fully in JavaScript, but React also provides a complementary aspect to development of its components – via JSX.
JSX is an XML pre-processor allowing HTML style markup within the JavaScript definitions to make them easier to read (its actually XML conforming to a published, currently draft, specification.) JSX can be defined inline for development purposes in HTML markup files (by adding the Babel JS browser API), which interprets JSX and converts it on the fly to equivalent JavaScript. Alternatively, JavaScript with XML (JSX) can be written in a separate .jsx file that is referenced in the HTML file header – but this will require a development web server to be running so that the output can be rendered properly during development. In either case, you’d expect to compile any JSX to raw JavaScript before deploying in a production environment due to the performance overhead associated with any on-the-fly transforms.
Getting Ready to Use ReactJS
Quick Start
If all you are trying to do is learn to code in ReactJS, the easiest way to get started (initially, at least) is to download the starter kit from React’s GIT project website, here.
The starter kit includes all the core JavaScript files for React itself, and also a good range of examples to help you understand how to use the API. In order to use JSX syntax (described further on in this article), you’ll need BabelJS – a JavaScript compiler project that can be used to handle pre-processing of the XML in the JSX file(s). The easiest way to link to BabelJS for development purposes is via a content delivery network, by adding a line to the header region of your HTML page:
<html>
<head>
    <script src='https://cdnjs.cloudflare.com/ajax/libs/babel-core/5.8.24/browser.min.js'></script>
</head>
</html>Code language: HTML, XML (xml)
Alternatively, you could download the JS file by pasting the src URL into a browser. Removing the ‘.min’ from the JavaScript filename will cause the web page to link to the non-minified version of the Babel JS file, which can be useful when you are debugging.
NOTE: At the time of authoring, the current version of the babel ‘browser’ (6.15.0) appears to be a bit broken, so it may be a good idea to link to a known working version like 5.8.24. You can always upgrade to the latest version when you’re ready to use ReactJS for production projects.
Now you’ve downloaded the starter kit, lets get going – unzip it to a folder. The starter kit is arranged with ‘build’ and ‘examples’ folders. The build folder contains all the ReactJS API JavaScript files and guess what the examples folder contains!
Navigate into the examples/basic folder, and then open the index.html file in a web browser. The example provides a dynamic view that is updated to show how long it has been since the page loaded. It uses a JavaScript callback function that runs on a timer basis.
Hint: not working for you? You might need to enable script execution for the page (e.g. via a button on the IE banner that gets displayed at the bottom of the browser window.)
If you view the raw HTML in the index.html file, you can see there isn’t much ‘code’ to producing such behaviour. Notice in this example that there isn’t any reference to BabelJS. This is significant, since you don’t need Babel for ReactJS to work – you only need the Babel script reference for on-the-fly JSX transforms while you are developing.
If you now open the examples/basic-jsx folder and view index.html in a web browser, you’ll notice the page is almost identical (save for minor changes in the example description.) A key difference you may observe here (depending on the speed of your Internet connection) is that the ‘If you can see this React is not working right’ message may be displayed while BabelJS loads. Once it pre-processes the JSX the view should be updated as expected.
Once again, if you view the raw HTML in the index.html file you should see that there isn’t much to the ‘code’ required to produce this dynamic behaviour. You may also notice that this time the BabelJS file is referenced in the body of the HTML.
Let’s try our own simple dynamic page that displays the current date and time to per-second resolution.
<html lang='en'>
<head>
    <title>My First React Example</title>
    <script src='js/react-15.3.2/build/react-with-addons.js'></script>
    <script src='js/react-15.3.2/build/react-dom.js'></script>
    <script src='js/babel-core-5.8.24/browser.min.js'></script>
    <script src='js/jquery/jquery-3.1.0.js'></script>
</head>
<body>
    <div id='content'>If you are viewing this: ReactJS failed to display CurrentTime!</div>
    <script type='text/babel'>
        var CurrentTime = React.createClass({
            setTime: function() {
                this.setState({date: new Date()});
            },
            componentWillMount: function(){
                this.setTime();
            },
            componentDidMount: function() {
                window.setInterval(function() {
                    this.setTime();
                }.bind(this), 250);
            },
            render: function() {
                return (
                    <div>
                        The current time is: {this.state.date.toLocaleString()}
                    </div>
                );
            }
        });

        $('content').ready(function() {
            ReactDOM.render(
                <CurrentTime />,
                document.getElementById('content')
            );
        });
    </script>
</body>
</html>Code language: HTML, XML (xml)
That’s all there is to it… we’ve now created a ReactJS component that is bound to date/time updates that occur every 250ms and trigger the component to re-render, drawing the updated date and time.
Setting Up Your Full Development Environment
Work in Progress
This isn’t required to get you started with ReactJS, only to make it useful in a production development environment. That being the case, I’ve concentrated on introducing ReactJS itself initially and will back-fill with additional information when I have time.
Typically, you would use a build pipeline tool, like Gulp or Webpack to compile and bundle your JSX.
Understanding the ReactJS Lifecycle
To really get to grips with ReactJS, we need to understand what happens, when, and why. First of all, here is a graphical representation of the React component lifecycle.
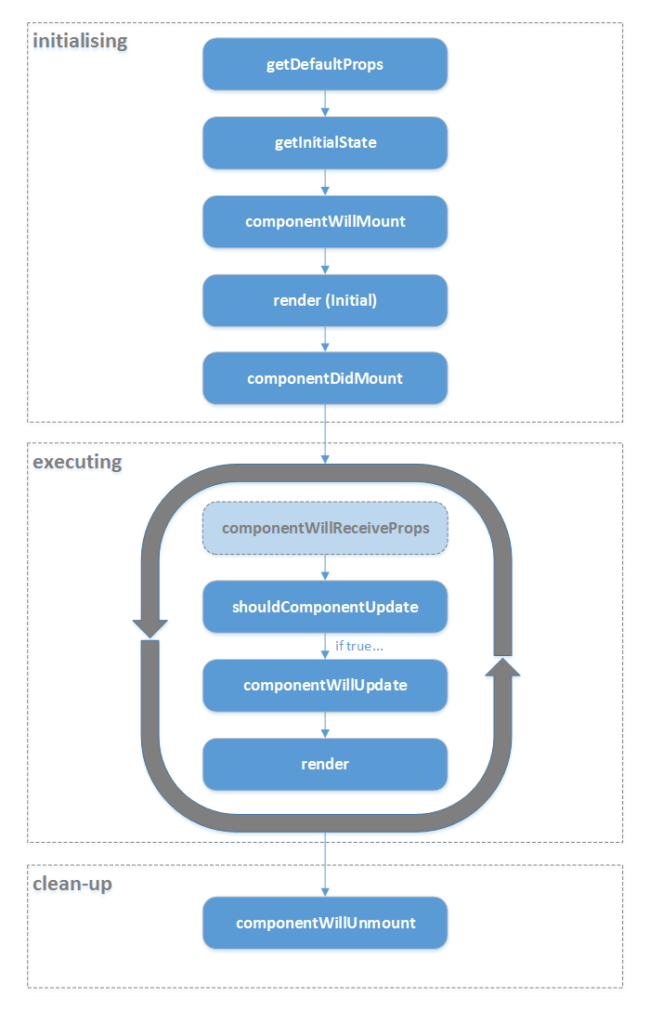
As you’ll note there are a series of events that are triggered by specific actions. There’s an initialisation stage, a repeating construct while the component is ‘executing’, and then a clean-up stage while the component is being unloaded. The physical lifetime of components can vary greatly – some components will be short-lived and others will continue to execute for longer (or indefinitely while the page is loaded in the web browser.)
Another point to note is that ReactJS can run client side (i.e. on the user agent) or server-side (like ASP.NET, PHP, etc.) We are concentrating on client side behaviour here but the same principles apply to the server.
Stages/Events:
- getDefaultProps – occurs when the component is created, giving the developer an opportunity to initialise default property values.
- getInitialState – occurs when the component has been created but before it is mounted in the DOM, giving the developer an opportunity to initialise the component’s default state.
- componentWillMount – occurs just before the component is going to be rendered for the first time, allowing context-based updates before the component is displayed.
- render (initial) – occurs just before the component is going to be mounted in the DOM. The initial render differs from other renders in the lifecycle as it establishes a base-view from which future renders will be analysed.
- componentDidMount – occurs just after the component was mounted in the DOM. Now the component is considered to be ‘executing’ and the main part of the lifecycle is running.
- componentWillReceiveProps – occurs when a component is going to be updated, indicating that there are changes to the component’s properties. This is an optional event and may not occur in all execution loop iterations.
- shouldComponentUpdate – occurs just before the component is updated, giving the developer an opportunity to evaluate the component’s properties and current state to determine what behaviour to exhibit. There is an opportunity to suppress the update at this point. If the update is suppressed, the component will wait for another event and not process the remaining steps in the current iteration.
- componentWillUpdate – occurs just before the component is updated, giving the developer an opportunity to prepare the component for rendering (if preceding steps are required.)
- render – re-renders the component in light of changes. The differences between the current render and the new one will be analysed, and only those differences will be pushed out to the DOM. This has the benefit over redrawing the entire component in the DOM in that only those aspects of the component view that are affected need to be updated. If nothing has changed due to the latest render, then the DOM doesn’t need to be updated! The new render then becomes the base-view from which changes to a new render will be evaluated next time.
- componentWillUnmount – occurs when the component is about to be unmounted from the DOM as it is being disposed of, giving the developer an opportunity to release any resources that may have been consumed by the component. This is an important step in the process as any resources that aren’t released may lead to memory leaks over time as components are initialised, consume resource, and then disposed of. This could be a particular concern when ReactJS is being used as the front-end for a mobile device application, etc. since the application lifecycle could be long-lived with components being created regularly.
The HTML markup below is a standalone ReactJS solution that writes messages to the web page when lifecycle event functions are called.
<!DOCTYPE html>
<html lang='en'>
<head>
<meta http-equiv='expires' content='0'>
<title>ReactJS - Lifecycle in Action!</title>
<script src='https://cdnjs.cloudflare.com/ajax/libs/react/15.3.2/react-with-addons.min.js'></script>
<script src='https://cdnjs.cloudflare.com/ajax/libs/react/15.3.2/react-dom.min.js'></script>
<script src='https://cdnjs.cloudflare.com/ajax/libs/babel-core/5.8.24/browser.min.js'></script>
<script src='http://ajax.googleapis.com/ajax/libs/jquery/3.1.0/jquery.min.js'></script>
<!--<script src='js/react-15.3.2/build/react-with-addons.js'></script>
<script src='js/react-15.3.2/build/react-dom.js'></script>
<script src='js/babel-core-5.8.24/browser.min.js'></script>
<script src='js/jquery/jquery-3.1.0.js'></script>-->
</head>
<body>
<script type='text/javascript'>
/* string.pad() extension function to pad out date info. */
if (typeof String.prototype.pad !== 'function') {
String.prototype.pad = function(paddingChar, totalLength, padLeft) {
if (typeof paddingChar === 'undefined' || totalLength <= this.length) {
return this;
}
var padding = Array(totalLength).join(paddingChar);
if (typeof padLeft === 'undefined' || padLeft) {
return (padding + this).slice(-totalLength);
} else {
return (paddingFormat + this).substring(0, totalLength);
}
}
}
/* Date.format() extension function to allow easy date/time formatting.
Follows C#.NET format conventions (rather than jQuery.) */
if (typeof Date.prototype.format !== 'function') {
Date.prototype.format = function(format) {
var day = ['Sunday','Monday','Tuesday','Wednesday','Thursday','Friday','Saturday'];
var month = ['January','February','March','April','May','June','July','August','September','October','November','December'];
var dayOfMonth = this.getDate().toString();
var monthIndex = this.getMonth();
var year = this.getFullYear().toString();
var shortYear = this.getFullYear().toString().substring(0,2);
var hours = this.getHours().toString();
var amPmHours = (this.getHours() > 12 ? this.getHours() - 12 : this.getHours()).toString();
var minutes = this.getMinutes().toString();
var seconds = this.getSeconds().toString();
var amPm = this.getHours() > 12 ? 'PM' : 'AM';
return format
.replace(/HH/g, hours.pad('0', 2, true)).replace(/H/g, hours)
.replace(/hh/g, amPmHours.pad('0', 2, true)).replace(/h/g, amPmHours)
.replace(/mm/g, minutes.pad('0', 2, true)).replace(/m/g, minutes)
.replace(/ss/g, seconds.pad('0', 2, true)).replace(/s/g, seconds)
.replace(/dddd/g, day[this.getDay()]).replace(/ddd/g, day[this.getDay()].substring(0,3))
.replace(/dd/g, dayOfMonth.toString().pad('0', 2, true)).replace(/d/g, dayOfMonth)
.replace(/yyyy/g, year).replace(/yy/g, shortYear)
.replace(/tt/g, amPm).replace(/t/g, amPm.substring(0, 1))
.replace(/MMMM/g, month[monthIndex]).replace(/MMM/g, month[monthIndex].substring(0,3))
.replace(/MM/g, (monthIndex + 1).toString().pad('0', 2, true)).replace(/M/g, monthIndex + 1);
}
}
</script>
<div id=content-div>
If you are seeing this: React failed to render the current time.
</div>
<hr />
<div id=messages-div></div>
<script type='text/babel'>
var DateFormat = React.createClass({
getDefaultProps: function() {
var messages = document.getElementById('messages-div');
messages.innerHTML =
messages.innerHTML + 'DateFormat.getDefaultProps<br />';
return { };
},
getInitialState: function() {
var messages = document.getElementById('messages-div');
messages.innerHTML =
messages.innerHTML + 'DateFormat.getInitialState<br />';
return { format: 'dd MMM yyyy HH:mm:ss' };
},
componentWillMount: function(){
var messages = document.getElementById('messages-div');
messages.innerHTML =
messages.innerHTML + 'DateFormat.componentWillMount<br />';
},
componentDidMount: function() {
var messages = document.getElementById('messages-div');
messages.innerHTML =
messages.innerHTML + 'DateFormat.componentDidMount<br />';
},
handleChanges: function(event) {
this.state.format = event.currentTarget.value;
this.props.onChange(event);
},
render: function() {
var messages = document.getElementById('messages-div');
messages.innerHTML = messages.innerHTML + 'DateFormat.RENDER<br />';
if (true) { //if (this.props.show) {
return (
<span>
Date Format:
<input type='text'
value={this.state.format}
onChange={this.handleChanges}
style={{ width: 200}} />
<br />
</span>
);
} else {
return null;
}
},
componentWillReceiveProps: function(nextProps) {
var messages = document.getElementById('messages-div');
messages.innerHTML =
messages.innerHTML + 'DateFormat.componentWillReceiveProps<br />';
},
shouldComponentUpdate: function(nextProps, nextState) {
var messages = document.getElementById('messages-div');
messages.innerHTML =
messages.innerHTML + 'DateFormat.shouldComponentUpdate<br />';
return true;
},
componentWillUpdate: function(nextProps, nextState) {
var messages = document.getElementById('messages-div');
messages.innerHTML =
messages.innerHTML + 'DateFormat.componentWillUpdate<br />';
},
componentDidUpdate: function(prevProps, prevState) {
var messages = document.getElementById('messages-div');
messages.innerHTML =
messages.innerHTML + 'DateFormat.componentDidUpdate<br />';
},
componentWillUnmount: function() {
var messages = document.getElementById('messages-div');
messages.innerHTML =
messages.innerHTML + 'DateFormat.componentWillUnmount<br />';
}
});
var TimeDisplay = React.createClass({
setTime: function() {
this.setState({ date: new Date() });
},
startTimer: function() {
var timerId = window.setInterval(function() {
this.setTime();
}.bind(this), 1000);
this.setState({ timerId: timerId });
},
getDefaultProps: function() {
var messages = document.getElementById('messages-div');
messages.innerHTML =
messages.innerHTML + 'TimeDisplay.getDefaultProps<br />';
return { };
},
getInitialState: function() {
var messages = document.getElementById('messages-div');
messages.innerHTML =
messages.innerHTML + 'TimeDisplay.getInitialState<br />';
return { date: new Date() };
},
componentWillMount: function(){
var messages = document.getElementById('messages-div');
messages.innerHTML =
messages.innerHTML + 'TimeDisplay.componentWillMount<br />';
this.setTime();
},
componentDidMount: function() {
var messages = document.getElementById('messages-div');
messages.innerHTML =
messages.innerHTML + 'TimeDisplay.componentDidMount<br />';
this.startTimer();
},
handleClick: function(event) {
if (event.currentTarget.innerHTML === 'STOP') {
window.clearInterval(this.state.timerId);
event.currentTarget.innerHTML = 'RESTART';
} else if (event.currentTarget.innerHTML === 'RESTART') {
event.currentTarget.innerHTML = 'STOP';
this.startTimer();
}
},
render: function() {
var messages = document.getElementById('messages-div');
messages.innerHTML = messages.innerHTML + 'TimeDisplay.RENDER<br />';
return (
<span>
The current time is: {this.state.date.format(this.props.format)}&amp;nbsp;<button type='button' onClick={this.handleClick}>STOP</button>
</span>
);
},
componentWillReceiveProps: function(nextProps) {
var messages = document.getElementById('messages-div');
messages.innerHTML =
messages.innerHTML + 'TimeDisplay.componentWillReceiveProps<br />';
},
shouldComponentUpdate: function(nextProps, nextState) {
var messages = document.getElementById('messages-div');
messages.innerHTML =
messages.innerHTML + 'TimeDisplay.shouldComponentUpdate<br />';
return true;
},
componentWillUpdate: function(nextProps, nextState) {
var messages = document.getElementById('messages-div');
messages.innerHTML =
messages.innerHTML + 'TimeDisplay.componentWillUpdate<br />';
},
componentDidUpdate: function(prevProps, prevState) {
var messages = document.getElementById('messages-div');
messages.innerHTML =
messages.innerHTML + 'TimeDisplay.componentDidUpdate<br />';
},
componentWillUnmount: function() {
var messages = document.getElementById('messages-div');
messages.innerHTML =
messages.innerHTML + 'TimeDisplay.componentWillUnmount<br />';
}
});
var ShowTime = React.createClass({
getDefaultProps: function() {
var messages = document.getElementById('messages-div');
messages.innerHTML =
messages.innerHTML + 'ShowTime.getDefaultProps<br />';
return ({ showFormat: false });
},
getInitialState: function() {
var messages = document.getElementById('messages-div');
messages.innerHTML =
messages.innerHTML + 'ShowTime.getInitialState<br />';
return { format: 'dd MMM yyyy HH:mm:ss' };
},
componentWillMount: function(){
var messages = document.getElementById('messages-div');
messages.innerHTML =
messages.innerHTML + 'ShowTime.componentWillMount<br />';
},
componentDidMount: function() {
var messages = document.getElementById('messages-div');
messages.innerHTML =
messages.innerHTML + 'ShowTime.componentDidMount<br />';
},
handleChanges: function(event) {
this.setState({ format: event.currentTarget.value });
},
render: function() {
var messages = document.getElementById('messages-div');
messages.innerHTML = messages.innerHTML + 'ShowTime.RENDER<br />';
return (
<div>
<DateFormat show={this.props.showFormat}
onChange={this.handleChanges} />
<TimeDisplay format={this.state.format} />
</div>
);
},
componentWillReceiveProps: function(nextProps) {
var messages = document.getElementById('messages-div');
messages.innerHTML =
messages.innerHTML + 'ShowTime.componentWillReceiveProps<br />';
},
shouldComponentUpdate: function(nextProps, nextState) {
var messages = document.getElementById('messages-div');
messages.innerHTML =
messages.innerHTML + 'ShowTime.shouldComponentUpdate<br />';
return true;
},
componentWillUpdate: function(nextProps, nextState) {
var messages = document.getElementById('messages-div');
messages.innerHTML =
messages.innerHTML + 'ShowTime.componentWillUpdate<br />';
},
componentDidUpdate: function(prevProps, prevState) {
var messages = document.getElementById('messages-div');
messages.innerHTML =
messages.innerHTML + 'ShowTime.componentDidUpdate<br />';
},
componentWillUnmount: function() {
var messages = document.getElementById('messages-div');
messages.innerHTML =
messages.innerHTML + 'ShowTime.componentWillUnmount<br />';
}
});
// It's ShowTime!!!!!
try {
ReactDOM.render(
React.createElement(ShowTime, { showformat: true }),
document.getElementById('content-div'));
} catch (e) {
alert('CurrentTime - something failed!');
}
</script>
</body>
</html>Code language: JavaScript (javascript)If you view the above HTML in a web browser (enabling script execution, if prompted), then you should observe that the time display updates every second and the page quickly fills with ‘event’ messages. You can hit STOP to halt proceedings so you can read through the messages without triggering any more.
At the top of the list of messages, you should notice the initialisation events are displayed. What you may also notice is that they are a bit muddled – all the getDefaultProps messages appear one after another, but the getInitialState, componentWillMount and render actions of the various components appear to be out of order. This is because parent components only trigger these in their children when they are rendered (in the parent’s render action.)
Also notice that it is only the TimeDisplay that is periodically writing updates. The reason for this is that our timer (setInterval() { … }) is updating the date property of the TimeDisplay component’s state every second. This triggers shouldComponentUpdate, componentWillUpdate and render actions only on TimeDisplay each time, because state is maintained internally in a component.
Now, refresh the browser to kick off a fresh run (and clear the existing messages.) Try changing the date format by removing the ‘:ss’ from the end. Notice that the time display updates, hiding the seconds aspect. Hit STOP again.
Read through the ‘event’ messages again. This time you should come across DateFormat.componentWillReceiveProps. It wasn’t there in the previous case, since there was nothing there to trigger it. You need to go up a few messages to get to the start of the sub-set that were triggered by the date format change. The reason for this is because changing the date format has triggered an event on the parent component (ShowTime) and this has then fed back down into its child components. The full set of actions would be:
ShowTime.shouldComponentUpdate
ShowTime.componentWillUpdate
ShowTime.RENDER

DateFormat.componentWillReceiveProps
DateFormat.shouldComponentUpdate
DateFormat.componentWillUpdate
DateFormat.RENDER

TimeDisplay.componentWillReceiveProps
TimeDisplay.shouldComponentUpdate
TimeDisplay.componentWillUpdate
TimeDisplay.RENDER

DateFormat.componentDidUpdate
TimeDisplay.componentDidUpdate
ShowTime.componentDidUpdateCode language: plaintext (plaintext)
What has happened is that our DateFormat component has detected a change of state (date format) and raised an event to the parent ShowTime component. ShowTime has then re-rendered in light of the data changes, and this has in turn caused both DateFormat and TimeDisplay child components to need to be re-rendered. The child components are passed the updated date format via their component propertiess (via this.props), and that’s why the componentWillReceiveProps action is logged for each child.
Once this behaviour completes, the TimeDisplay component goes back to updating every second (until STOP is clicked), which is why the remaining messages are all from that component.
To date, there has been no mention of the componentWillUnmount event. This is because our components are still executing. If you author a component that has a distinct lifetime within the page, then it is a good idea to clean up any resources it uses when it is being unmounted – otherwise memory leaks could be introduced. This is especially important if you are developing a Web application that will be a standalone app (e.g. a wrapped Web app for a mobile device), because it is likely to be long running and may consume more and more resources over time if they are not properly released.
JavaScript and XML (JSX)
If you properly read through the example code in the lifecycle section above, then you may have thought “Woah! What is this HTML embedded in the JavaScript code?” (in the render functions.) Well, as previously mentioned, its not HTML for a start – its XML – and its referred to as JSX.
Although ReactJS solutions are largely developed in raw JavaScript, you can use JSX too. In order to process JSX you need a JSX/XML pre-processor. This is why we linked to Babel’s browser.min.js file in our examples – it provides the XML pre-processing that converts our nice readable XML syntax into equivalent JavaScript on-the-fly. NOTE: while its fine to use Babel in this way for development purposes, it has a significant performance overhead that should not be transferred to a production deployment. Instead, JSX should be pre-compiled into native JavaScript before solutions are deployed.
JSX has the benefit of making the ‘code’ for views in React components more readable, and easier to understand. For example:
// This...
ReactDOM.render(
    <div className='container'>
        <h3>Some Title</h3>
        <p>Some content</p>
    </div>,
    document.getElementById('placeholder')
);

// is equivalent to this...
var title = React.createElement('h3', null, 'Some Title');
var content = React.createElement('p', null, 'Some content');
var root = React.createElement('div', { className: 'container' }, { title, content });
ReactDOM.render(root, document.getElementById('placeholder'));Code language: JavaScript (javascript)
Although the complexity of the two alternative forms isn’t that different, the first one that uses XML (JSX) is much easier to read and understand. Even in this simple case, the root element appears last in the programmatic version – making it harder to visualise the layout. Something to note is that the XML version specifies className instead of just class (unlike HTML), and this is the case because class is a reversed keyword in JavaScript. For more information on the acceptable syntax for JSX, see the (draft) specification, here.
Getting to Grips with ReactJS
Components and Data
Data is passed into a component via a ‘properties’ variable (this.props). Properties are immutable – they are used once when the component is rendered.
The ‘state’ variable (this.state) is how we make React components responsive. State is contained within the component, and it can be updated using this.setState() (e.g. this.setState({ data: newData }).)
Consider the example below, where several components have been defined to represent the display of a customer order.
var OrderEntryRow = React.createClass({
    render: function() {
        return (
            <tr>
                <td>{this.props.name}</td>
                <td>{this.props.price}</td>
                <td>{this.props.quantity}</td>
                <td>{this.props.price * this.props.quantity}</td>
            </tr>
        );
    }
});

var OrderDetailsTable = React.createClass({
    getInitialState: function() {
        return {data: []};
    },
    componentDidMount: function() {
        $.ajax({
            url: this.props.url,
            dataType: 'json',
            cache: false,
            success: function() { this.setState({ data: data }); }.bind(this),
            error: function(xhr, status, err) { alert('Failed to get order details'); }
        });
    },
    render: function() {
        var finalTotal = 0.0;
        var rows = [];
        this.props.order.details.forEach(function(entry) {
            finalTotal += entry.UnitPrice * entry.Quantity;
            rows.push(
                <OrderEntryRow name={entry.Product}
                    price={entry.UnitPrice}
                    quantity={entry.Quantity} />
            );
        });
        return (
            <table>
                <thead>
                    <tr>
                        <th>Product</th>
                        <th>Unit Price</th>
                        <th>Quantity</th>
                        <th>Sub-Total</th>
                    </tr>
                </thead>
                <tbody>
                    {rows}
                </tbody>
            </table>
            <hr>
            <strong>Order Total: {finalTotal}</strong>
        );
    }
});Code language: JavaScript (javascript)
Here, we’ve got a component representing a row of data (OrderEntryRow) as a child to the full order details view (OrderDetailsTable). The details for a single item being ordered is passed into the OrderEntryRow component via its properties (this.props), so it can render its content. The table component expects a full order summary via its properties, and needs to produce an order item row for each entry in the provided data. Notice that the OrderDetailsTable render function defines ‘rows’ as an array of JSX declarations and then passes that variable into the table body where it will be interpreted/translated.
Compiling ReactJS for Deployment
Work in progress
This isn’t required to get you started with ReactJS, only to make it useful in a production development environment. That being the case, I’ve concentrated on introducing ReactJS itself initially and will back-fill with additional information when I have time.
Typically, you would use a build pipeline tool, like Gulp or Webpack to compile and bundle your JSX.