

In this tutorial, we will look at the more fundamental aspects of the C# programming language. We will look at the type system in C#, specifically built in types such as int, bool etc. and we will look at how to create and use variables and constants, along with string, identifiers, expressions and statements.
In this article:
- Types
- Variables and Constants in More Detail
- Statements
- Iteration Statements
- Operators
- Introduction to Visual Studio
Types
C# is a strongly typed language. You must declare the type of each object you are going to create, such as integers, floats, strings etc., and the complier will help you prevent bugs by enforcing that only data of the right type is assigned to those objects.
C# divides types into two sets:
- Intrinsic, built-in, types that the language offers.
- User defined types, that you, the programmer specify.
These can then be split into two categories, value types and reference types.
NOTE: All the intrinsic types other than Object and String are value types, and all user-defined types are reference types, other than structs and enumerated types.
The principal difference between value and reference types is the way they are handled in memory. A value type holds its actual value in memory on the stack. The stack is a data structure used to store items on a last in, first out basis. The stack refers to an area of memory supported by the processor.
The address of a reference type is stored on the stack, but the actual object is stored on the heap. The heap is an area of memory used to allocate space for objects. When an object is allocated on the heap, the address is returned, and that address is assigned to a reference on the stack. There are both advantages and disadvantages of storing objects on the heap, covered in a later chapter.
Objects on the stack are destroyed when they go out of scope.
Typically, a stack frame is defined by a function. Thus, when you declare a variable within a function it is only reserved memory on the stack until execution returns from that function. Conversely, when the reference to an object on the heap is destroyed in the stack, the memory reserved on the heap may not be released (or ‘garbage-collected’ as it is commonly known) until sometime later.
You define variables and constants of a particular type in code to store data of that type.
A variable is a storage location in memory associated with a data type. The value stored by the variable can be updated programmatically by the code.
A constant is a value that, once declared and initialised, cannot be changed. You usually define constants where you want a value to be fixed for all time.
For example:
const int FreezingPointInCelsius = 0;
const int BoilingPointInCelsius = 100;

int temperature = FreezingPointInCelsius;
bool isBoiling = true;

if (isBoiling)
{
    temperature = BoilingPointInCelsius;
}Code language: C# (cs)
Built-In Types
C# offers a plethora of intrinsic types, each of which is mapped onto an underlying type supported by the Common Language Specification (CLS). Mapping the C# primitive types to .NET types ensures that the objects created in C# can be used interchangeably with objects created in any other language compliant with the CLS. Each type has a specific size in memory. That way, the CLR knows how much memory to allocate for the type. The following table shows the built in primitive types:
| Type | Size (Bytes) | .NET CLS Type | Description |
|---|---|---|---|
| byte | 1 | Byte | An unsigned value in the range 0 to 255. |
| char | 2 | Char | A 16-bit Unicode character. |
| bool | 1 | Boolean | A Boolean value (true or false). |
| sbyte | 1 | SByte | A signed value in the range -128 to 127. |
| short | 2 | Int16 | A signed short-integer value in the range -32,6768 to 32,767. |
| ushort | 2 | UInt16 | An unsigned short-integer value in the range 0 to 54,535. |
| int | 4 | Int32 | A signed interger value in the range -2,147,483,648 to 2,147,483,647. |
| uint | 4 | UInt32 | An unsigned integer in the range 0 to 4,294,967,295. |
| float | 4 | Single | A single precision floating point number. |
| double | 8 | Double | A double precision floating point number. |
| decimal | 16 | Decimal | Fixed precision up to 28 digits and the position of the decimal point. Typically used for financial calculations. |
| long | 8 | Int64 | A signed long integer. |
| ulong | 8 | UInt64 | An unsigned long integer. |
Strings are another built-in type but they are an object type not a primitive so will be dealt with in a later tutorial and largely ignored for now.
Choosing a Built-in Type
Typically, you decide which size integer you wish to use based on the size of the value you want to store. That said, memory is fairly cheap, and programmer time expensive, so most of the time you will probably just declare your variables of type int. 32-bit integers are often faster than smaller data types as modern CPU’s are optimized for dealing with them. Further more, because of padding inserted for alignment; there is often little space to be gained from using smaller data types.
For floating point numbers, there are the three built in data types, offering various levels of precision. The C# compiler assumes that any number literal with a decimal part is a double unless you tell it otherwise. To assign a float instead, follow the number with an F. To assign a decimal, follow the number with an M. The char type represents a Unicode character.
Char literals can be simple characters such as ‘A’. A char can also be described using a concept known as character escaping (these are also commonly also known as ‘escape characters’), which is a special literal token where the first character is a backslash and one or more characters immediately after the backslash define the actual character representation.
Common escape characters are:
| Escape Code | Meaning |
|---|---|
| \’ | Single quote (inverted comma). |
| \” | Speech mark (double-quotes). |
| \\ | Backslash |
| \0 | Null. |
| \a | Alert (aka Bell). |
| \b | Backspace. |
| \f | Form feed. |
| \n | New line. |
| \r | Carriage return. |
| \t | Horizontal tab. |
| \v | Vertical tab. |
| \xNN | ASCII character code, where NN is hexidecimal (e.g. \x5A = ‘Z’). |
| \uNNNN | Unicode character, where NNNN is hexidecimal (e.g. \u005A = ‘Z’). |
Escape characters are used to tell the compiler that what follows takes an alternative interpretation. For example, the speech mark character (“) is used as a delimiter for a string literal. Consider the following line:
string message = "Nancy said "Hello World!" to the crowd.";Code language: C# (cs)If the code formatting in the statement above is working, then you should notice that the speech mark before ‘Hello’ terminates the string and the speech mark after the exclamation mark starts a new string value.
This would lead to a compiler error, but there’s a simple fix and that’s to escape the speech marks:
string message = "Nancy said \"Hello World!\" to the crowd.";Code language: C# (cs)Converting Built-in Types
Objects of one type can be converted into an object of another type (if they are nominally combatible) implicitly or explicitly. Implicit conversions happen automatically by the compiler. These types of conversions are guaranteed not to lose any information. For example, you can implicitly cast from a short (2 bytes) to an int (4 bytes). No matter what value is represented by a short, it is not lost when converting to an int:
short x = 5;
int y = x; // Implicit conversion is fine here.Code language: C# (cs)
If you try to convert the other way, however, you can lose information. If the value stored in the int is larger than 32,767, then the value will be truncated in the conversion, and the compiler will not perform an implicit conversion. Consider the following lines of code:
int y = 500;
short x = y; // This will raise a compiler error (e.g. Cannot implicitly convert type 'int' to 'short'.)Code language: C# (cs)
In this situation, you can use an explicit conversion instead. What an explict conversion tells the compiler is that you know you won’t have a value over the maximum a short-integer can store or that you don’t mind losing the upper 16 bits. You have to use the cast operator to do the conversion:
int y = 500;
short x = (short)y;Code language: C# (cs)
The Convert class can also be used to convert between types and may also work in scenarios where a direct cast fails. For example:
float someNumber = 5618.165F;
decimal converted = Convert.ToDecimal(someNumber);Code language: C# (cs)
If you want to convert from a number represented as a string into a native numeric type then each of them has a Parse method that you can use.
string numberAsText = "8298.1058";
decimal number = decimal.Parse(numberAsText);Code language: C# (cs)
Variables and Constants in More Detail
The C# compiler requires a variable to be initialised before it is used. Consider the following:
int number;
Console.WriteLine("My number = {0}", number);Code language: C# (cs)
The write-line call will result in a compiler error, like “Use of unassigned local variable ‘number’”.
Variables therefore need a definite assignment prior to use, but you don’t need to set the value on the same line as the variable is declared. This is acceptable, and wouldn’t raise a compiler error:
int number;
number = 23;
Console.WriteLine("My number = {0}", number);Code language: C# (cs)
As previously mentioned above, constants are useful when you specifically want to assign a value and not have it change for the lifetime of the application. You might wonder why you would declare a constant instead of using the value itself in code. Specifying static values as constants both improves readability, and also helps removes ‘magic numbers’ and ‘string literals’ (values that might not be easy to interpret when read by another developer).
Consider the following:
// Using literal values may make the code more difficult to interpet and understand.
int temp = 100;
char statusCode = 'W';
temp = 9;               // (typo, should've been 0)
statusCode = 'c';       // (typo, should've been 'C')

// Defining constants helps improve readability, for example:
const int FreezingPoint = 0;
const int BoilingPoint = 100;
const char WorkingStatus = 'W';
const char CompletedStatus = 'C';

int temp = BoilingPoint;
char statusCode = WorkingStatus;
temp = FreezingPoint;
statusCode = CompletedStatus;Code language: C# (cs)
As you can see, using constants makes the code much more readable.
A problem with using ‘magic numbers’ and ‘string literals’ for static values is that it is easy to type the wrong value in code and not notice until you are debugging code issues. In the example above, the temperature (temp) variable is assigned a value of 100 (°C), and the status code variable is assigned a ‘W’ (for ‘working’).
Sometime later the temperature hits freezing and the routine completes, updating the temperature variable to the freezing point (mistyped as 9 instead of 0 in the case of the magic number) and setting the status to completed (again mistyped as a lower case ‘c’ instead of the expected upper case value). Defining all those values as constants ensures they are consistent and correct, and if the values are used in multiple places throughout the code then a typo like 9 instead of 0 can be fixed once where the constant is defined instead of having to read through all code that might be affected.
Statements
In C#, a single program instruction is called a statement. Programs consist of sequences of statements, each ending with a semi-colon (‘;’). The compiler evaluates each statement in order, from the start of the sequence to the end. This would be entirely straight forward and terribly limiting if it were not for branching. C# supports two forms of branching:
- Unconditional Branching
- Conditional Branching
Unconditional Branching
An unconditional branch can be created in one of two ways. The first and most common way is to invoke, or call, a method. Execution stops in the current function and branches to the method that was called. When the method finishes, execution returns to the caller function which then continues.
The second way is to use one of the unconditional branching keywords:
- goto – a jump statement that jumps to a label within the same method and same scope as the jump point. Goto statements are very difficult to read and debug, counterintuitive to normal program flow, and are therefore generally considered bad programming style and to be avoided.
- break – a jump statement that exists a loop or switch statement.
- continue – a jump statement that skips the remaining statements in the current iteration of a loop and moves to the next iteration.
- return – a jump statement that exits the current method, optionally specifying a return value (and if not a void is returned).
- throw – a jump statement that throws a software exception, for use when abnormal behaviour occurs.
Conditional Branching
A conditional statement creates a conditional branch. These are signalled by keywords such as if, else, switch etc. A conditional branch only executes if a condition is evaluated as true.
If Statements
The conditional statement is evaluated in the head of the if statement. If the condition is evaluated as true, the statement, or block of statements (aka the ‘code block’), in the body of the if statement is executed.
If statements may contain alternative flows via the use of the else keyword. If statement blocks are executed from top to bottom using short-circuit evaluation, so the next alternative condition is not evaluated unless the current condition is not asserted.
For example:
if (expression1)
{
    // Program block 1 executes if expression1 evaluates to true.
}
else if (expression2)
{
    // Program block 2 executes if expression1 => false and expression2 => true.
}
else
{
    // Default program block in all other cases.
}Code language: C# (cs)
If statements can be nested inside one another to handle complex scenarios, but the practice of deep nesting is not recommended and should be avoided in favour of other conditional statement types wherever possible.
Let’s try a worked example.
- Open Visual Studio and create a new C# Console Application code project.
- In
Program.cs, define an integer constant calledFreezingPointand assign it a value of 0. - In the
Mainmethod of the file, output a prompt to the user usingConsole.WriteLineasking them to input the current outside temperate in degrees Celsius. - In the
Mainmethod of the file, add aConsole.ReadLine()statement that sets the returned value to a string variable calleduserInput. - Use
int.Parseto convert the user input to a numeric temperature value, assigning the return value from that method call to an integer variable calledcurrentTemperature. - Write a conditional statement as follows (using
Console.WriteLineto output messages):- If the input is less than the freezing, prompt the user with “Warning! Ice on the road!”.
- If the input is exactly 0, prompt the user with “Freezing point! Watch for patches of ice!”.
- If the input is greater than 0 and less than 5 then output “Drive carefully – some risk of ice!”.
- In all other cases, output “Road conditions are good!”.
ASIDE: We haven’t talked much about operators yet, but it is worth noting that the equality operator has 2 equals signs (==) where as the assignment operator has only one (=). For example:
bool isFreezing = currentTemperature == FreezingPoint;Code language: C# (cs)The single equals sign is an assignment, and the double equals is being used to check if the current temperature is equal to the freezing point (of water). If you use the assignment operator for evaluations by mistake you should get a compile-time error that is easy for you to fix by adding the second equals sign.
- Build and run the application.
- Enter a numeric values when prompted, and check the expected message is displayed.
- Re-run the app a few times, trying values that should display the different messages.
- Once you’ve checked numbers work as expected, see what happens when you enter a text value like ‘five’. (You should find your program raises a software exception and terminates, because
int.Parsecannot deal with non-numeric values.)
Switch Statements
A switch statement in C/C++ and C# is more widely called a ‘case’ statement or a ‘select’ statement in other programming languages. The main differences between a switch statement and an if statement is that the switch statement receives an object instead of an expression, and the evaluation of that object is done by the case statements in the body of the switch statement’s code block. A switch statement is declared like this:
switch (expression)
{
    case constant-expression:
        // Do something.
        break;
    case constant-expression2:
        // Do something else.
        break;
    case default:
        // Do another thing in all other cases.
        break;
}Code language: C# (cs)
The conditional expression is put in parentheses after the switch keyword at the head of the switch statement but, unlike the if statement, the expression is not evaluated to a Boolean outcome at this point. Instead, the expression must be an object value such as a numeric or string variable, and each case will evaluate the object value to determine if it meets the criteria of the case expression (which must be a constant expression such as a literal string, literal number, etc.).
If a case is matched, the sub-routine code block associated with the case statement is executed. The last statement in the case‘s code block must be the break statement. This will cause the program flow to exit the switch statement without running any further statements. Consider the following:
using System;
using System.Collections.Generic;
using System.Text;

namespace SwitchStatements
{
    /// <summary>
    /// Represents the different superstores that are available.
    /// </summary>
    enum Superstore
    {
        None = 0,
        Tesco = 1,
        Asda = 2,
        Morrisons = 4,
        Sainsburys = 8
    }

    /// <summary>
    /// Demonstrates the use of the switch statement.
    /// </summary>
    class Program
    {
        /// <summary>
        /// The main program entry point.
        /// </summary>
        static void Main()
        {
            Console.Title = "C# Programming Fundamentals: Switch Statements";

            //Record my choice of store
            Superstore myStore = Superstore.Asda;

            switch (myStore)
            {
                case Superstore.Asda:
                    Console.WriteLine("You choose to shop at Asda.");
                    break;
                case Superstore.Morrisons:
                    Console.WriteLine("You choose to shop at Morrisons.");
                    break;
                case Superstore.Sainsburys:
                case Superstore.Tesco:
                    Console.WriteLine("You choose to shop at Tesco or Sainsburys.");
                    break;
                default:
                    Console.WriteLine("Error! You didn't choose a valid store.");
                    break;
            }
        }
    }
}
Code language: C# (cs)
Set a breakpoint at the start of the Main method and build and run the application using with debugging so you can trace through the program. You can set a breakpoint by clicking to the left of the line where you want to add it (just off the text editor’s page pane).
If you’ve added the breakpoint you should notice a coloured circle (typically red but might be affect by the theme you have chosen). You can remove breakpoints again by clicking on the circle once more, but don’t do that now!
If the code project is in debug mode then hitting F5 runs the program if your Visual Studio IDE is configured with the default C# keyboard settings – and if you aren’t using the default settings then expand the ‘Debug’ option on the main menu and see what the keyboard shortcut is for the ‘Start Debugging’ option. Also check what the step over keyboard shortcut is (F10 for C# settings).
Once you run your app with debugging, it should pause at the breakpoint you set. Press the step over command (or keyboard shortcut) repeatedly and notice how the program flow proceeds. With the myStore variable set to Superstore.Asda the code should step into that case in the switch statement and the others shouldn’t execute.
Experiment, by settings the myStore variable’s value to other options from the Superstore enumerated type. Observe how the program execution changes. Notice that the same message is output for both the Superstore.Sainsburys and the Superstore.Tesco values.
Although we said above that each case must have a break statement, for empty case statements this isn’t true. An empty case can ‘fall-through’ to the next case statement, to save you having to repeat the same code multiple times if you want the same behaviour in multiple cases.
Iteration Statements
C# provides an extensive suite of iteration statement to support looping constructs.
The While Loop
The semantics of the while loop are ‘while this expression is true, do this work’; and the syntax is:
while (expression)
{
    // Do something.
}Code language: C# (cs)
Like the if statement, the while loop statement’s expression is evaluated as a Boolean outcome. Consider the following example:
using System;
using System.Collections.Generic;
using System.Text;

namespace WhileLoop
{
    /// <summary>
    /// An example program to explore the while loop.
    /// </summary>
    class Program
    {
        /// <summary>
        /// Main entry point for the application.
        /// </summary>
        static void Main()
        {
            const int maxCount = 10;
            int count = 1;

            while (count <= maxCount)
            {
                // Print the value of count to the screen.
                Console.WriteLine("count = {0}", count);

                // Postfix count. (This is the same as doing count = count + 1;)
                count++;
            }
        }
    }
}Code language: C# (cs)
Notice that count is tested before entering the body of the while loop construct. What would happen if you changed the initial value of count to 11? The loop would not execute at all as the expression would evaluate to false.
It is very easy to end up with infinite loops when implementing while loops if the expression never evaluates to false, so program them with care.
The Do-While Loop
A key difference between a while loop and a do-while loop is how the initial evaluation is done. In a while loop the expression is evaluated and the loop’s code block is only executed if the expression evaluation is asserted (to true). Consider the following:
do
{
    // Do work.
} while (expression);Code language: C# (cs)
A do-while loop will always execute its loop body at least once as the expression is only evaulated AFTER the initial iteration of the code block’s execution.
For example, if we re-write the while loop code above we get:
using System;
using System.Collections.Generic;
using System.Text;

namespace DoWhileLoop
{
    /// <summary>
    /// An example program to explore the do-while loop.
    /// </summary>
    class Program
    {
        /// <summary>
        /// Main entry point for the application.
        /// </summary>
        static void Main()
        {
            const int maxCount = 10;
            int count = 1;

            do
            {
                // Print the value of count to the screen.
                Console.WriteLine("count = {0}", count);

                // Postfix count. (This is the same as doing count = count + 1;)
                count++;
            } while (count <= maxCount);
        }
    }
}Code language: C# (cs)
If the above program is run, it will always output at least one line of ‘count = <value>’ where <value> is the initial value count is assigned. Even if count is a number greater than the maximum for the loop (like 11 or 185479) then that value will be written to the screen.
The For Loop
In our while and do-while examples above, there is a common pattern we’re using that is often seen in iterative statements: initialise a variable (i = 0), test the variable (i < 10), execute a series of statements, and increment the variable’s value (i++). The for loop allows you to combine all these steps in a single loop statement instead of needing to manually code it yourself. Consider the following:
for (initialiser; expression; iterator)
{
    // Do work.
}Code language: C# (cs)
We can re-write our earlier while / do-while loop demonstration programs using a for loop like so:
using System;
using System.Collections.Generic;
using System.Text;

namespace ForLoop
{
    /// <summary>
    /// An example program to explore the for loop.
    /// </summary>
    class Program
    {
        /// <summary>
        /// Main entry point for the application.
        /// </summary>
        static void Main()
        {
            const int maxCount = 10;

            for (int i = 1; i < maxCount + 1; i++)
            {
                // Print the value of 'i' to the screen.
                Console.WriteLine("count = {0}", i);
            }
        }
    }
}Code language: C# (cs)
Notice we write less code in this case. Also notice that instead of having to define a ‘count’ variable here, we can just use the for loop’s iteration variable And, we’ve used an expression where we evaluate i against ‘maxCount + 1 ‘ because it is more efficient to use the less-than operator than it is to use the less-than-or-equal operator.
It is worth noting at this point that for loops are usually used for determinate looping situations (where we know how many iterations are required – even if this is stored in a variable). If, on the other hand, we don’t know how many iterations will be required to meet an expression’s needs, then using the while or do-while loop constructs makes more sense.
The ForEach Loop
The foreach is new to the C-family of programming languages (i.e. it wasn’t available in C or C++, and was introduced for the first time to C#). It is similar to the for loop in that it works as a determinate loop construct but instead of the iteration variable effectively being limited to an interation counter, richer object types can be used. Here’s the structure of a foreach loop for reference but we’ll go into more depth on this loop construct in a later tutorial, when we’ve learnt more about .NET and the Framework Class Library (FCL).
foreach (expression)
{
    // Do work.
}

// For example...
foreach (string message in messages)
{
    Console.WriteLine(message);
}Code language: C# (cs)
Break and Continue in Loops
We’ve briefly mentioned break and continue jump statements above, but we’ll take a closer look at them now as they are used in loops a lot.
There are times when you want to break out of the current iteration of a loop’s code block without executing the remaining statements and go immediately to the next iteration of the loop – and that is exactly what the continue jump statement will do.
There are also times when you want to break out of loop completely without executing any more statements or any further iterations – and that is what the break statement will do.
For example:
string input;
int number;

while (true)
{
    Console.WriteLine("Enter a number greater than 10 and press enter...");
    input = Console.ReadLine();

    if (!int.TryParse(input, out number))
    {
        Console.WriteLine("ERROR: the supplied value was not a number. Please try again.");
        continue;
    }

    if (number < 11)
    {
        Console.WriteLine("ERROR: the number entered was invalid. Please try again.");
        continue;
    }

    Console.WriteLine("Well done! The number you entered ({0}) was > 10.", number);
    break;

    // This last statement will never run and will probably cause a compiler warning.
    Console.WriteLine("Goodbye!");
}Code language: C# (cs)
In the above example code, the user is prompted to enter a number greater than 10.
If they enter an empty string or non-numeric value then int.TryParse will not be able to parse the string to an integer and will return false. This triggers the first error message to be displayed, and then the continue jump statement stops execution of the remaining statements in the loop body and advances the program to the next iteration of the loop.
If they enter a numeric value, but one that is not greater than 10 then the second error message will be displayed, and again the continue jump statement immediately jumps execution to the beginning of the next loop iteration.
Finally, if the user enters a valid value, they are commended on their choice and the break jump statement exits the loop without any further execution. That means the ‘Goodbye’ statement will never run.
Operators
An operator is a symbol (one or more characters) that causes C# to take action. The C# primitives (such as int, decimal, etc.) support a number of built-in operators such as assignment, increment, evaluation, etc.
Mathematical Operators
C# supports 5 mathematical operators, 4 of which are for simple arithmetic (+ for addition, - for subtraction, * for multiplication, and / for division). These arithmetic operators work just as you would expect, with the exception of when the division operator is being used with integers.
If you divide one integer by another, then the runtime will throw away any remainder and only return the whole number portion (i.e. the mantissa if we are looking at floating point numbers – as the exponent is thrown away). This is because integer division can only return whole numbers, hence the loss of fidelity. For example:
int result = 17 / 4;Code language: C# (cs) In the above calculation, result will be assigned a value of 4. When performing division calculations using floating point numbers, this loss of resolution does not occur.
The fifth operator we haven’t mention so far is called the modulus operator (%), and you can use it to retrieve the remainder from integer division. For example:
int result = 17 / 4;
int remainder = 17 / 4;Code language: C# (cs)
In the above pair of calculations, result will be 4 just as before and remainder will be assigned a value of 1.
The modulus operator can be useful if you want to check if one integer is an exact multiple of another as the modulus would be 0 (e.g. if (firstNumber % secondNumber == 0) { do-something }).
Self-Assignment Operators
It is a common requirement for variables to need to be updated based on their current value. Suppose you just had a salary rise (of 5000), you could calculate your new salaray like this:
int mySalary = 45000;
mySalary = mySalary + 5000;Code language: C# (cs)
The 5 arithmetic operators can be combined with an equals sign to create self-assignment operators for each (i.e. +=, -=, *=, /=, and %=). So the previous code could be re-written as:
int mySalary = 45000;
mySalary += 5000;Code language: C# (cs)
Prefix and Postfix Operators
Suppose you wanted to use the current value of an index and then increment it, or wanted to increment a value and then use it. You might do something like this:
int index = 0;
// Use index.

index += 1;
// Use index.Code language: C# (cs)
C# provides an alternative way of incrementing and decrementing numbers by way of prefix and postifx operators (-- and ++). A prefix operator appears before the variable name, and a postfix operator appears after it. They behave differently to one another in when they are executed.
Consider the index assignments and use above. In the second case we needed to increment the index before we used it. With a prefix operator we could do this instead:
int index = 1;
// Use index.

// Using index.
string insertSql = string.Format(
    "INSERT INTO (Id,Name,DateOfBirth) VALUES ({0},{1},{2}",
    ++index,
    "John Smith",
    "17/04/1969");Code language: C# (cs)
Don’t worry about the string.Format method as we’ll introduce that in a later tutorial. Instead look as where index is being used, and notice that it is prefixed with the ++ increment operator. This tells the compiler/runtime increment index and then use the incremented value (i.e. the prefix instructs the program to increment the index variable FIRST before using it). The updated value of index will already be assigned to the variable, so Id would be ‘2’ in this case.
Consider this code as an alternative:
int index = 1;

// Using index.
string insertSql = string.Format(
    "INSERT INTO (Id,Name,DateOfBirth) VALUES ({0},{1},{2}",
    index++,
    "John Smith",
    "17/04/1969");Code language: C# (cs)
Notice that this time the increment operator is after the variable name. This tells the compiler/runtime to use the current value of index and then increment it. So, Id would have a value of ‘1’ in this alternative case.
The complementary -- prefix and postfix operators work in exactly the same way, decrementing the current value before or after use respectively.
Relational Operators
Relational operators compare two values and return a Boolean outcome. For example:
bool isBigger = firstValue > secondValue;Code language: C# (cs)The following relational operators are available in C#:
- Equals (
==). Returns true if both sides of the operator are equal, or false otherwise. - Not equal (
!=). Returns true if the sides of the operator are not equal, or false otherwise. - Greater than (
>). Returns true if the left side of the operator is larger than the right side. - Greater or equal (
>=). Returns true if the left side is equal to or larger than the right side. - Less than (
<). Returns true if the left side of the operator is smaller than the right side. - Less or equal (
<=). Returns true if the left side is equal to or smaller than the right side.
Logical Operators
We covered if statements in brief above, explaining that they execute if an expression is true. Relational operators can be used in if statement expressions, and so can logical operators.
Where a relational operator compares the left side and right side of the operator for a given type of relationship, logical operators (aka conditional operators, or Boolean operators ) process their target(s) directly and typically evaluate (join) one or more Boolean values to calculate an outcome.
C# supports the following logical operators:
- AND (
&&). Returns true only if both the left-hand and right-hand sides of the operator are true. - OR (
||). Returns true if either side of the operator (or both) is true, or false otherwise. - NOT (
!). Returns true only if the expression immediately after the operator is false.
For example:
if (setting < MaxValue && setting > MinValue)
{
    // Value in range, so use it.
    SaveValue(setting);
}

if (setting < MinValue || setting > MaxValue)
{
    // Value out of range.
    throw new Exception("Value out of range.");
}

if (!isLoaded)
{
    // Show work-in-progress spinner and 'Loading...' message.
}Code language: C# (cs)
Short-Circuit Evaluation
C# logical/conditional operators make use of a concept called short-circuit evaluation.
This works by evaluating only as much of a compound conditional expression as is need to determine the outcome. The AND and OR conditional operators we have described above could more completely be described as ‘And Also’ and ‘Or Else’.
Consider the code example immediately above. In the first if statement the setting variable is checked to make sure it is less than the upper limit allowed. If not, the expression fails and returns false, and the check against the lower limit is not performed at all. Why? Because it doesn’t need to be – failing the first operand in an AndAlso conditional operation means the expression outcome is always going to end up as false so the program doesn’t need to waste execution time evaluating the rest of the expression.
Likewise, in the second if statement, if the setting variable value is less than the lower limit then we already know the setting value is invalid so there is no need to check it against the upper limit too.
For the && and || operators, while they both implement short-circuit evaluation, the && operator short-circuits if any of its terms are evaluated as false; where as the || operator does the opposite and short-circuits as soon as any of its terms are evaluated as true.
Bitwise Operators
In computer programming, a bitwise operation operates on one or two bit patterns or binary numerals at the level of their individual bits. On many computers, bitwise operations are slightly faster than addition and subtraction operations and significantly faster than multiplication and division operations. These are not to be mistaken for the Boolean logical operators when used within conditional statements.
A logical OR (|) takes two bit patterns of equal length and produces another one of the same length by matching up corresponding bit positions and OR-ing them together.
Consider this:
3 | 5 = 7

If that doesn't immediately make sense lets look at the bit level representation
of the number and then OR them together (we'll just use the lowest 4 bits)...

(3)  0011
(5)  0101

If we OR each bit together (if either bit is 1, outcome = 1 else 0), we get:

(7)  0111

So, if we did this in code then result would equal 7:
int result = 3 | 5;Code language: plaintext (plaintext)
A logical AND (&) also takes two bit patterns of equal length and produces another one of the same length by matching up corresponding bit positions and AND-ing them together.
If we use the same numbers again:
3 & 5 = 1

To prove this is the case, let's look at the bit representations again:

(3)  0011
(5)  0101

If we AND each bit together (if either bit is 0, outcome = 0 else 1), we get:

(1)  0001Code language: plaintext (plaintext)
A logical XOR (^) operates the same as the OR and AND, except it XORs the bits together.
If we use the same numbers one last time:
3 ^ 5 = 6

To prove this is the case, let's look at the bit representations again:

(3)  0011
(5)  0101

If we XOR each bit together (if only one bit is 1, outcome = 1 else 0), we get:

(6)  0110Code language: plaintext (plaintext)
Bit-Shift Operators
Bit-shift operators, as the name implies, shift a bit pattern left or right in its register. They are an optimal way of dividing or multiplying by 2^N (i.e. 2 to the power N, so 2,4,8,16, etc.)
The left-shift operator multiplies by powers of 2.
23 << 1 = 46Code language: plaintext (plaintext)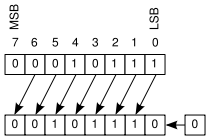
The right-shift operator divides by powers of 2 (remember that the least significant bit is discarded, which might lead to a loss of resolution, so 23 bit-shifted right by 1 would divide by 2 and discard the remainder).
23 >> 1 = 11Code language: plaintext (plaintext)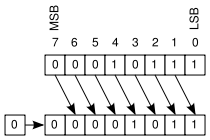
You can bit-shift by more than one bit. The following examples are valid:
23 << 3 = 184     (2^3 = 8, so this is 23 * 8)
23 >> 4 = 1       (2^4 = 16, so this is 23 / 16 and discard any remainder)Code language: JavaScript (javascript)
The Ternary Operator
The ternary operator is so-called because it consists of three operands. It provides a shorthand means to specify an if statement that has a simple expression and only two branches (condition met, or else the default condition). The syntax for the operator is:
object result = expression ? successOperand : failureOperand;

// For example:
string status = isCompleted ? "OK" : "FAIL";Code language: JavaScript (javascript)
When the expression is evaluated, if the outcome is true then the ‘successOperand’ is assigned, and if instead the expression outcoem is false then the ‘failureOperand’ is assigned.
Operator Precedence
When processing complex calculations or evaluating complex expressions the compiler and runtime must know the order of precedence (importance) to apply to the atomic parts of those larger constructs.
For example, consider the calculation below:
decimal result = 4.99m * 4 + 1.99m * 2;Code language: C# (cs)What is this calculation stating? Is it:
- Take 4.99 and multiply it by 4, then take the result of that and add 1.99 and then multiply the sub-total so far by 2. (Which equals 43.90.)
Or is it:
- Take 4.99 and multiply it by 4, also (separately) take 1.99 and multiply it by 2, and then add the results of the individual sub-calculations; like we would do in normal mathematics where we treat multiplication as more important that addition. (Which equals 23.94.)
As you can see, if the compiler/runtime interprets the calculation differently to how you expected it to execute then the difference in outcome can be significant.
Therefore, most languages explicitly define an order of precedence that will be followed when evaluating calculations and expressions.
For C#, the following table defines the order of precedence for the different types of operators it supports (with the top row being of highest precedence and the bottom row being of the lowest):
| Category | Operators |
|---|---|
| Primary | x.y f(x) a[x] x++ x– checked unchecked stackalloc. |
| Unary | + – ! ~ ++x –x (T)x *x &x (NOTE: +/- here are NOT arithmetic operators). |
| Multiplicative | * / % (NOTE: these are the arithmetic operators). |
| Additive | + – (NOTE: these are the arithmetic operators). |
| Shift | << >> |
| Relational | < > <= >= is as |
| Equality | == != |
| Logical AND | & |
| Logical XOR | ^ |
| Logical NOT | ! |
| Conditional AND | && (And-Also) |
| Conditional OR | || (Or-Else) |
| Ternary Condition | ?: |
| Assignment | = *= /= %= += -= <<= >>= &= ^= |= |
So, based on the above table we know that the above calculation would be executed like this…
decimal result = (4.99m * 4) + (1.99m * 2);… giving a result of 23.94.
Introduction to Visual Studio
Although we have briefly delved into using the Visual Studio IDE (Integrated Development Environment) already in this tutorial, it was only in passing and you may have skipped those parts of worked examples because of a lack of familiarity with the product.
This section aims to introduce Visual Studio in broad terms and give you a jump start on navigating and using it.
One of the first confusions with Visual Studio is the keyboard settings option. When you initially run VIsual Studio it will ask you which keyboard mapping you prefer. There are several different ones that have evolved mostly to help developers migrating from other IDEs and languages to Visual Studio and .NET to have familiar keyboard shortcuts to make life a little easier.
The problem with having an alternative keyboard layout is that if you are working in teams, other developers may instruct you based on keyboard shortcuts they use rather than C#’s default set, so I’d recommend switching to the C# layout if you can and embrace C# in its entirety – keyboard settings and all!
If you have a different keyboard layout, you can easily switch to the C# one by clicking the Tools menu in Visual Studio, choosing Options, and then select the Environment node on the left hand node-tree of the Options window and find the Keyboard Settings option once the Environment settings load. Now simply choose the one you want (i.e. Visual C# 2005).
The Hello World Code Project
It is a time-honoured tradition that the first program you write in a new programming language is the ‘Hello World’ application. This program simply displays some format of “Hello World!” when it runs.
To create the Hello World code project in Visual Studio do the following:
- Launch Visual Studio if it is not already running.
- From the main menu, choose File, then New, then Project…
- On the New Project window, select Console Application, type ‘HelloWorld’ (no spaces) as the name of the code project and then click OK.
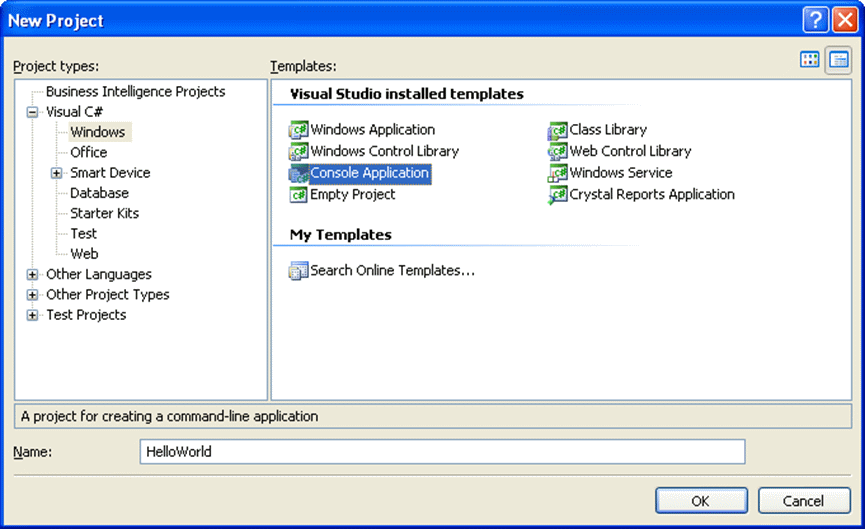
- This will create an unsaved code project with some templating to save you the effort.
- You need to explicitly save the code project at this point (File menu, Save All), selecting the location you want the code project to be stored at. (UPDATE: this tutorial was written a long time ago. More recent versions of Visual Studio prompt for the save location and .NET runtime version during the project creation wizard steps.)
Now that you’ve saved the code project and have it configured, let’s take a tour of the IDE.
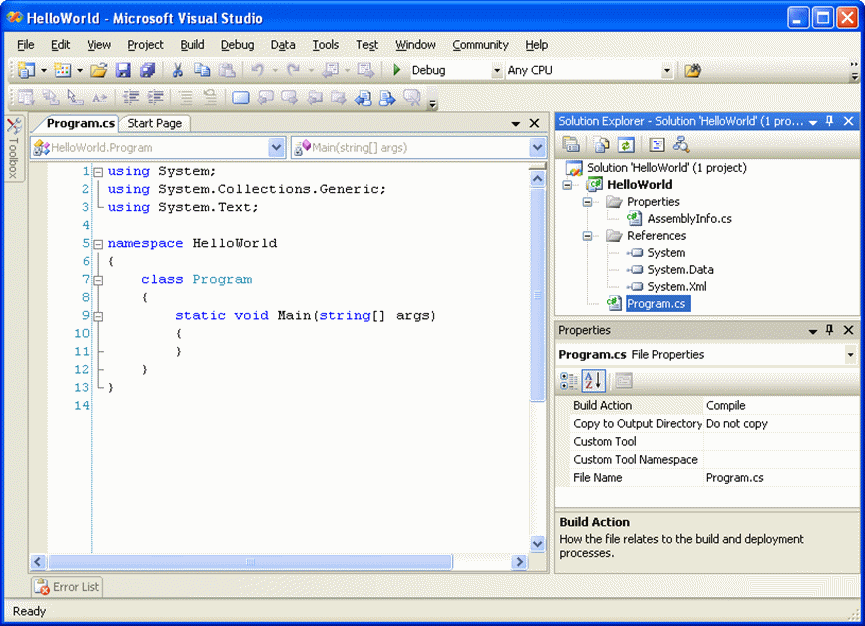
By default the large window on the left hand side and consuming most of the screen is the code editor window. Each time you add a new (.cs) code file to the code project, it will be opened as a new tab in this editor.
The two combo boxes at the top of the code editor window are used to easily navigate through your source file. If there is more than one class, enumerated type, or delegate in your source file, the combo box on the left-hand-side (LHS) allows you to select and navigate straight to it. NOTE: It is a good advisory coding practice that you only have one thing per source file (i.e. a class in this case). This makes the code more readable, maintainable, and less cluttered.
On the LHS drop-down menu, there are icons to help identify the types of declaration being identified. For example:
| This icon represents a class. | |
| This icon represents an enumerated type. | |
| This icon represents a delegate. |
The combo box on the right-hand-side (RHS) lists the fields, properties, methods, etc. that the LHS entity that you selected include.
Again the RHS drop-down menu has helpful icons to make it easier to identify the child type:
| This icon represents a constant. | |
| This icon represents a property. | |
| This icon represents a field. | |
| This icon represents a method. | |
| This icon represents an event. |
Both the LHS and RHS icons may also be overlaid with an access modifier icon too. This could be one of:
| Private access level. | |
| Protected access level. | |
| Internal access level. |
The right hand pane in Visual Studio is, by default, Solution Explorer (although a Properties pane may also be present, vertically splitting the space). This explorer pane shows the contents of your current solution (a solution can contain multiple code projects). A solution file may be in the same folder as a code project but by default it should be saved the parent folder with each code project then having its own sub-folder. A solution file has a .sln extension.
As briefly mentioned, inside your solution you will have one or more code projects (a single Console Application project in our simple ‘Hello World’ case, but complex solutions may have many code projects). For a C# project, the project file should have a .csproj extension.
Each code project has an AssemblyInfo.cs file that holds specification properties about your code project (name, description, version, etc.)
Each code project may reference other resources (such as other assemblies or code projects) containing functionality you want to import into your solution. Some references will be added automatically so that your code can compile and you can access FCL types.
Now that we’ve explained what the code editor looks like and where your project files are, let’s look at the code in a little more detail.
Using Directives
If you look at Program.cs in the code editor, you may notice a couple of things. At the top of the file there will be some using directives. This simply tells the compiler what types you want to include from other libraries. For example System is required by most code files.
Although, by default, Visual Studio tends to add System.Collections.Generic and System.Text to the source code file, those imports aren’t be used here and could be deleted.
A using directive essentially tells the IDE and the compiler, this code file is using types from this library. From the IDE perspective that allows features like IntelliSense to display method descriptions, etc. and from the compiler’s perspective it explains where to get a type with a specified name from.
Namespaces
You’ll probably have also noticed that, in Program.cs, the Program class is encapsulated in a namespace construct.
Namespaces provide a means to group classes and other entity types into a package/collection and extend the basic class name to make it more unique – giving it a naming scope. This allows developer to group and organise code better, and provides a way to declare globally unique types.
Microsoft also made namespaces hierarchical in nature, encouraging use of ‘dot notation’ in the naming scheme to build the hierarchy. For example:
System
System.Data
System.Collections
System.Collections.Generic
System.IO
System.TextCode language: plaintext (plaintext)
Visual Studio automatically sets the default namespace of your code project to the project name you entered, which is why it is HelloWorld in this case. The default namespace can be changes in the code project’s properties, but doing this does NOT update the namespace in existing code files so you’ll have to do that manually afterwards.
Since we’re talking about namespace naming conventions, as a general rule, a good structure to aim for is:
Company.AppOrSolutionName.TechnologyOrDomain.SubDomain [.LowerLevelSubDomain(s)]Code language: plaintext (plaintext)Typically a 3 or 4 term namespace is all you need. For example:
MyCom.SalesApp.UI
MyCom.SalesApp.Services.UserProfiles
MyCom.SalesApp.Services.Customers
MyCom.SalesApp.Services.BusinessLeads
MyCom.SalesApp.Services.SalesOrders
MyCom.SalesApp.Services.Reporting

MyCom.OrdersApp.UI
MyCom.OrdersApp.Services.Orders
MyCom.OrdersApp.Services.Fulfilment
MyCom.OrdersApp.Services.Tracking
MyCom.OrdersApp.Services.InvoicingCode language: CSS (css)
Running Your Code Projects
So now we know a little bit more about Visual Studio and its layout, let’s build and run the app.
Actually, before doing that we need to make our app output Hello World so we’ll do that now, using the Console class.
- Open the
Program.cscode file in the code editor if it isn’t already loaded. - Inside the
Mainmethod, typeConsole.WriteLine("Hello World!"); - Save the changes.
To build the app, you can choose the main menu’s Build menu option and then the Build Solution command. Don’t do this now though, as we’re going to be lazy instead!
Running the app in the IDE will implicitly build the code project(s) first if any code changes have been made since the last build. So, let’s do that now. From the Debug menu, choose the Start Debugging option.
You should notice that the code project builds and then runs immediately afterwards. A console window should be displayed and “Hello World!” should be output to that console. Something else to note is that there will probably be some other text below it saying something like the program exited with code 0 (no error) and you can close the window. This is normal, as the debugger keeps the console session open so you can view it even after the program completes.
Close that console window and run the app from the IDE again, this time choosing the Start Without Debugging option from the Debug menu. Again, the IDE is still hooked into the process enough that the console window remains open.
Now, go to Solution Explorer in the IDE and right click on the HelloWorld code project node. A context menu should appear and one of the options should be something like Open Folder in Windows Explorer. When you find it, click that.
This will open the code project’s root folder in Windows Explorer. You can now navigate the file structure, and we want to get to the compiled program executable. So, double-click the bin folder and then the Debug folder within it (if your build target is Release instead of Debug then your app might be built to the Release folder instead).
You should now see your HelloWorld.exe file. Double-click on it to run it. You may notice that a console window is briefly displayed and then closes again (if you notice it at all). Unlike when you run the app from the IDE, there is no host process to stop the console closing again after the program finishes. This is why it is nearly always better to run the app from the IDE.
Debugging Your Code
Let’s say your code doesn’t work as expected. In this simple case it is unlikely, but it could happen even in this simplest of scenarios if you’ve typed the wrong thing.
You can set breakpoints on your code by viewing the code file in the IDE’s code editor, selecting a line you want to break on, and then click the border on the LHS of the code editor pane. A small red circle should appear showing the breakpoint is set.
Do that now for the Console.WriteLine statement so that the program will stop when it gets there.
Run the app with debugging by choosing Debug from the main menu, and then the Start Debugging option.
When the app runs, it will pause at the breakpoint you have set and the IDE will highlight its position. You can take several different actions from a debugging perspective now. You can view the current state of any variables in scope (none in this case), and you can step through the code too. The 3 main navigation flows are:
Step Into. This will step into a sub-routine if the current program position is about to execute one. Any functionality built into the runtime will be skipped over but your own properties, methods, etc. can be stepped into so you can see how they behave.Step Over. Instead of stepping into a sub-routine you can step over it. Stepping over a method call lets the sub-routine run and return, so your debugging cursor will then be at the next statement.Step Out. If you have stepped into a sub-routine, you may have seen or debugged enough and want to return to the caller. In this case you can step out of the current execution and return to its parent.
There is actually a 4th option, which is just to continue and let the program run again. To do this you just hit the play button on the debugging toolbar (it will probably also have a ‘Continue’ label on it) or you can choose Debug from the main menu and then the Continue option.
In our simple 1-line HelloWorld app, you won’t be able to step into or out of any sub-routines, but you will be able to step over the console write or simply hit continue. Have a try.